What’s New in Empire SUITE?
Date: Aug 31th, 2023
What’s New in Empire SUITE August 2023?
Enhancements in this Release
In addition to bug fixes and ongoing performance improvements, we’ve added the following new features to the Empire SUITE
• Enhanced Performance Evaluations functionality
• Expanded Employee Profile Management functionality
• Assignment summarization
• Improved Teams management
• Best Match improvements
• International phone numbers and address support
• Assignment drill downs in Resource and Analytics
• Future Exception Time events now available in Empire RESOURCE
• Practice Engine integration
• Resource and Project Custom View Toggle
• Include/Exclude Pending PTO Events from Home Page Banner
• Option to sort and view staff in a resource view alphabetically or by staff level alphabetically
Employee Profile Management
We’ve enhanced our Skills management functionality to include user defined Profile Types. For example, you can add an Industry profile type so you can keep track of staff industry expertise or Certifications profile type to keep track of staff certifications such as CPA, CFE, MBA, etc. From the Profile menu, select Setup Profile Type:
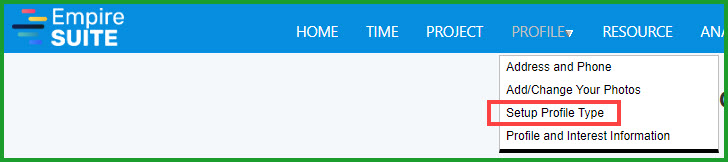
Figure1 – Setup Profile Type
Depending on the Profile Type, the Style can be Skills-based or Performance Evaluation-based:
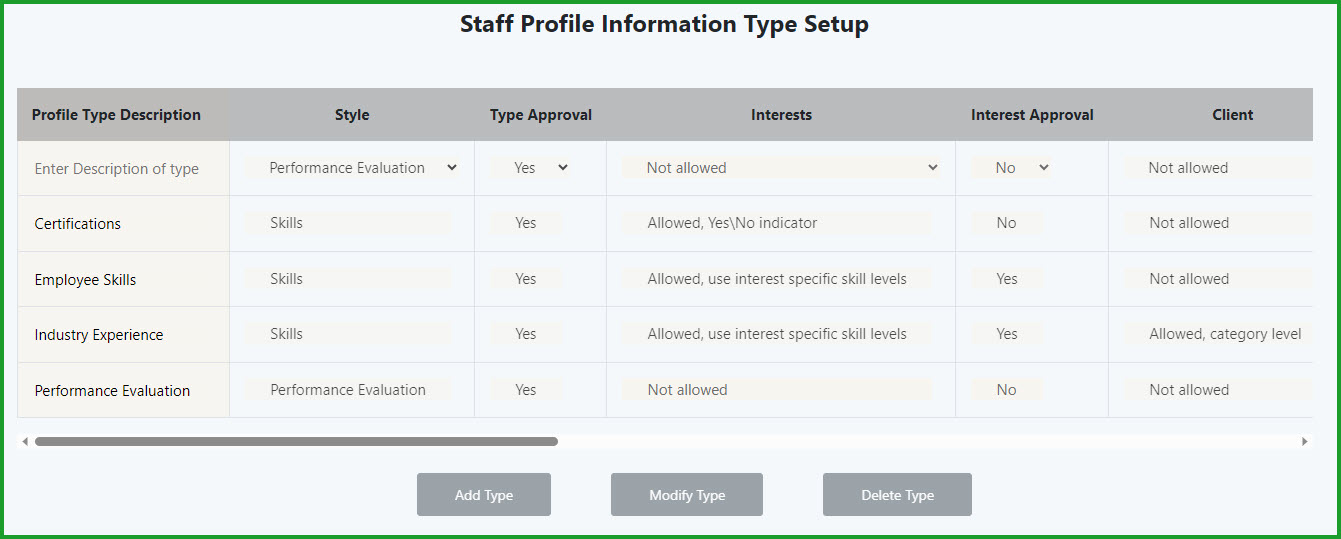
Figure2 – Staff Profile Type Setup
As with Skills, you can define proficiency levels as your company requires, and depending on the profile type, your staff can indicate whether or not they are ‘interested’ in a particular skill or industry. Interest in a particular skill or industry indicated by staff can be used when creating assignments.
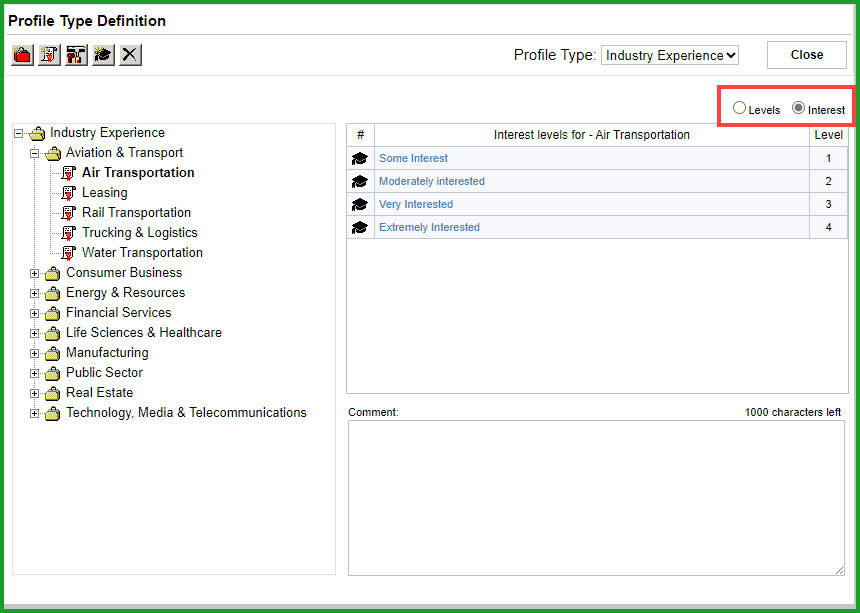
Figure3 – Defining Interest Levels
Managing Profile Types and Interests
If you allow your staff to self-assign their proficiency level in a specific Profile Type, you can now require manager approval for assessments outside of a defined range. For example, an employee may define themself as a native Spanish speaker or an Expert in Mergers & Acquisitions, but you can require a manager to approve the assessment before it is applied to the staffer:
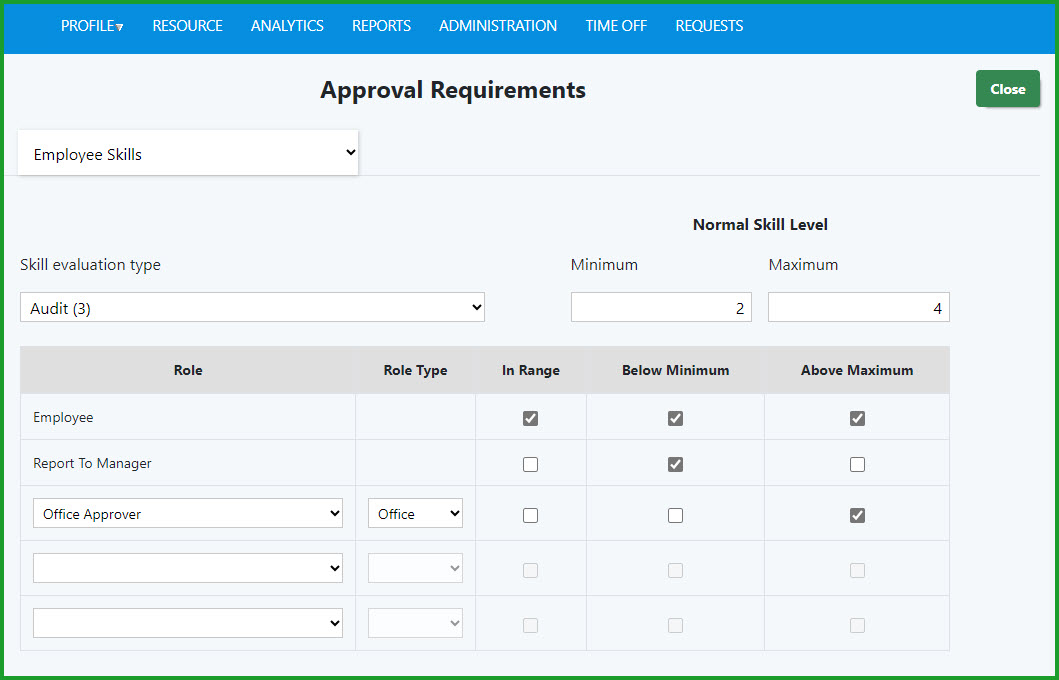
Figure4 – Employee Profile Approval Setup
Staff can define their interest level in a Profile Type from the Profile and Interest Information page:
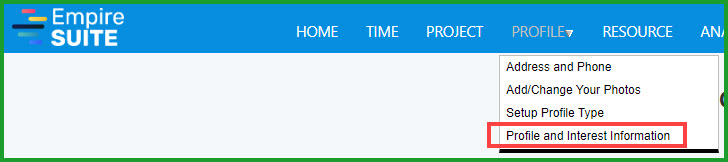
Figure5 – Profile and Interest Information
Users can define their level interest for all the defined profile types:
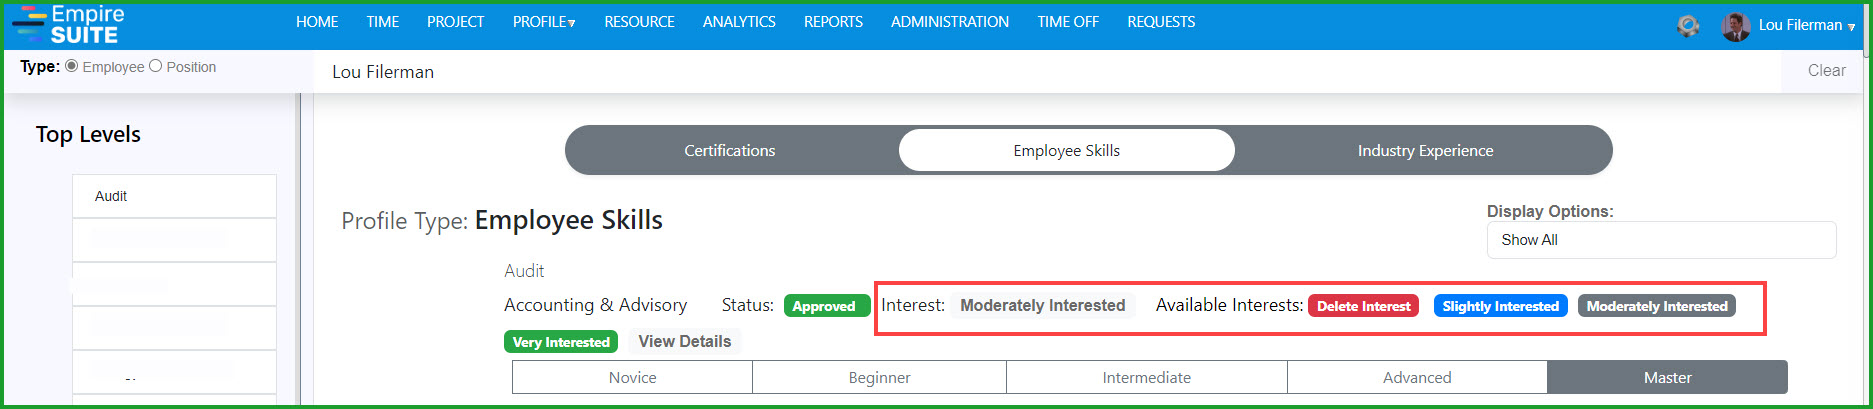
Figure6 – Interest Levels
Improved Teams and Portfolio Management
We’ve changed the way users can manage Teams and Portfolios and update Team/Portfolio information. When you’re working with a Team or Portfolio, click the Pencil Icon to either edit the Current View or switch to a Custom View and Edit the selection criteria:
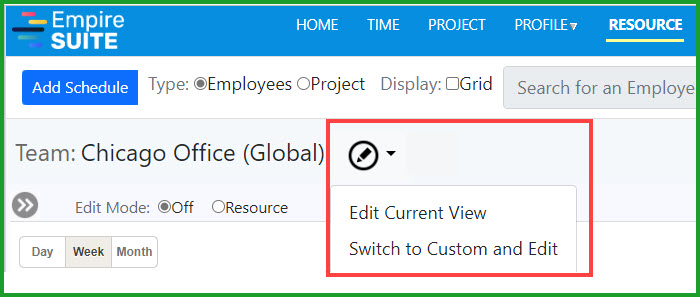
Figure7 – Editing Teams
Mousing over the Red down arrow enables several options:
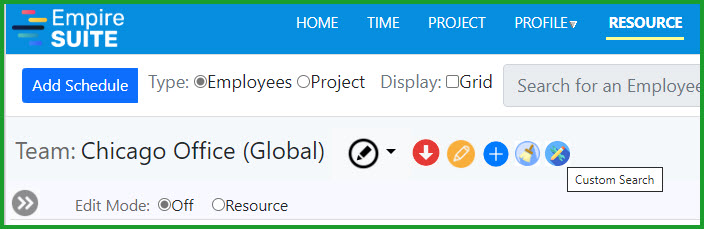
Figure8 – Teams Management Options
• The red ‘Down Arrow’ icon launches the Teams management page showing up to three (3) of the most recently used Teams. Click All Teams. . .
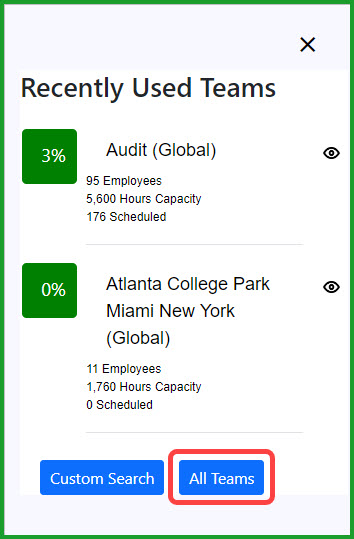
Figure9 – All Teams
. . .and select a Team Type to see the available Teams based on the Team attributes:
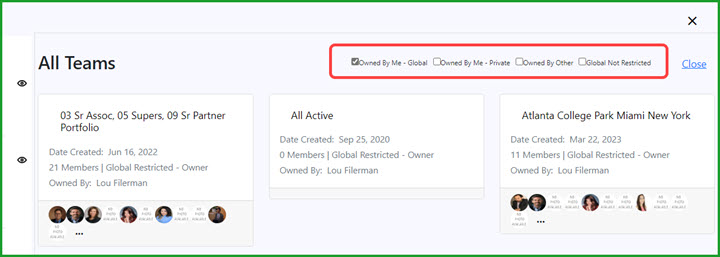
Figure10 – Team Types
• The yellow ‘Pencil’ icon launches the Edit Team page:
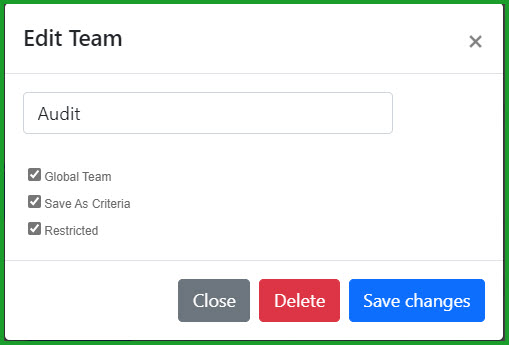
Figure11 – Edit Team Page
• The blue ‘Plus’ icon launches the Create a New Team page
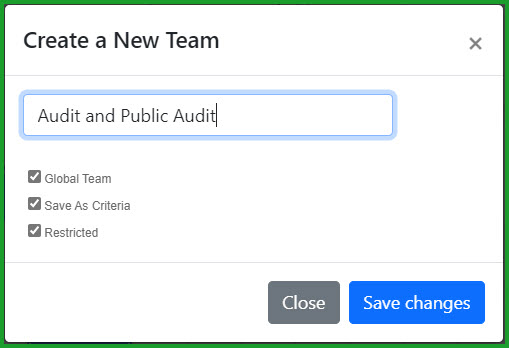
Figure12 – Create a New Team
• The white/blue paint brush option clears all the Team tags.
• The light blue ‘Pencil and Wrench’ icon launches the Custom Search view which displays search results from the most recent custom search session.
We also added a new permission to allow users to manage global restricted teams when they are not the team owner.
Saved and Named Assignment Requirements
You can now save assignment requirements and name the requirements set so it can be used again without having to redefine the requirements each time.
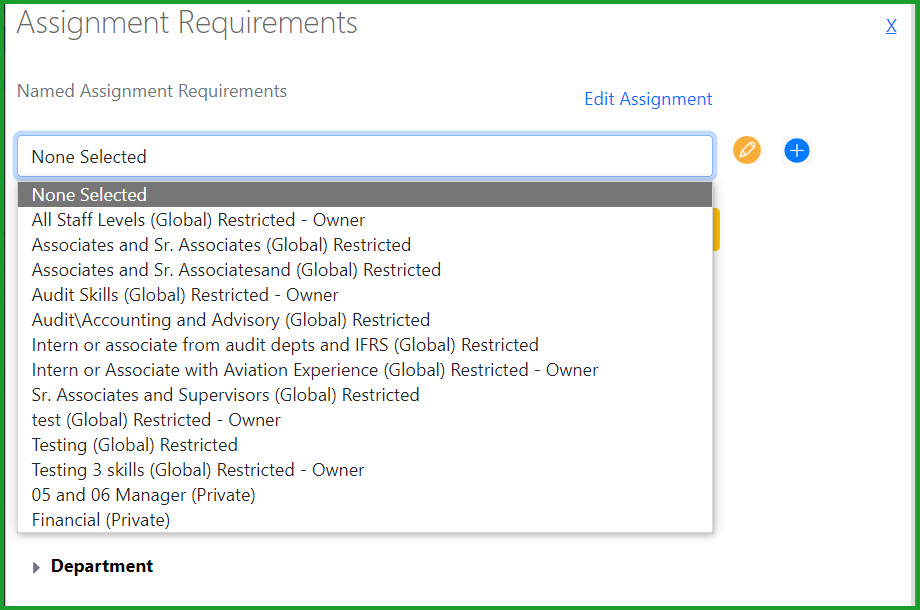
Figure14 – Saved Assignment Requirements
Improved Best Match Scheduling
Best Match scheduling now includes matching assignment requirements (Staff Levels, Offices, Departments and Skills) with employee interest in the particular requirement. For example, if an Assignment requires Audit Skills. . .
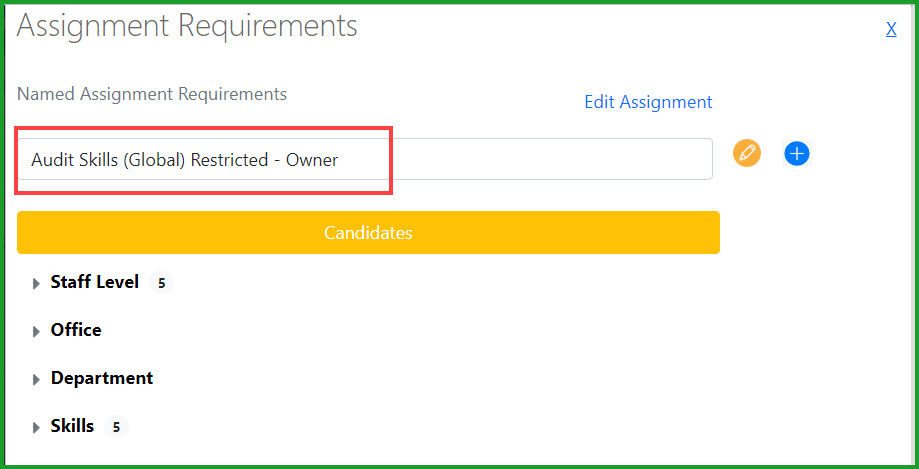
Figure15 – Audit Skills Requirements
. . .you can click the Candidates bar and see which candidates meet the assignment requirements and which candidates are interested in the skills required for the assignment:
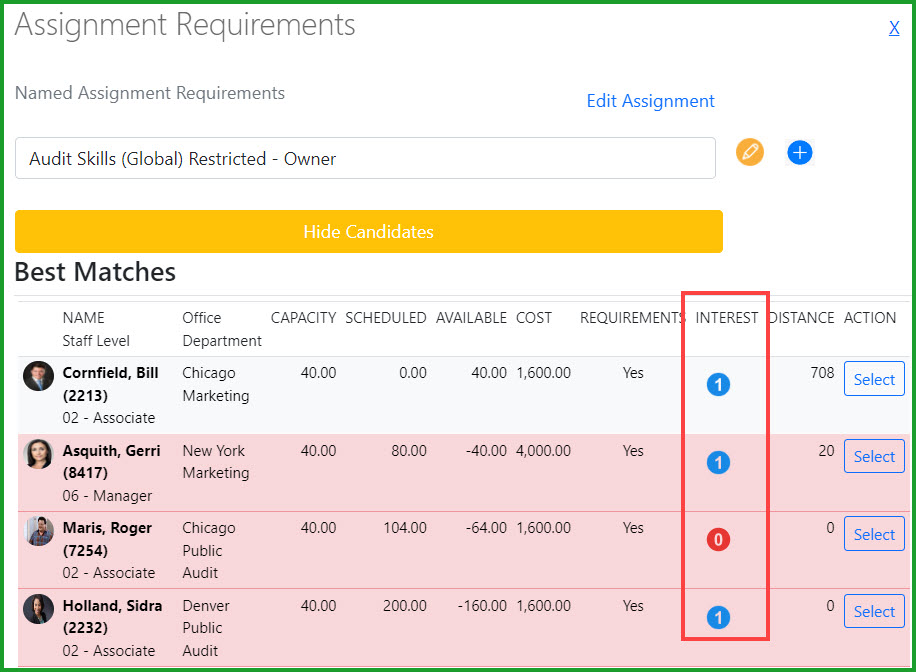
Figure16 – Candidates and Interests
You can also launch the Assignment requirements page by mousing over the assignment and clicking the three-bar icon:
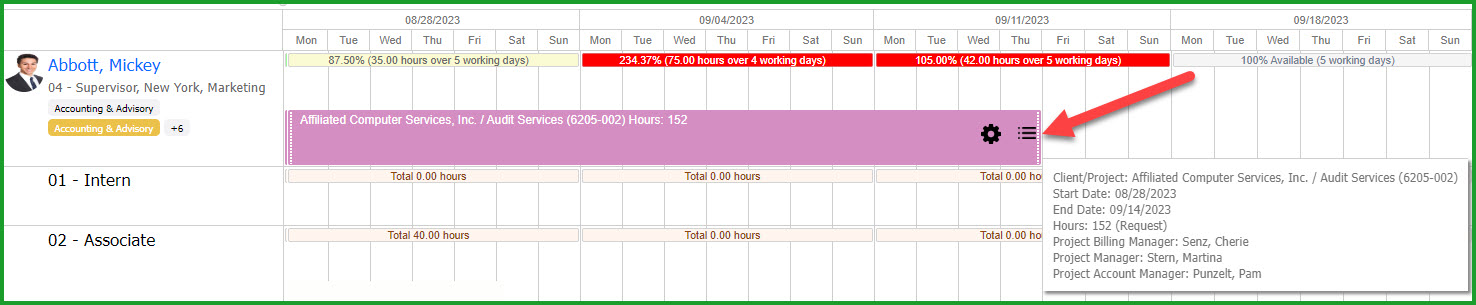
Figure17 – Assignment Requirements Link
Best Match automation can also help you find the optimal resource based on several factors:
• Travel Distance – Office to Employee Home
• Cost – based on the employee or staff level cost rate
• Interest – You can prioritize based on Employee Interest in the particular assignment requirements
Please note you can select either prioritize by Cost or by Employee Interest, but not both:
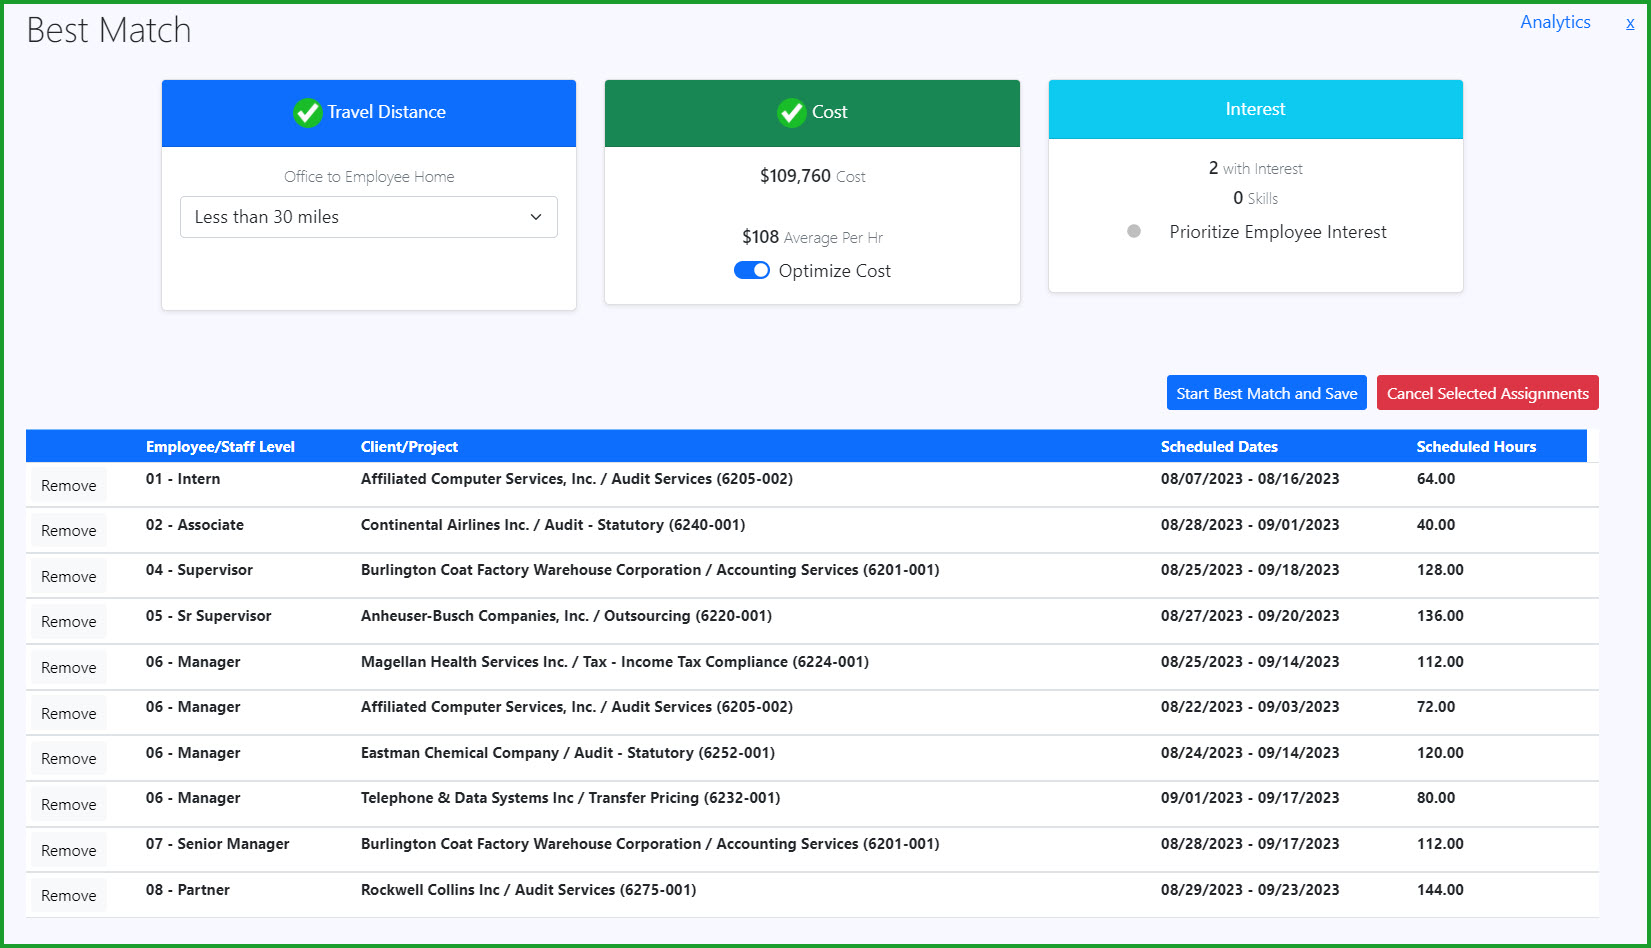
Figure18 – Best Match Priorities
Assignment Drill Downs in Resource Project View Grid Mode
You can drill down on project assignments in Resource grid mode by clicking the Expand icon:
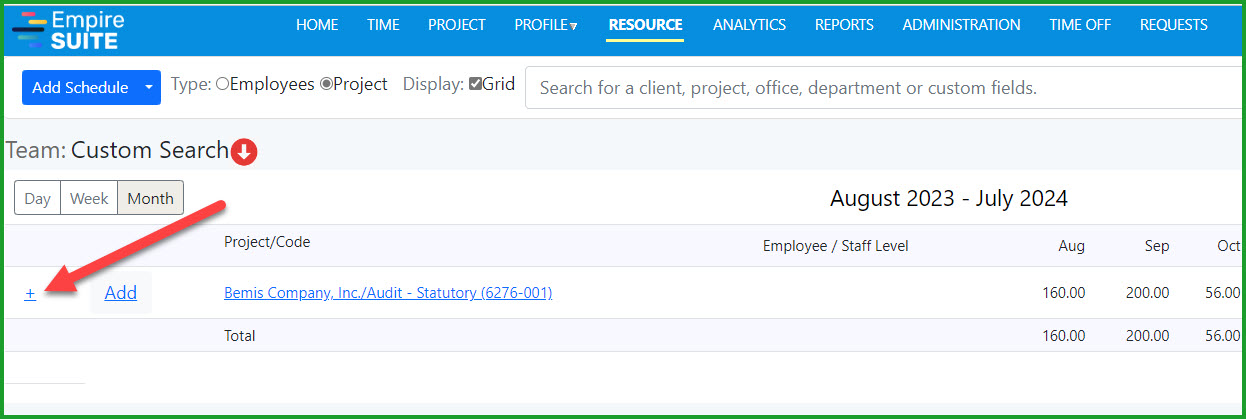
Figure19 – Project View Grid Mode Drill Down
Clicking the expand icon will display all the assigned staffers:
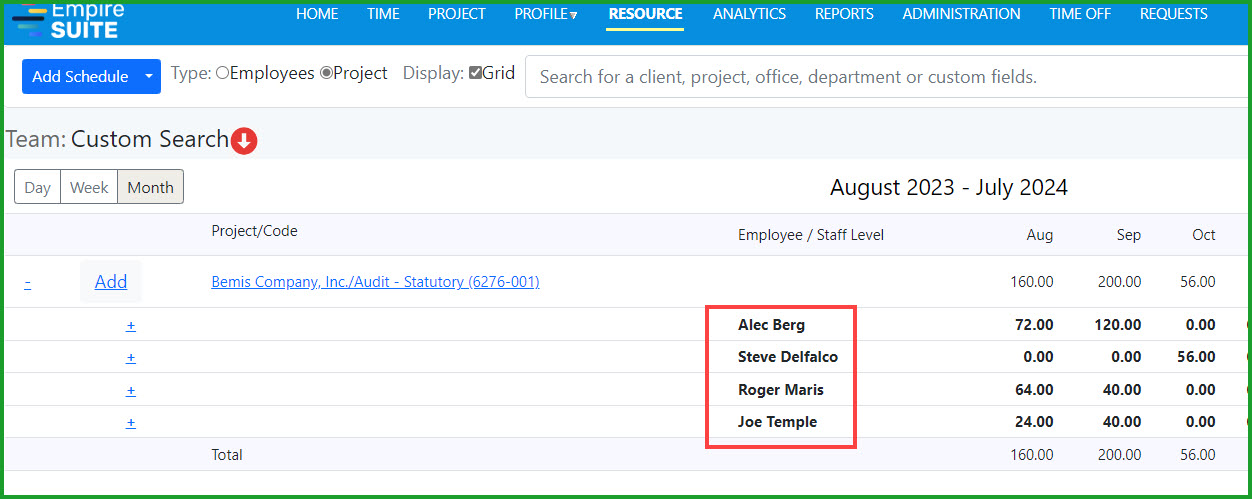
Figure20 – Expanded Project View
Summarize Assignments into a Single Row
You can now view multiple assignments for the same staffer in a single, summarized row in Project view mode in the Analytics page or in the Resource page in Grid mode. In the example below, Alec Berg has several assignments on the Bemis Company Audit in August and September:
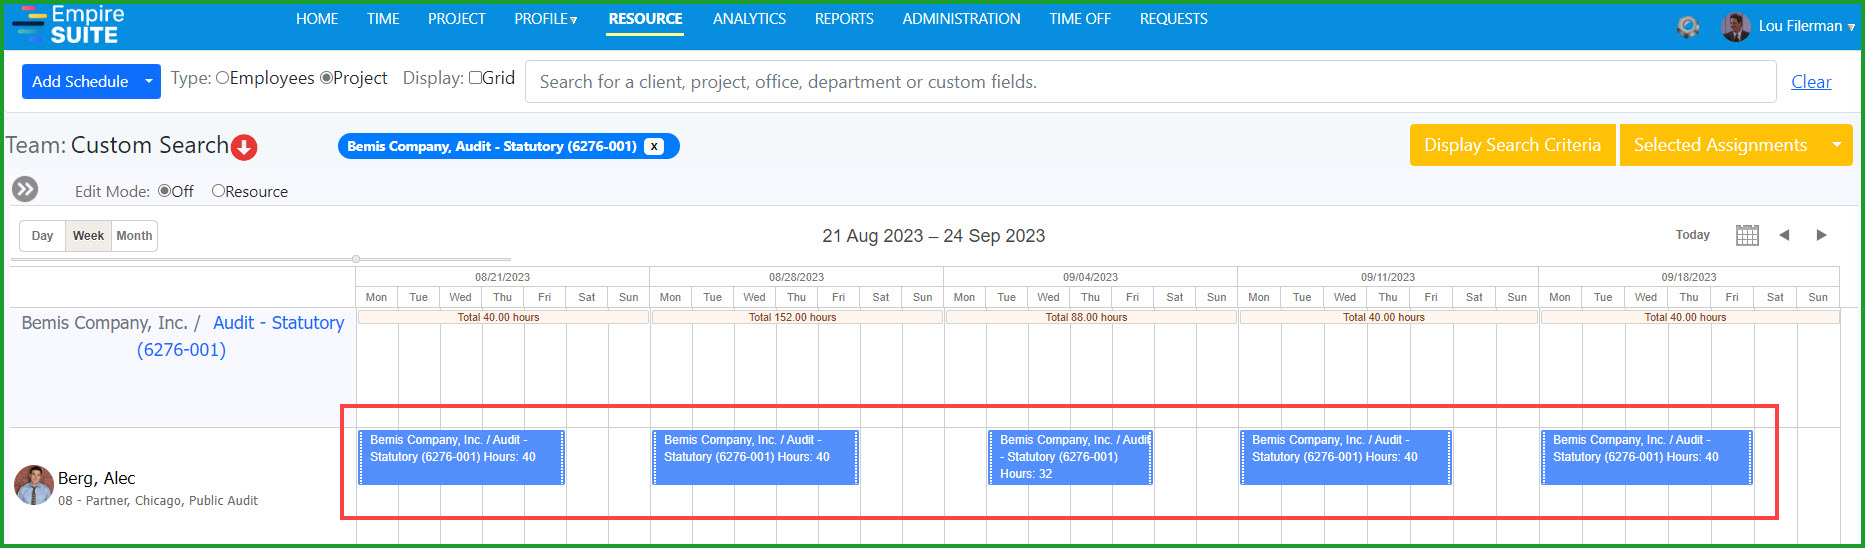
Figure21 – Multiple Assignments
However, in Resource Grid mode, you can see them in a single row. . .
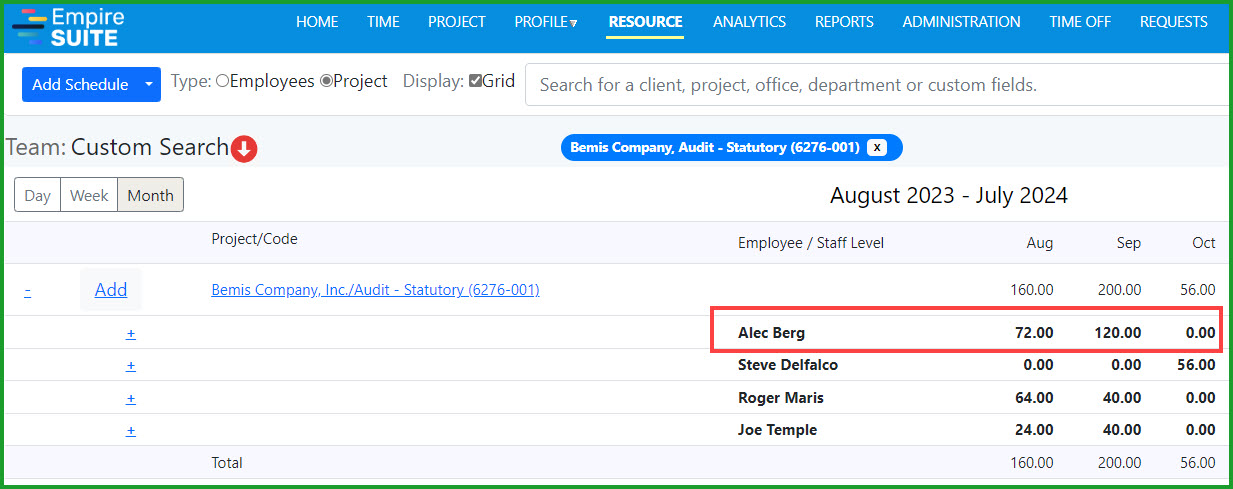
Figure22 – Summarized Assignments
. . .or you can see each assignment in a separate row:
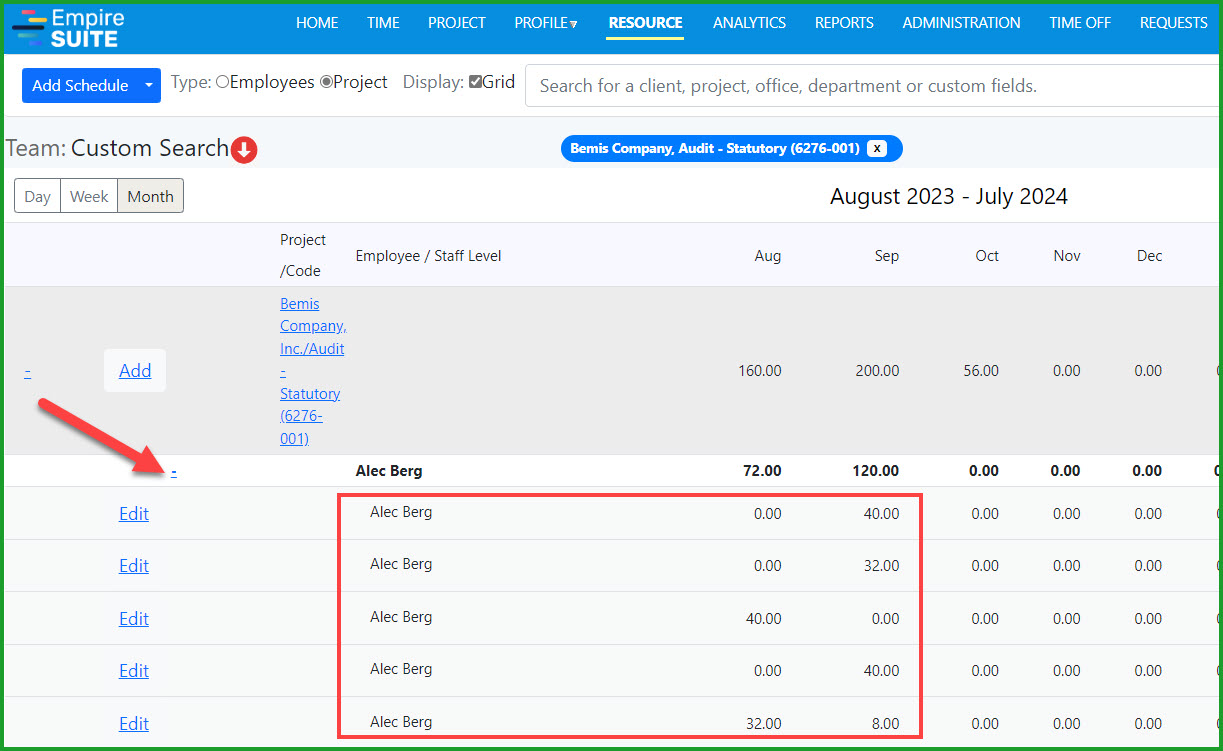
Figure23 – Assignments by Row
Practice Engine Integration
We are pleased to announce integration between Practice Engine™ and Empire SUITE. Our integration uses the Practice Engine APIs to populate employees, clients and jobs (projects) in Empire SUITE. Filtering options based on Empire SUITE Teams and Portfolios are available so users can control the downloaded data:
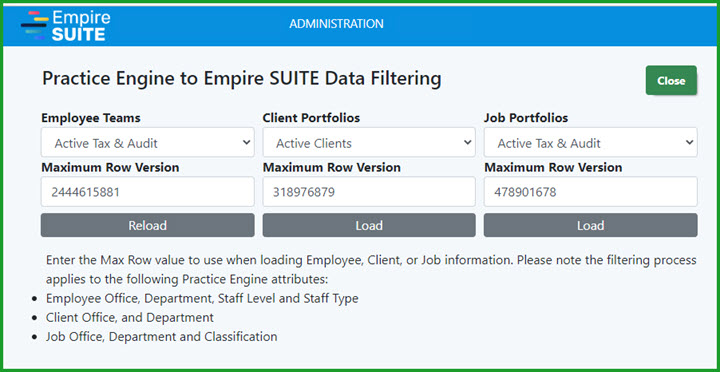
Figure24 – Practice Engine Integration Data Filtering
Users can also control when the integration queries the Practice Engine database to downloaded updated employee, client and jobs data:

Figure25 – Practice Engine Integration Schedule
If your firm uses Practice Engine for practice management, let us show you how integration between the two applications will improve your ability to schedule your employees more effectively for audit, tax compliance and CAS jobs.
Include/Exclude Pending PTO Events
We’ve added the ability to include or exclude Pending PTO Events from the Home Page banner. Click the Funnel icon to open the filter and click the checkbox to include Pending PTO events as appropriate:

Figure26 – Pending PTO Events
Option to sort and view staff in a resource view alphabetically or by staff level alphabetically
We’ve added an option in the Resource Display Options to allow users to view employees either alphabetically or alphabetically by staff level:
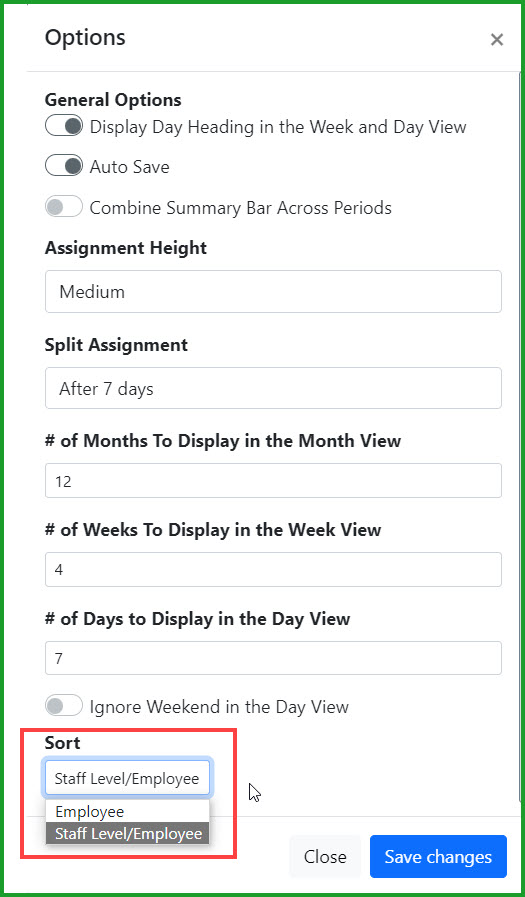
Figure27 – Resource Page Staff View Options
Users are now sorted alphabetically, but by staff level:
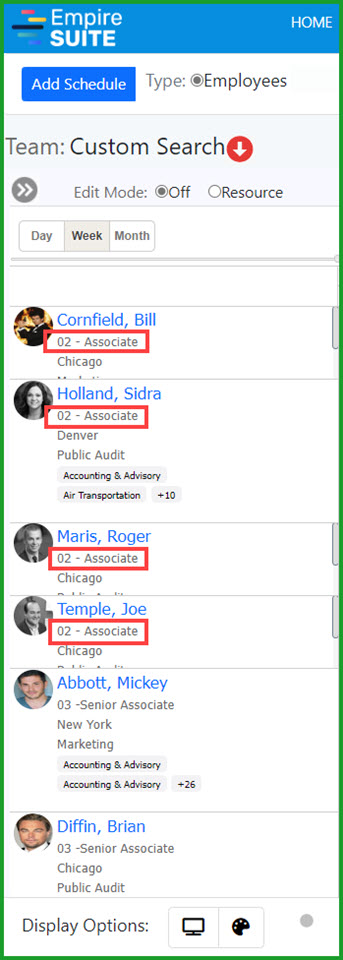
Figure28 – Alphabetically by Staff Level Mode
Home Page Improvements – Opportunities and Skills/Interests Buttons
We’ve added Skills and Interests and Review Opportunities buttons to the user’s home page when the user is configured in Full Screen mode:
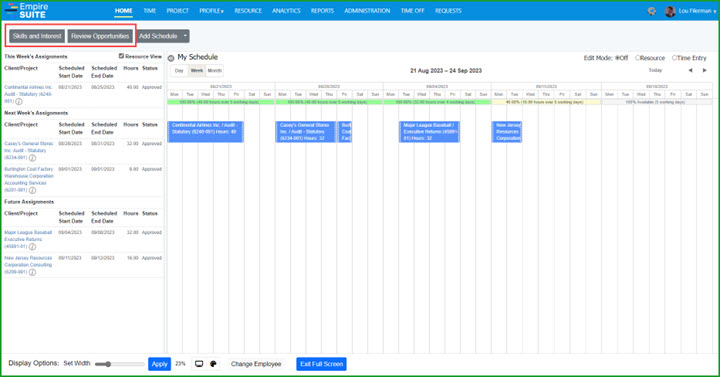
Figure29 – Opportunities and Skills Home Page Buttons
Employee Profile and Custom Fields
The employee profile page now includes Custom Fields:
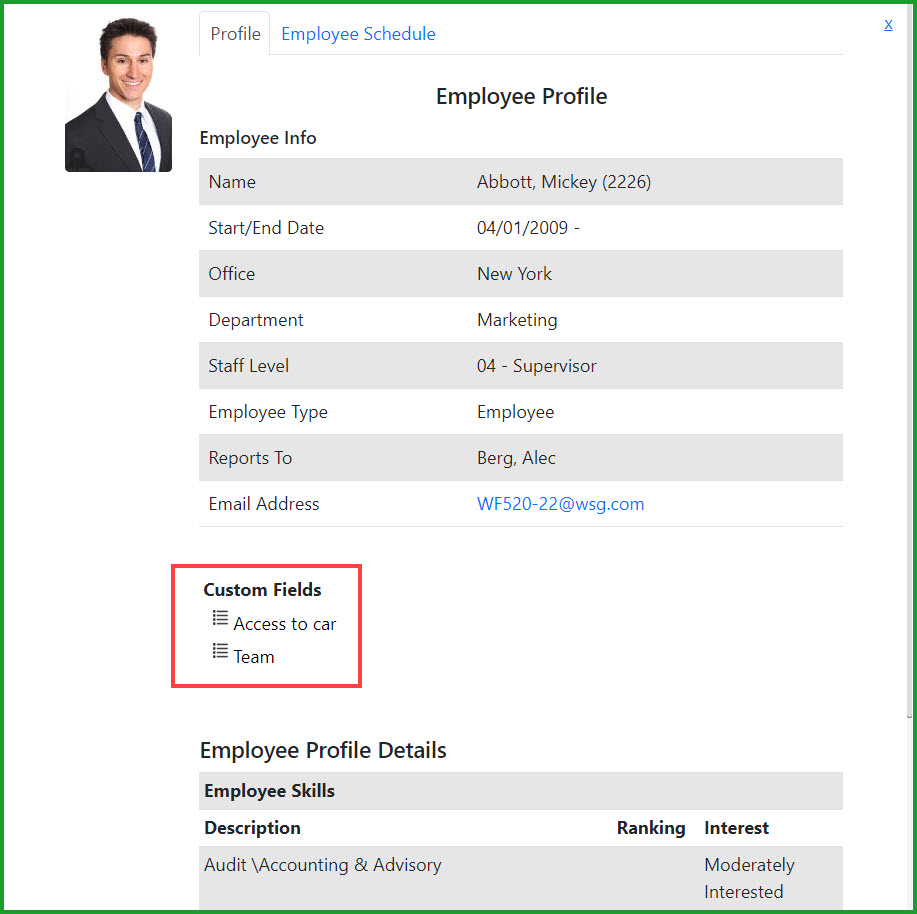
Figure30 – Employee Profile and Custom Fields
Toggle Between Assignment Requirements and Edit Assignment
You can now toggle between assignment requirements and the assignment. From the Requirements page, click the Edit Assignment link:
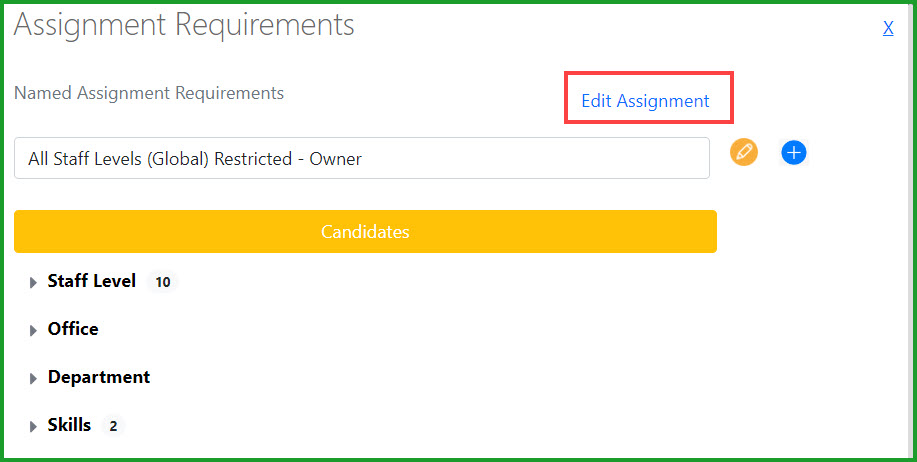
Figure31 – Assignment Requirements/Edit Assignment Toggle
To toggle to the Assignment Requirements from the Edit Assignment page, click the Edit link:
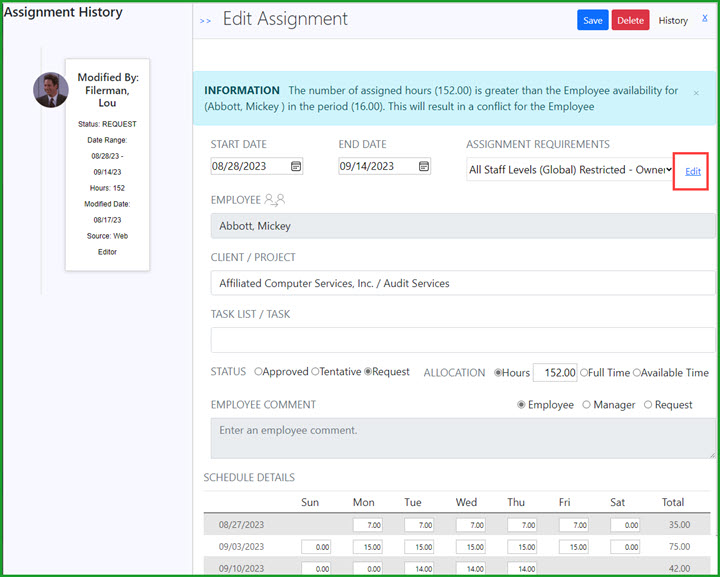
Figure32 – Assignment Requirements Toggle
Performance Evaluations Enhancements
We’ve enhanced our Performance Evaluations functionality by adding a user configurable approval process, as well as adding support for importing Performance Evaluations criteria. Users with the appropriate security permission can define the Performance Evaluations approval process based on the evaluation type – annual, disciplinary, etc. – and assign reviewers and due dates:
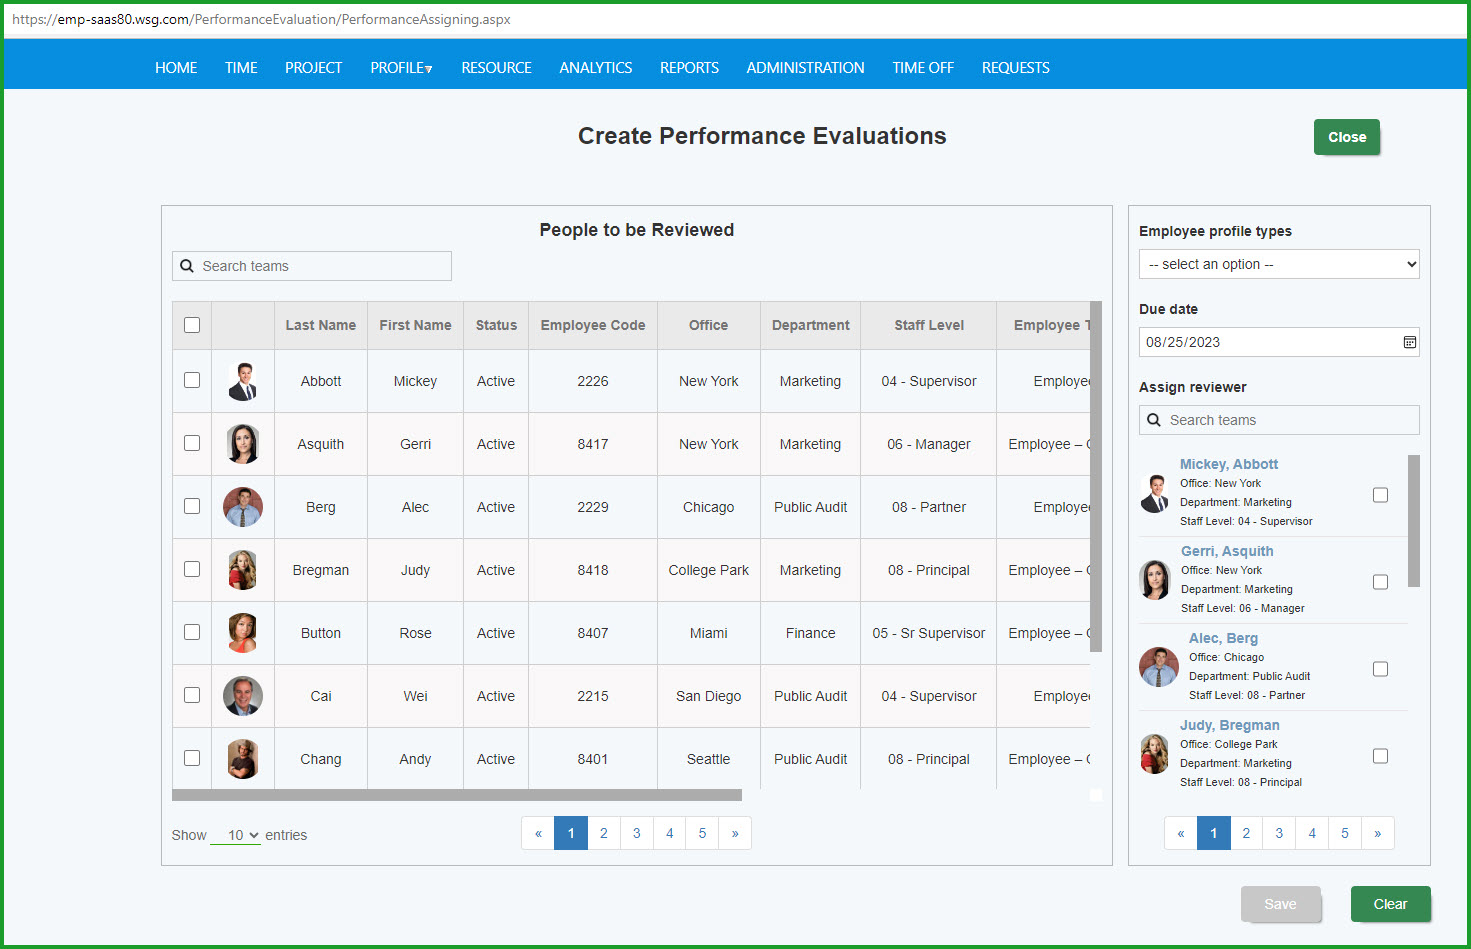
Figure33 – Creating Performance Evaluations
Date: Dec 31th, 2022
What’s New in Empire SUITE Dec 2022?
Enhancements in this Release
In addition to bug fixes and ongoing performance improvements, we’ve added the following new features to the Empire SUITE:
• Make PTO requests from the home page in self-scheduling mode
• Project and Project Portfolio view on the Resource page
• Teams/Portfolios management redesign
• Empire RESOURCE grid view mode
• Redesigned Best Match
• New UI for scheduling recurring assignments
• Multiple resource ‘move assignment’ capability
• Add/edit Projects from Empire RESOURCE
• Delete multiple selected assignments with a single menu
• Added project information to Empire RESOURCE
• Added the project forecast view to Empire RESOURCE
• PTO Exception Rules
PTO Requests, Reviews and Statements from the User Home Page
Users can now make PTO requests, review any pending approvals and display their PTO statement from the home page when in self-scheduling mode. Click the down arrow to the right of the Add Schedule button to display the PTO request options:
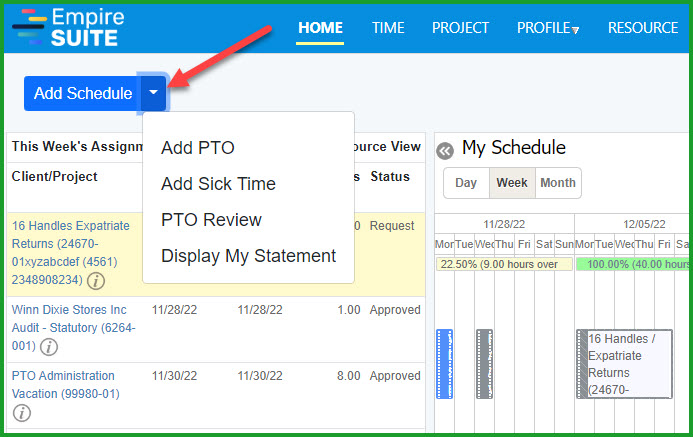
Figure1 – PTO Requests from My Schedule Page
Project/Project Portfolio View
We’ve added a project portfolio view and portfolio management capability to the Resource page. Click the Project radio button to change the display to a project-oriented view:

Figure2 – Resource Page Project View
You can create approved assignments, tentative assignments and requests in Project mode just as in Resource mode. Click the Add Schedule button in the upper left corner, or as in Resource mode, click and drag in the calendar pane to create a new assignment. You can manage existing assignments in Project mode the same as in Resource mode – simply left-click the assignment to display the menu items and edit, delete or reassign as appropriate:
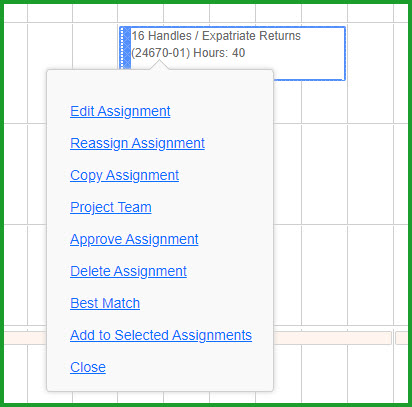
Figure3 – Project Mode Assignment Menu Options
Add projects, view project and edit project information from the Resource page
Users with the appropriate security permissions can now add new projects and view and edit existing projects without leaving the Resource page. While in Project View mode, click the down arrow to the right of the Add Schedule button:
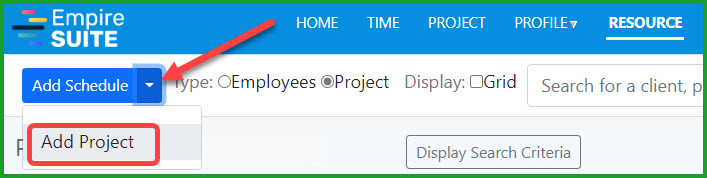
Figure4 – Adding a Project from the Empire RESOURCE Page
You can also view and edit an existing project from the Resource page while in Project mode by mousing over the project name and clicking the Pencil icon:
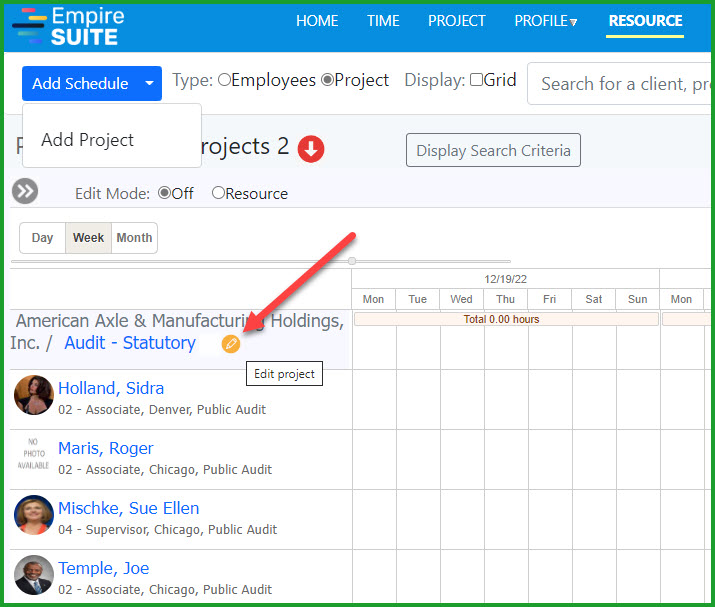
Figure5 – Editing a Project from the Resource Page
Redesigned Teams/Portfolio Management
We’ve redesigned the UI for creating and managing Teams and Portfolios. To select an existing Team, click the red down arrow:
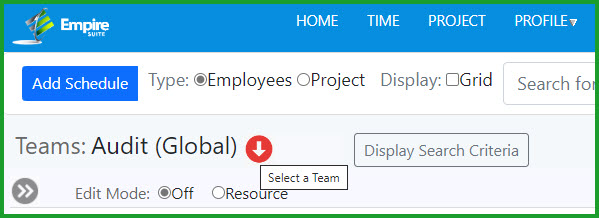
Figure6 – Selecting a Team
To edit an existing team, click the yellow pencil icon:
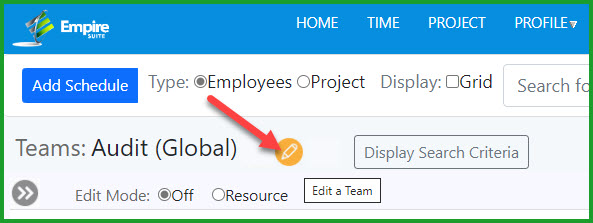
Figure7 – Editing a Team
To add a new Team, click the blue Plus Sign icon:

Figure8 – Adding a New Team
We’ve updated our Best Match capability by changing the assignment selection from all assignments to allow the user to select which assignments to apply Best Match to. Click the Gear Icon to add a Staff Level assignment to Best Match:
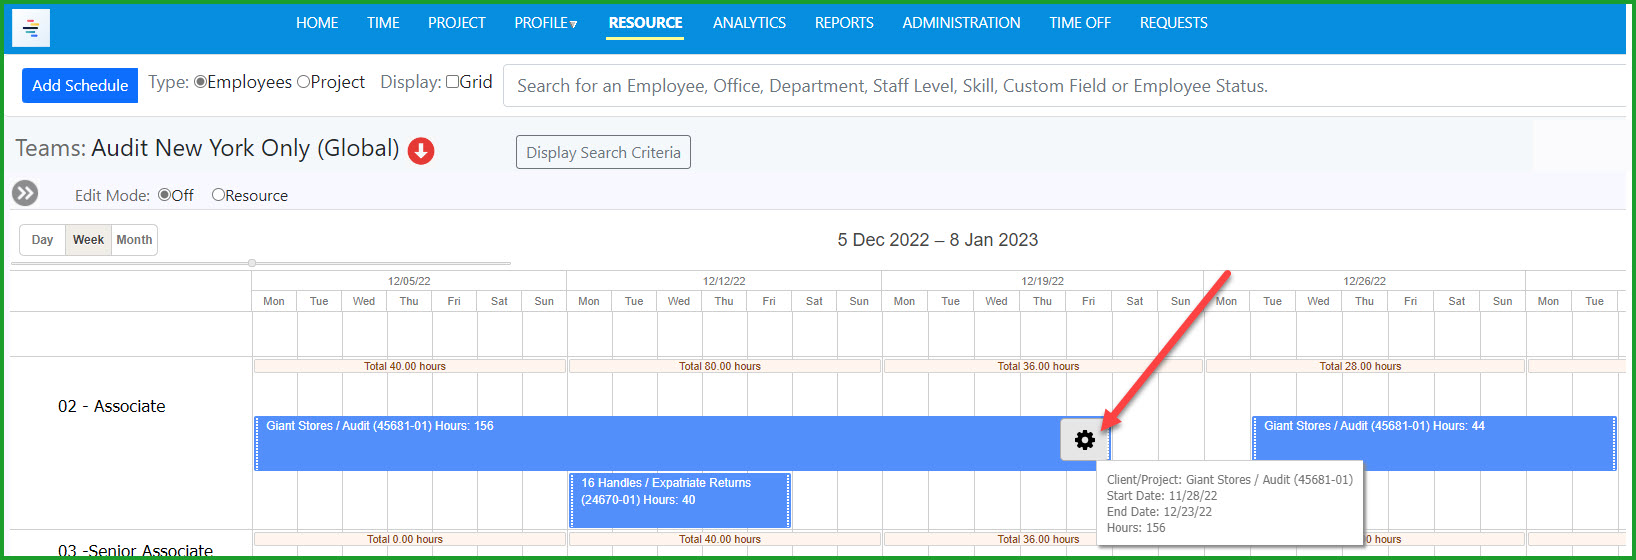
Figure9 – Adding a Staff Level Assignment to Best Match
The counter in the Select Assignments button will show the total of selected assignments:
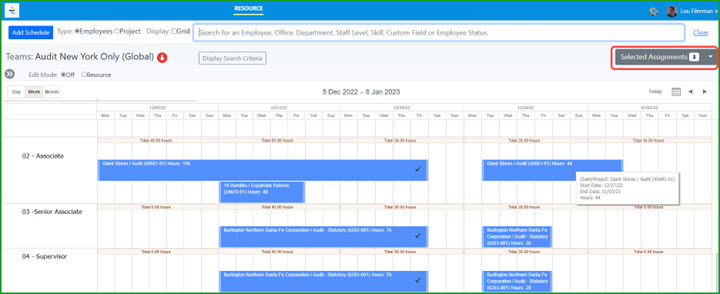
Figure10 – Selected Staff Level Assignments Counter
Click the Selected Assignments button to get started:
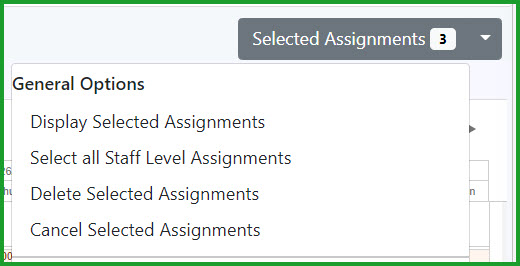
Figure11 – Selected Assignment General Options
The Display Selected Assignments option will show the currently selected Assignments:
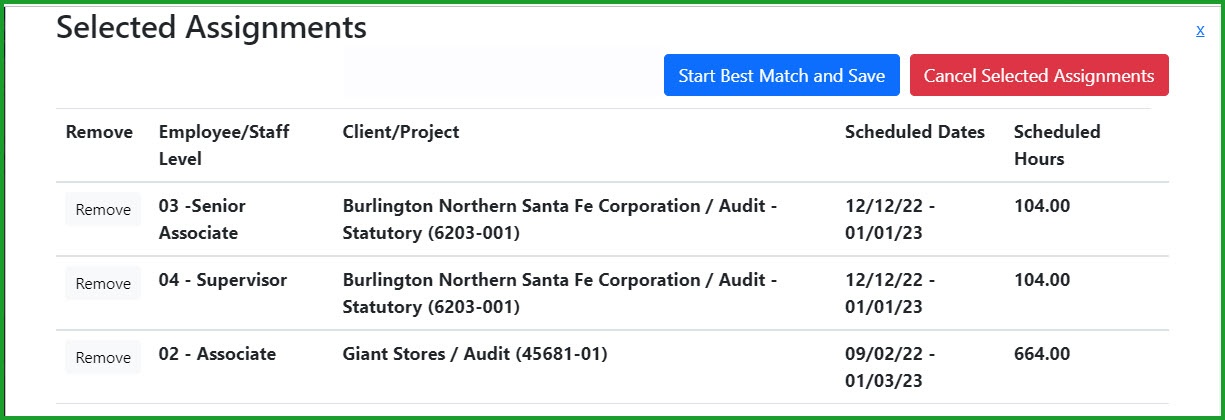
Figure12 – Display Selected Staff Level Assignments
The Select All Staff Level Assignments option will add any existing Staff Level assignments that haven’t been selected into the group. Staff Level Assignments added by the Select All option will have a check mark indicating they have been added to the group:
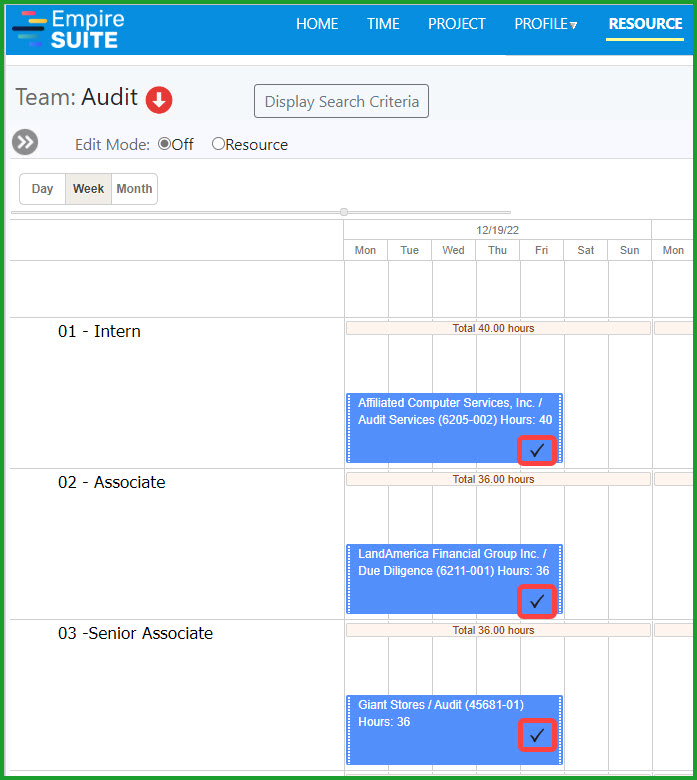
Figure14 – Selected Staff Level Assignments
We have also enhanced our Skills functionality so it can be included as a requirement for resource assignments as appropriate.
Recurring Assignments
We’ve added a new UI to support recurring assignments. Recurring assignments can be created in Empire RESOURCE in either employee or project view mode. To create a recurring assignment, create an assignment by either clicking and dragging in the calendar pane or by clicking the Add Schedule button in the upper right corner of the page:
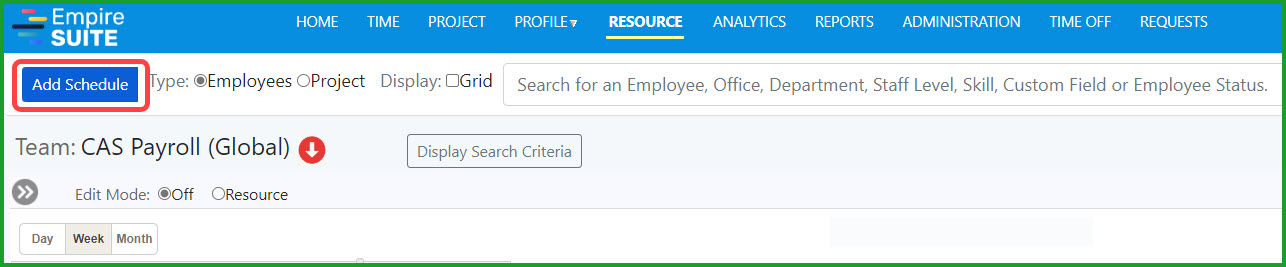
Figure15 – Empire RESOURCE Add Schedule
In this example, we’ve created a one day a week payroll processing assignment:
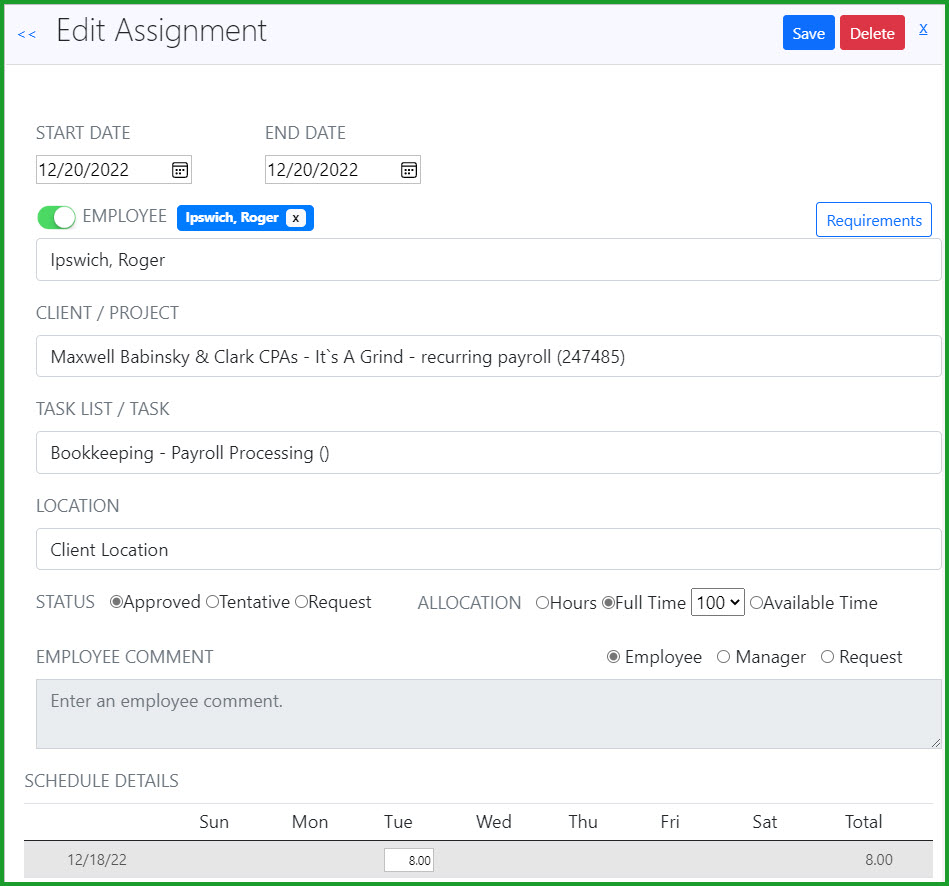
Figure16 – Weekly Payroll Processing Assignment
Once the assignment is created, click the Gear icon for the assignment, or left-click the assignment and select Add to Selected Assignments:
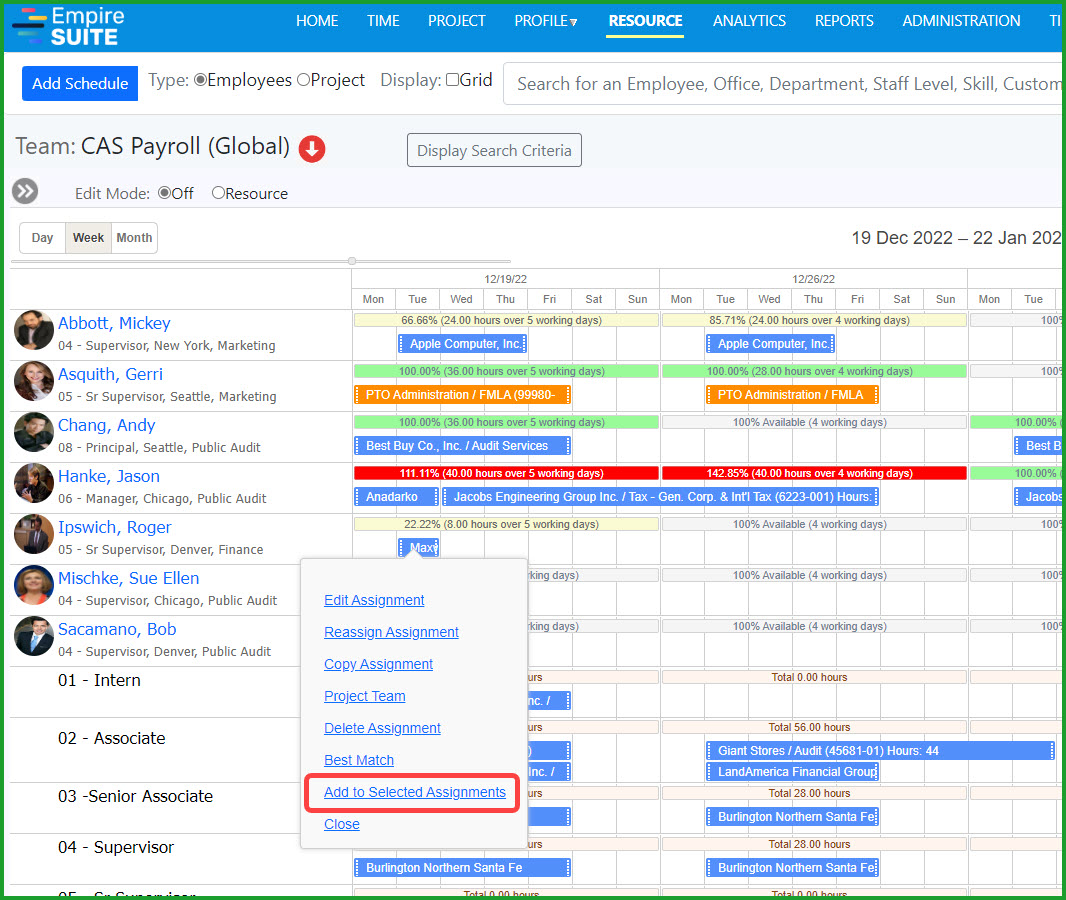
Figure17 – Add to Selected Assignments
The Selected Assignments counter has been incremented to include the new selected assignment. Click the down arrow at the right of the Selected Assignments to open the menu:
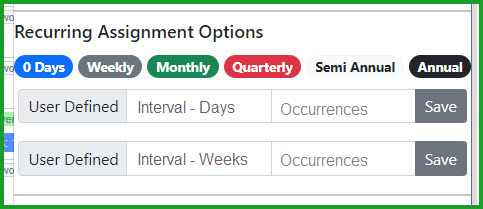
Figure18 – Recurring Assignment Options
In this example, we’ll set up an assignment for every other Tuesday for eight occurrences:
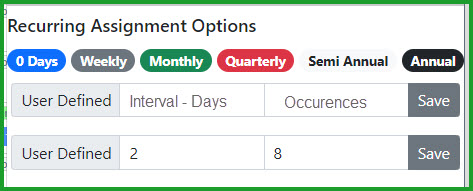
Figure19 – Recurring Assignment Setup
And here is the recurring assignment in the calendar:
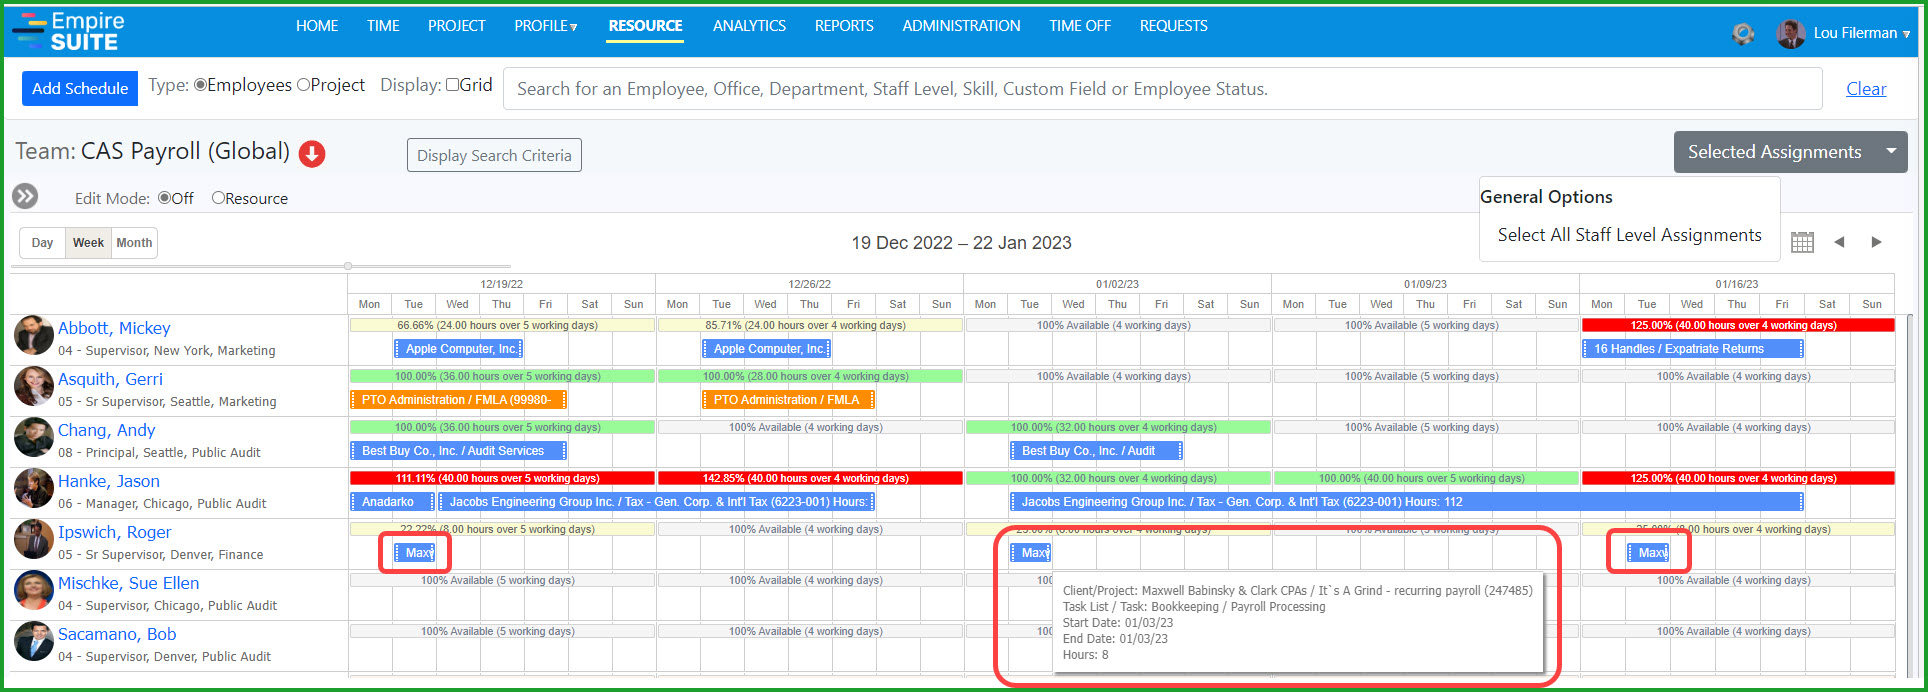
Figure20 – Recurring Assignments in the Calendar
You can create recurring assignments using Daily, Weekly, Monthly, Quarterly, Semi-Annual and Annual intervals and occurrences. Be sure to have the Calendars, Summary Periods and Approval Periods configured to allow the desired intervals and occurrences.
Enhanced Move Assignment Capability
You can now select and move assignments for multiple resources instead of one resource at a time. Click the Gear icon to select the assignments you want to move...
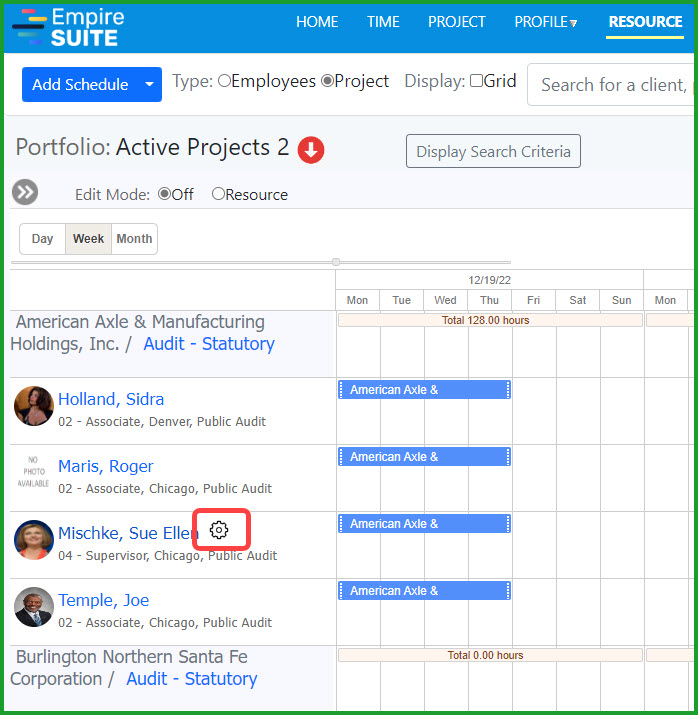
Figure21 – Select an Assignment to Move
. . .or click the Gear icon by the project name to select all assignments for a project:
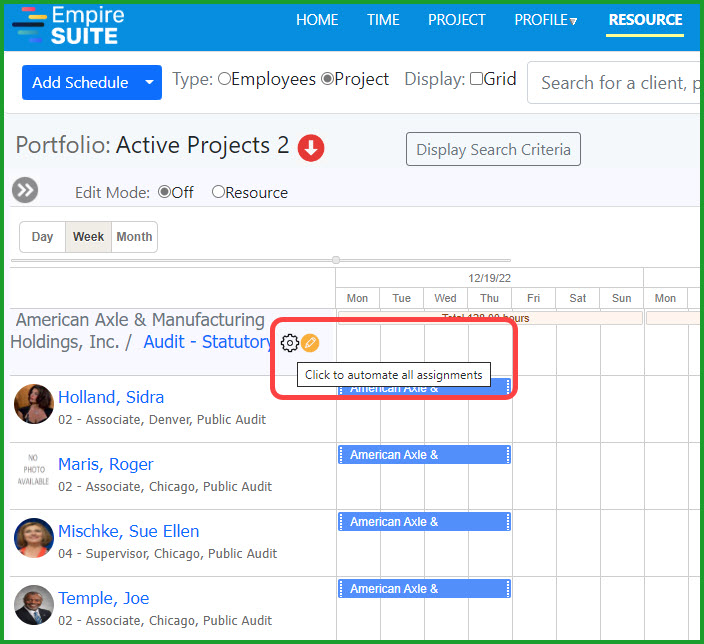
Figure22 – Select All Assignments for a Project
This will update the Selected Assignments counter. Click the down arrow to the right of the Select Assignments button to open the menu which includes Move Assignment Options:
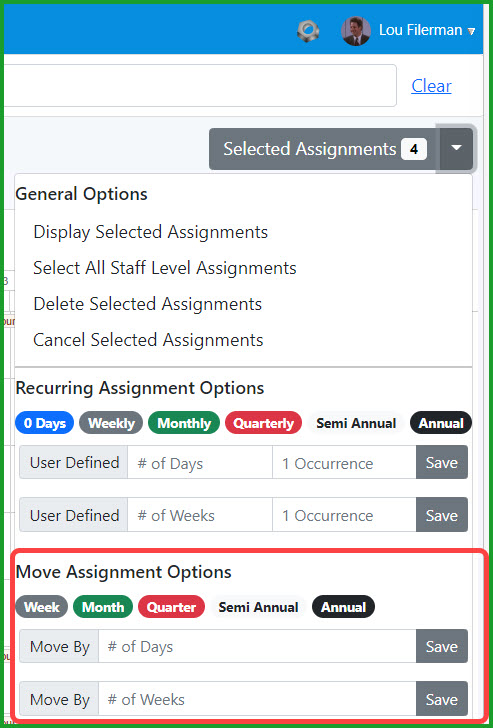
Figure23 – Move Assignment Options
In this example, to move all the assignments by 4 weeks, enter 4 in the Move By # of Weeks field and click Save:
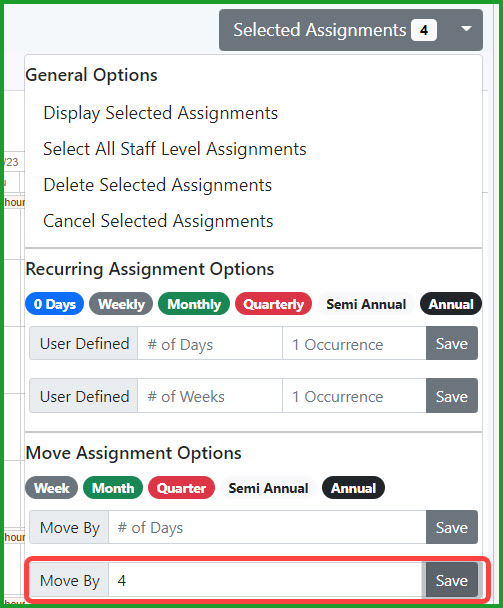
Figure24 – Moving the Selected Assignments
You can move by Days, Weeks, Months, Quarters, Semi-Annually or Annual increments. Please make sure your Calendars, Approval Periods and Summary Periods have been configured to support the desired change. Here you can see the selected assignments have been moved out 4 weeks. You can move assignments back by entering a negative number in the Move By Days or Move By Weeks field.
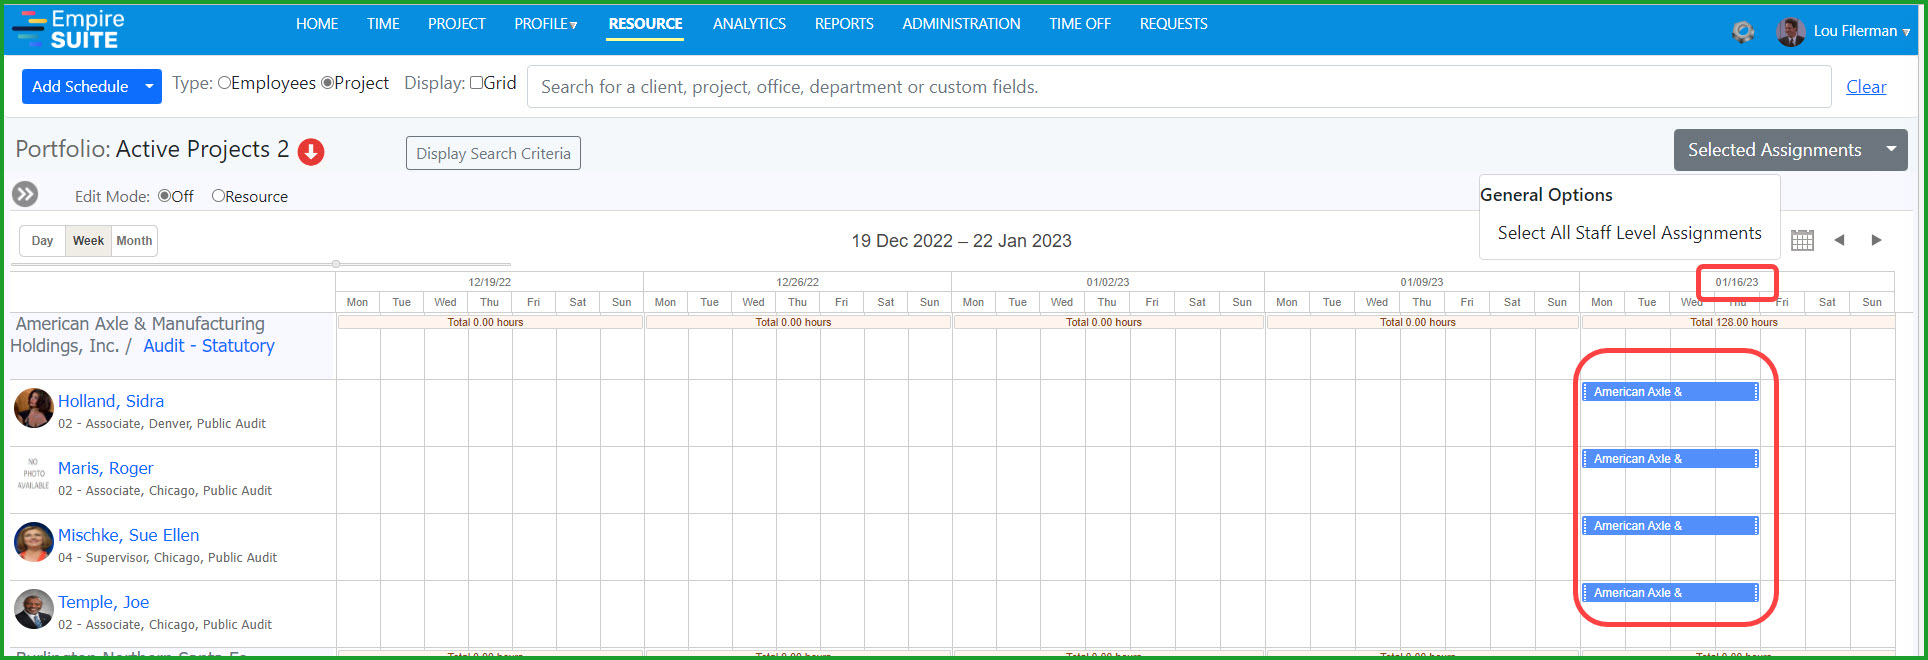
Figure25 – Selected Assignments After Move By
You can also delete assignment by selecting them into the list or remove all the selected assignments from the list using the Delete Selected Assignments and Cancel Selected Assignments options as seen in Figure an above.
Empire RESOURCE Grid View
We’ve added a grid view mode to the Resource page. By clicking the Grid checkbox...

Figure26 – Empire RESOURCE Grid Mode Checkbox
...you can change this view...
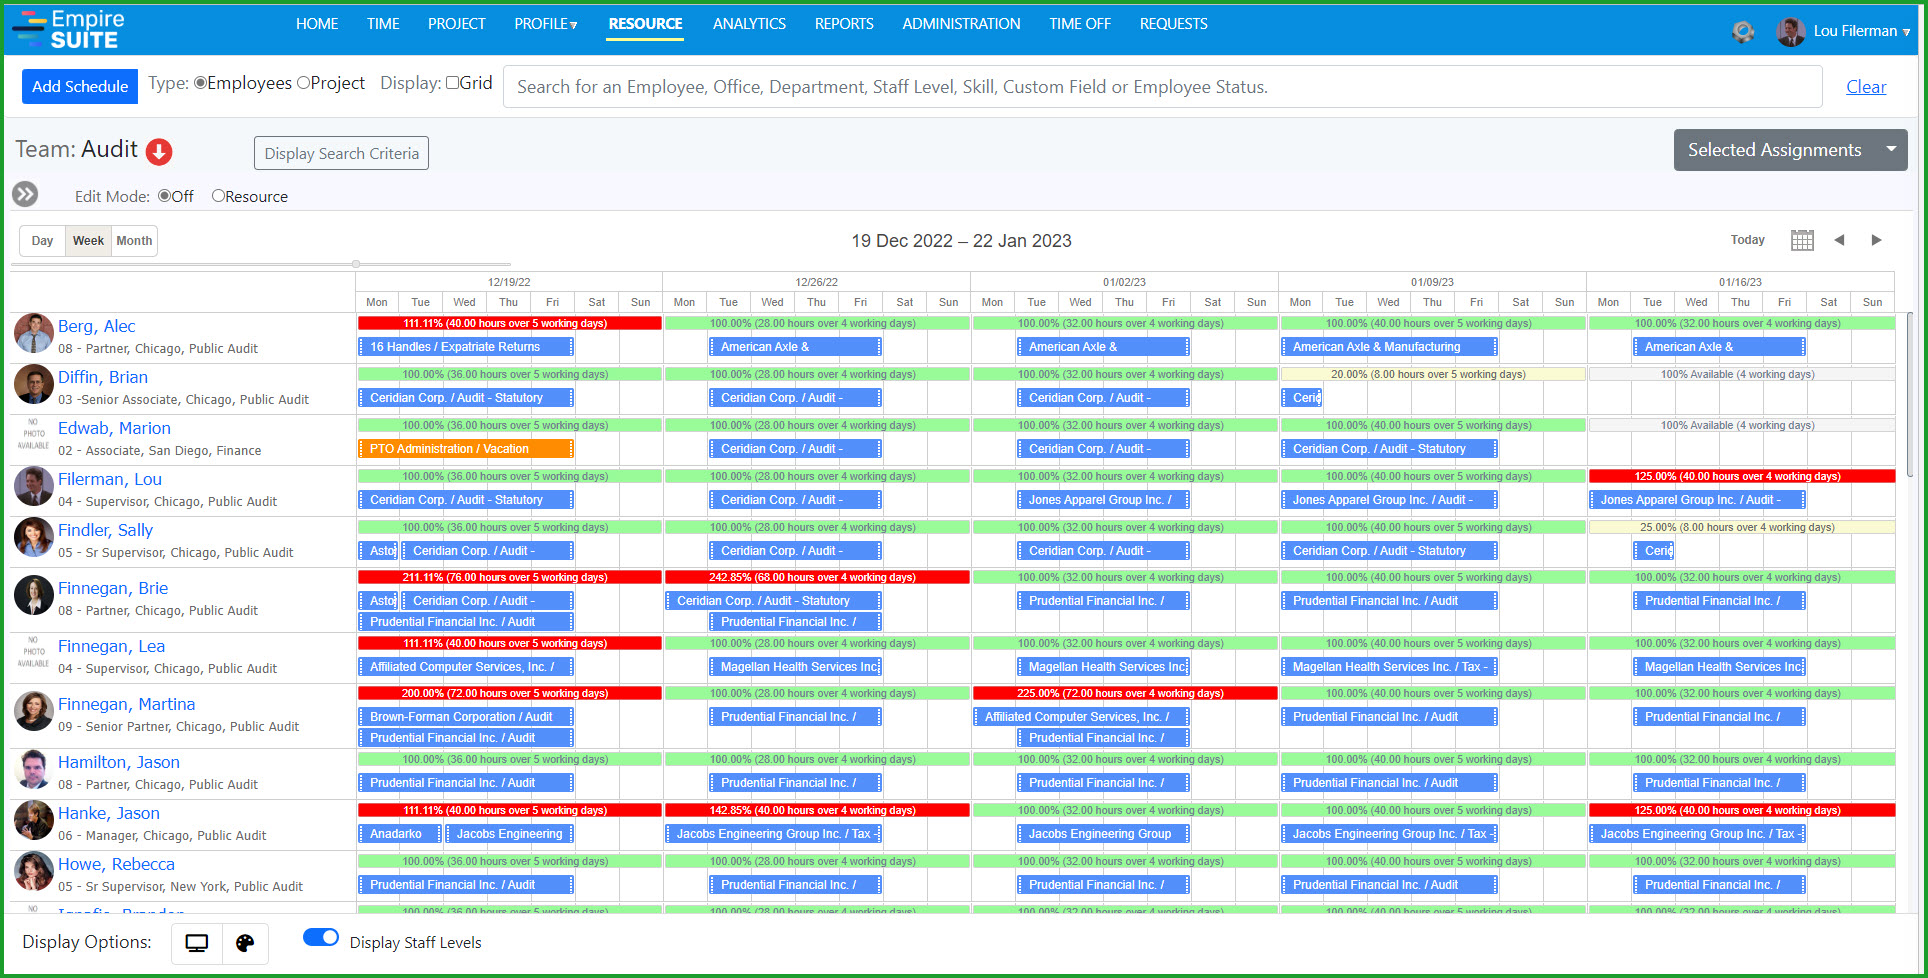
Figure27 – Empire RESOURCE Calendar View Mode
...to this view. Please note the totals at the right-hand edge of the page for the displayed date range:

Figure28 – Resource Page in Grid Mode
Multiple Assignment Delete
You can now delete multiple assignments instead of deleting assignments one by one. To delete all assignments for a project, click the Gear icon to select the assignments:
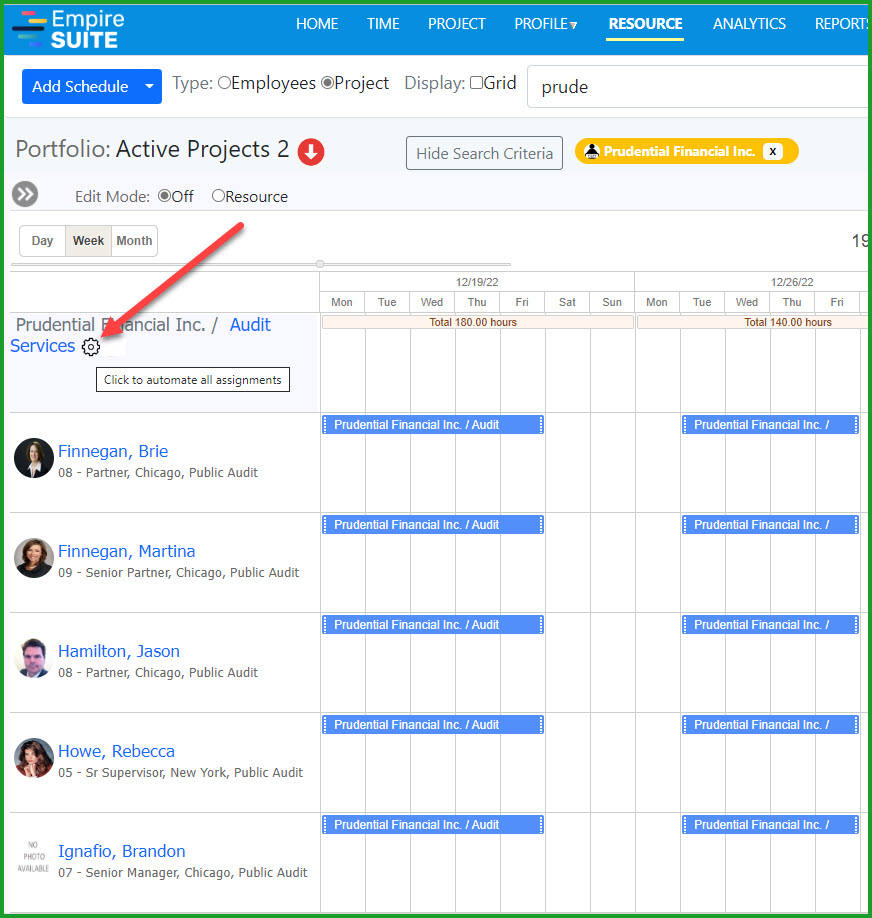
Figure29 – Selecting All Assignments for a Project
Click the down arrow to the right of the Selected Assignments button to open the menu:
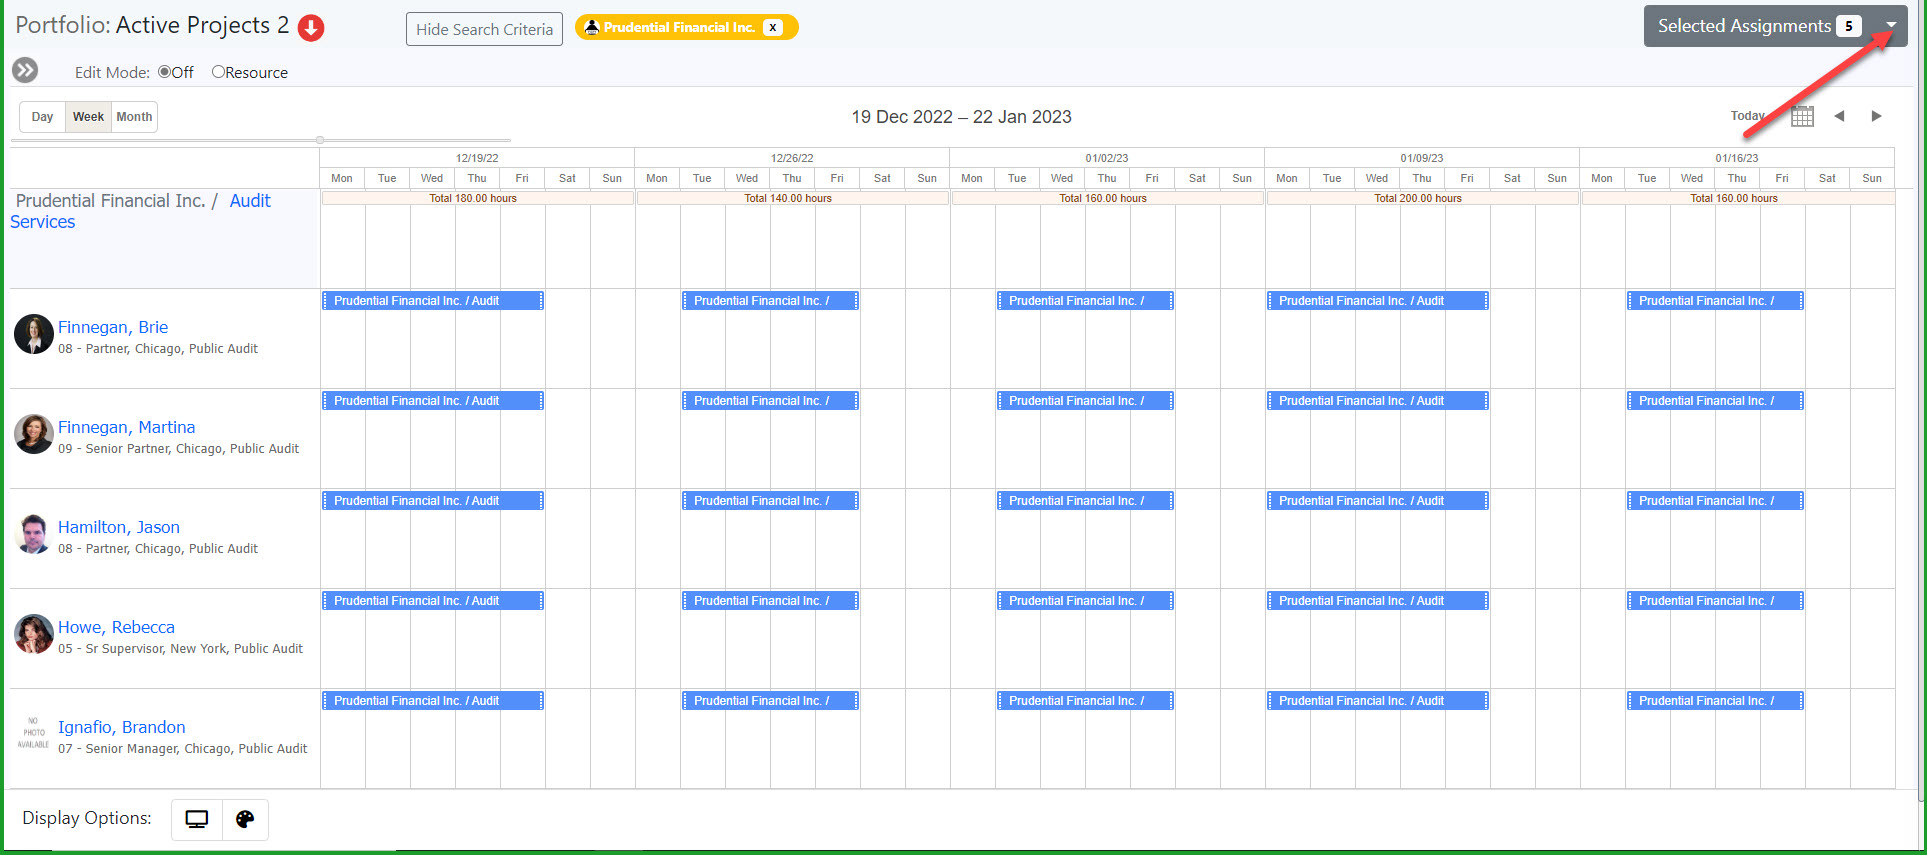
Figure30 – Selected Assignments Menu Control
Select Delete All Assignments to delete the selected assignments:
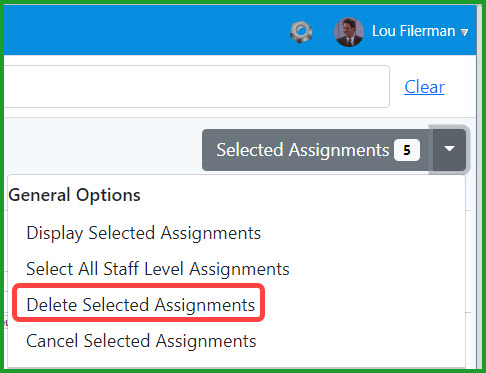
Figure31 – Deleting All Selected Assignments
Project Forecast View in Resource Page
You can now see project forecast information in the Resource page. In Project mode, click the Red down arrow to see a list of Portfolios:
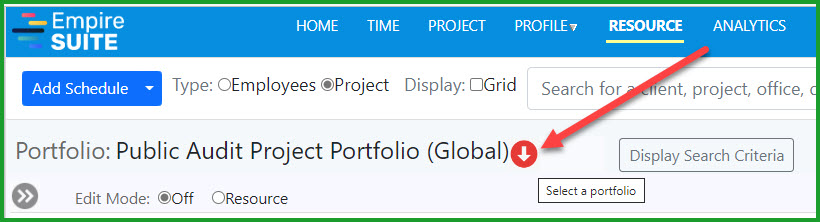
Figure32 – Select a Portfolio
Click the Eye icon next to a Portfolio to see forecast information for all the projects in the Portfolio
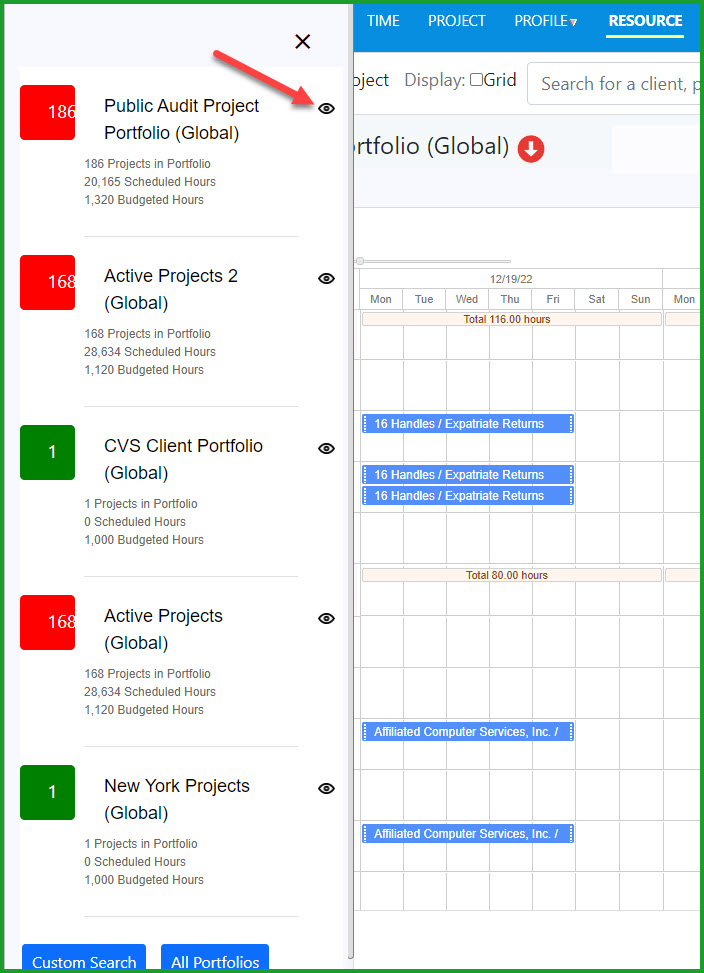
Figure33 – Portfolio List
The forecast information includes actual hours recorded, remaining scheduled hours, estimated hours at completion, the estimated hours from the project setup page, and the variance between the Estimated hours at completion and the estimated hours:
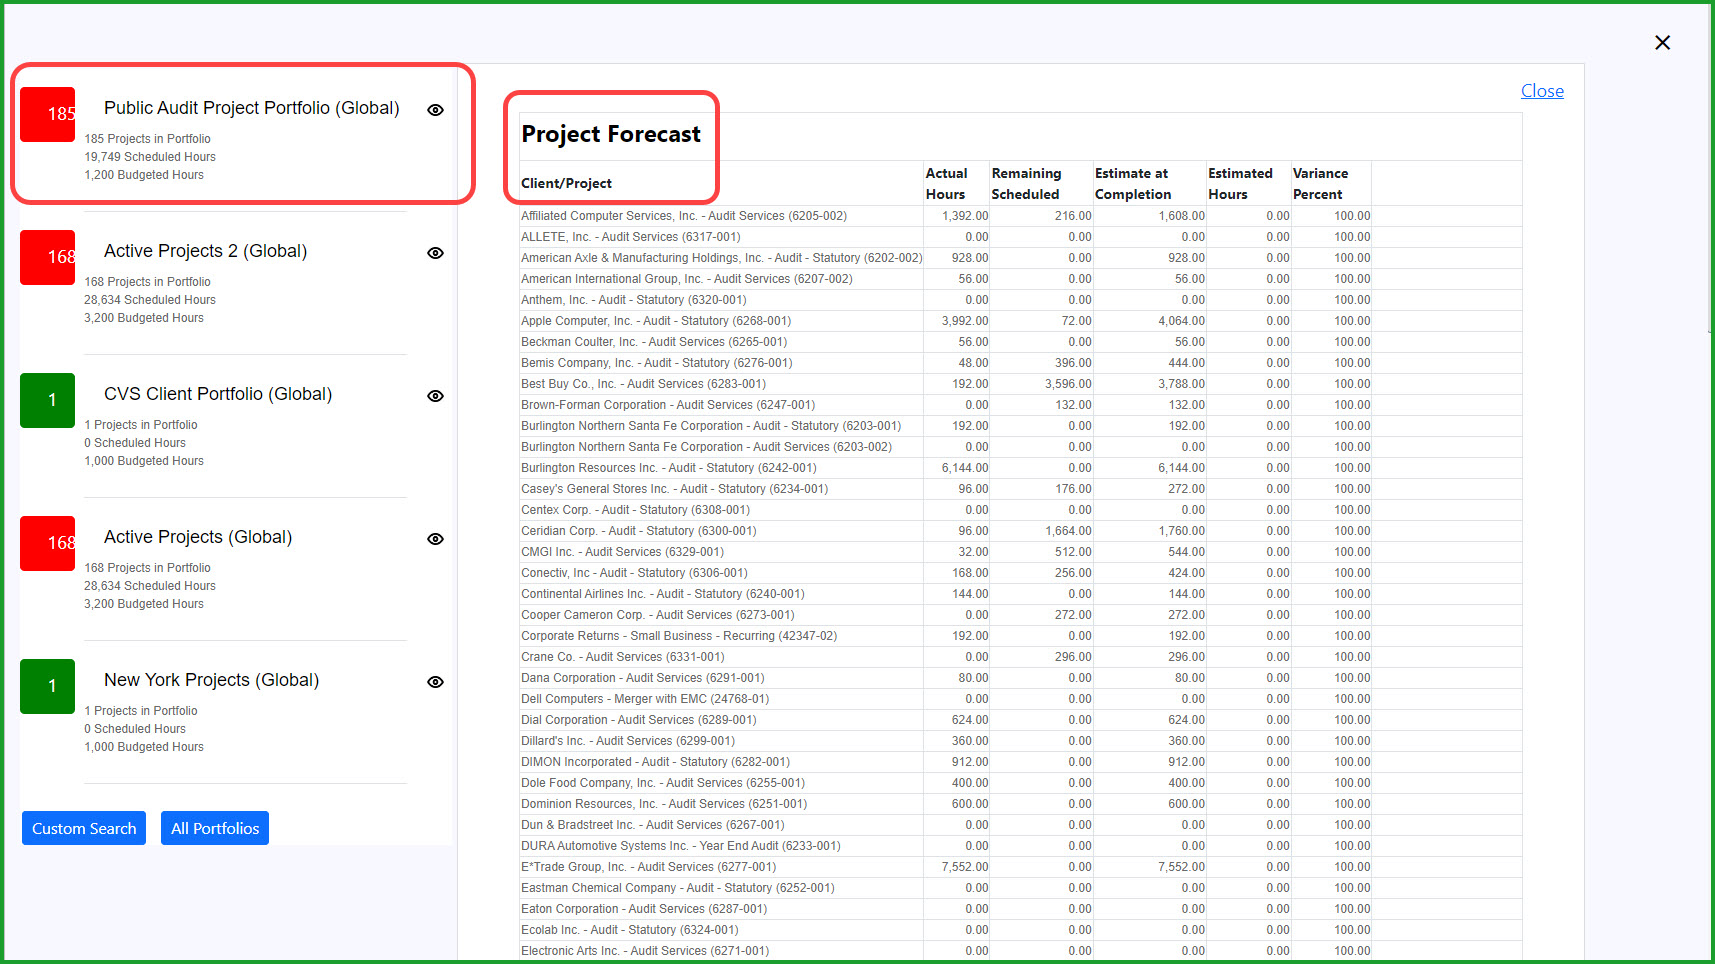
Figure34 – Project Estimate Information
PTO Exception Rules
We’ve added a new feature allowing administrators to define PTO request ‘Exception’ rules. These options can be used to require an additional approval when the set limits are exceeded. From the Time Off menu, select Administration \ PTO Policies. Then click the PTO Exception Rules radio button:
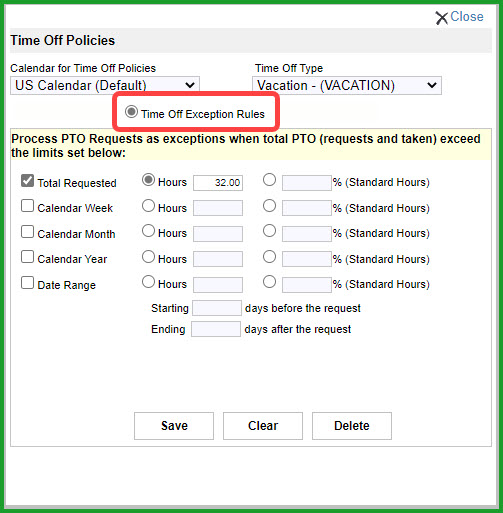
Figure35 – PTO Exception Rules Setup
These settings allow you require an extra approval if the amount requested exceeds the defined limits for the total request amount, in a week, in a month, in a calendar, year or across a defined date range. You can also set a limit requiring an additional approval if the request amounts exceed a percentage of the standard hours for the requested period.
Date: Aug 15th, 2022
What’s New in Empire SUITE Aug 2022?
Resource Assignment Best Match Automation
Automation and Best Match
We’ve added automation to Best Match capability for unnamed Resource (Staff Level or Position) and named assignments and requests. The Automation process evaluates the assignment requirements and suggests reassignment candidates, one by one or as a user-selectable group.
If you mouse over an assignment, you’ll see a ‘gear’ icon in the lower right corner:

Figure 1 – Assignment Automation Icon
If you want to include an assignment in the Best Match Automation process, click the icon. You’ll see a checkmark on the assignment and the new Best Match counter will be updated:
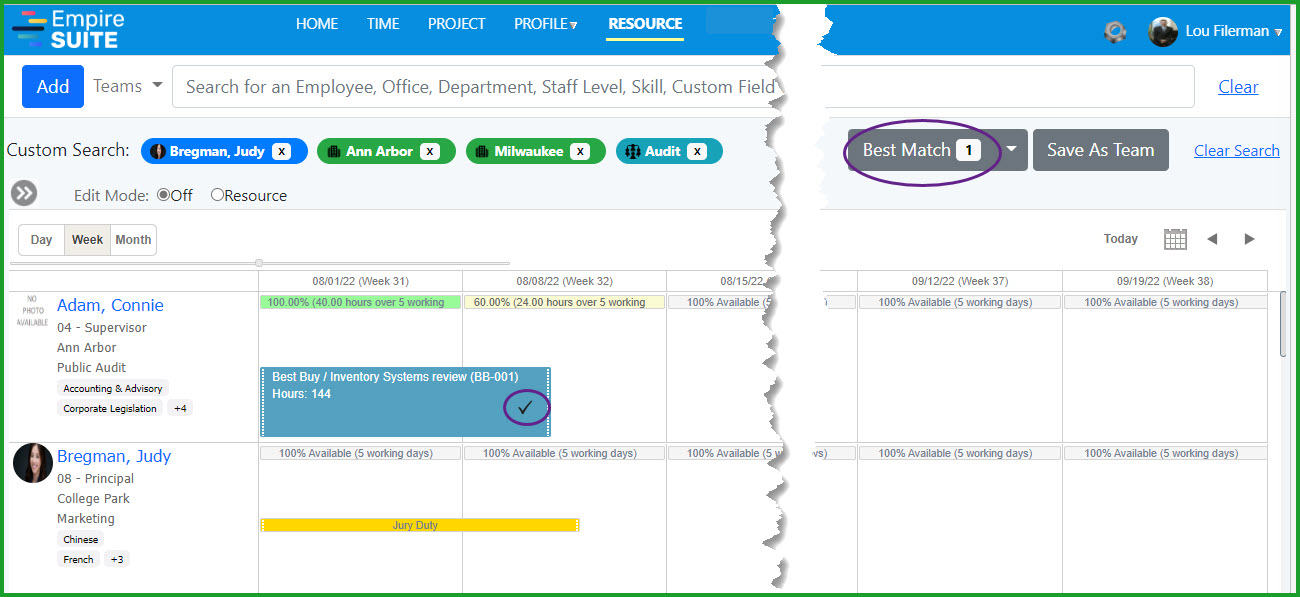
Figure 2 – Best Match Counter
You can add as many assignments as needed by clicking the icon in the assignment.
If you want to add all assignments for a user to Best Match, click the gear icon in the information pane:
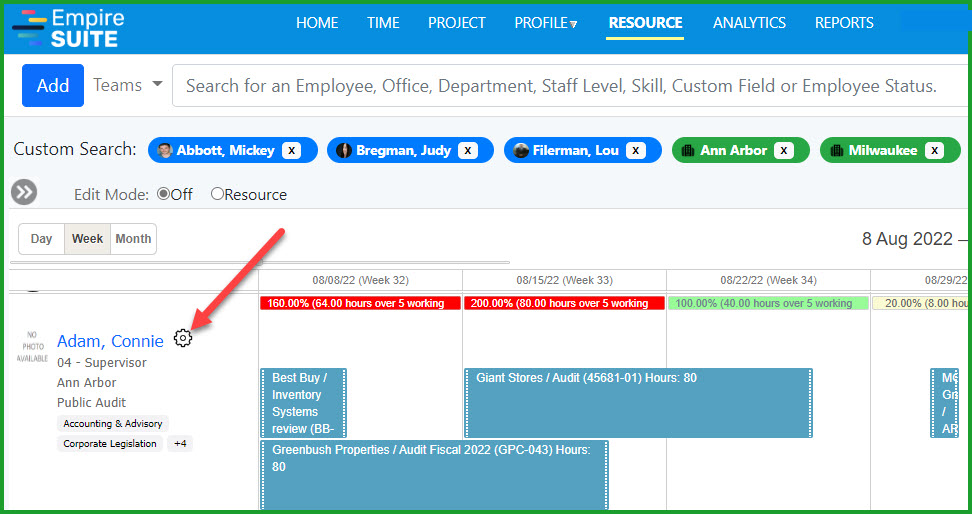
Figure 3 – All Assignments for a User
If you want to add all assignments for a user to Best Match, click the gear icon in the information pane:
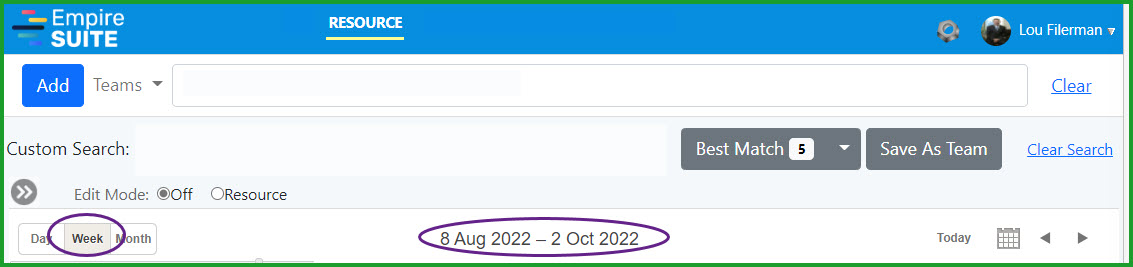
Figure 4 – Best Match Select All Assignments Date Range
Best Match Options
If you haven’t selected any named, resource assignments, clicking Best Match allows you to select all Staff Level assignments:
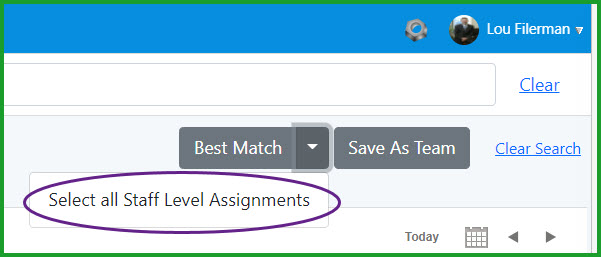
Figure 5 – Select all Staff Level Assignments
If you’ve selected named assignments, specific staff level assignments or a mix of both, the Best Match process gives you several options:
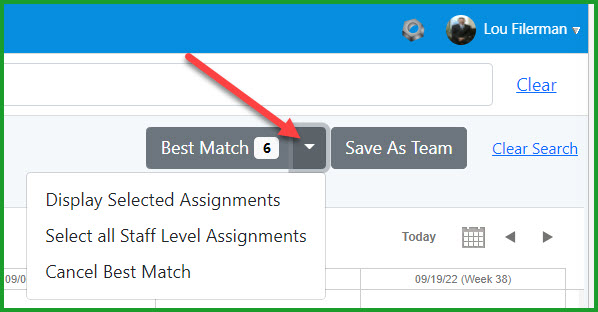
Figure 6 – Best Match Options
Display Selected Assignments
Click Display Selected Assignments to see the list of assignments:
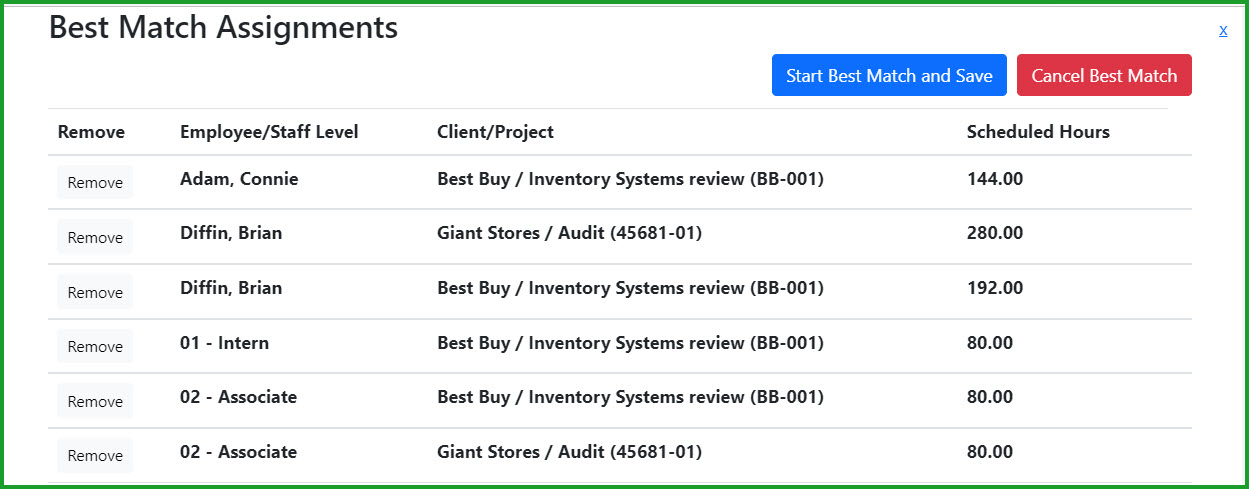
Figure 7 – Selected Assignments
Click the Remove link next to the Employee/Staff Level name to remove an assignment from the Best Match process
Click Cancel Best Match to close the page and return to the Resource calendar view. Cancel Best Match will also remove the selected assignments from the process. You’ll need to reselect the desired assignments to continue with Best Match
Click Start Best Match and Save to begin the matching and reassignment process
Select All Staff Level Assignments
The Select All Staff Level Assignments option will select all Staff Level assignments for automation. Please note if you have named resource selections in the list, the Select All Staff Level Assignments option will remove the named resource assignments from the Best Match queue, and only the Staff Level assignments will be included. To see all the unnamed resource assignments, click the Display Selected Assignments option:
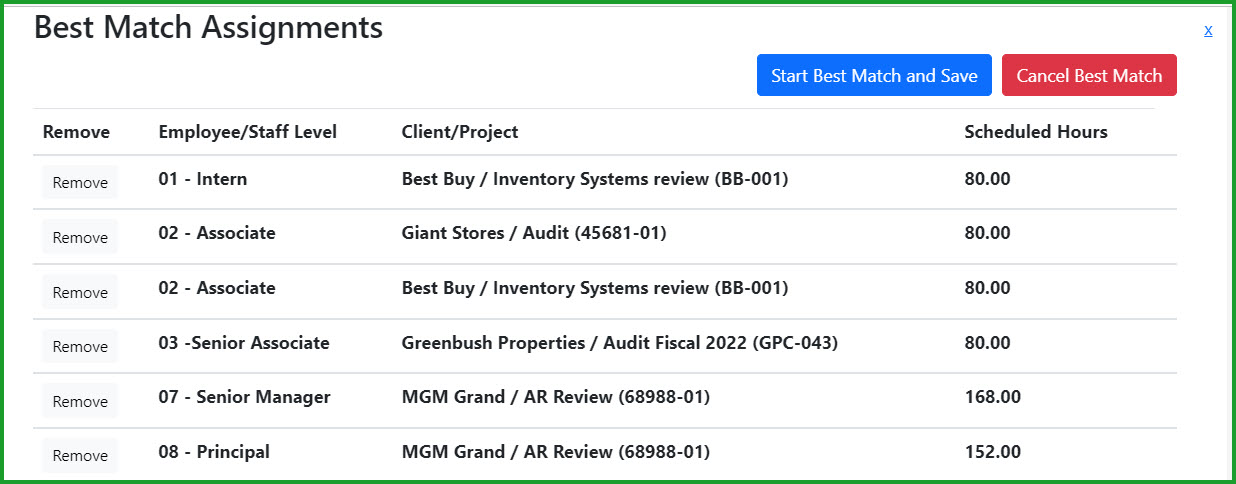
Figure 8 – Best Match Staff Level Assignments
From here, you can remove the appropriate assignments by clicking the Remove link, start the matching process or cancel the best match process.
Cancel Best Match
The Cancel Best Match option will stop the best match process and remove all selected assignments for both named and unnamed user
Using Best Match
When you have the selected the desired assignments, from the Best Match Assignments page, click Start Best Match and Save:
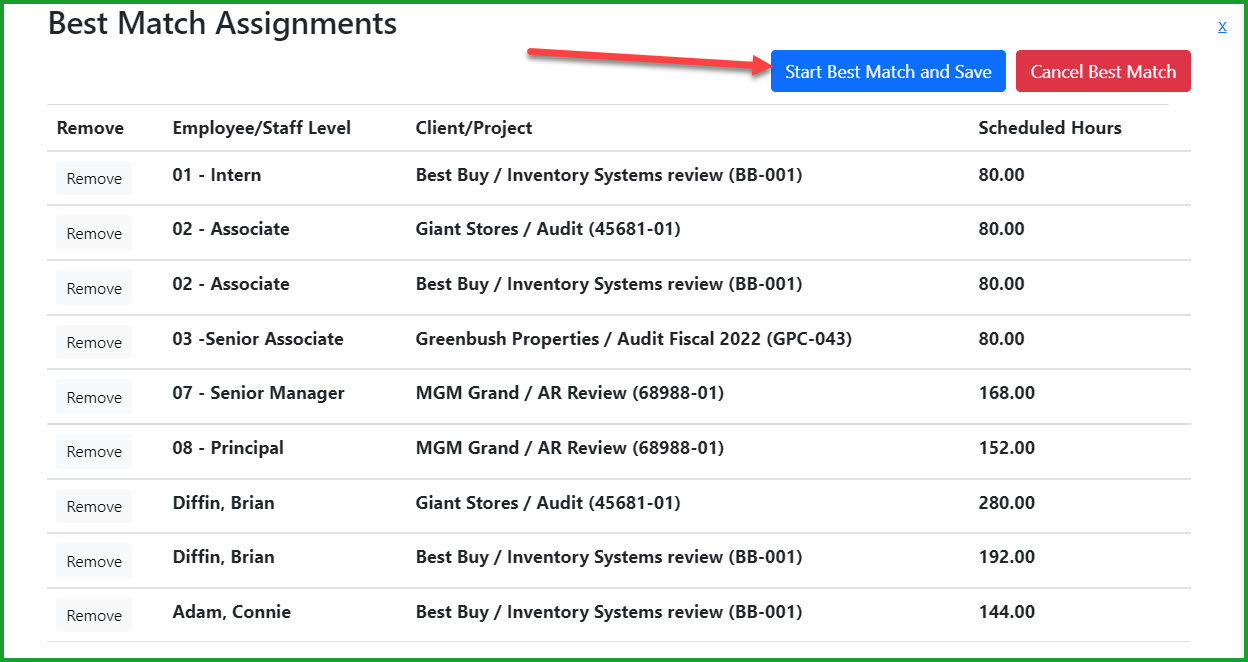
Figure 9 – Start Best Match and Save
If there are available resources that match the assignment requirements, Best Match will make the reassignment:
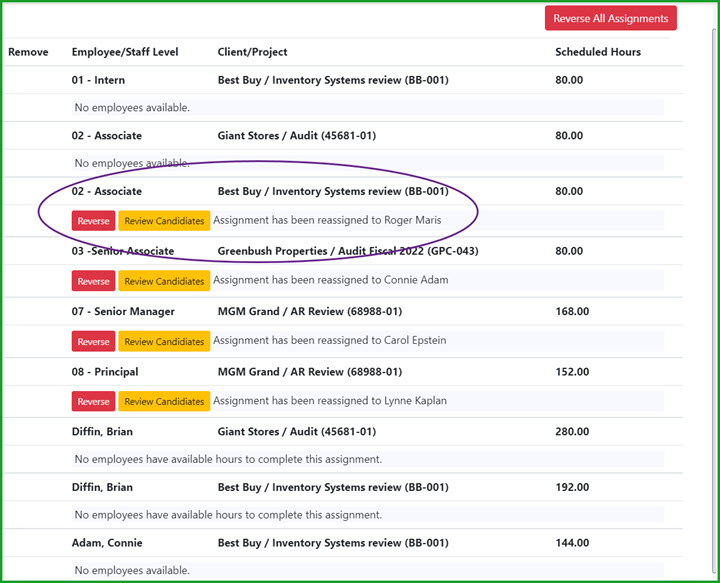
Figure 10 – Best Match Reassignments
Click Reverse All Assignments to override the Best Match process and restore the previous named and unnamed assignment
Click Reverse to cancel the reassignment and restore the assignment to the previous employee or Staff Level
Click Review Candidates to see other resources who met the assignment requirements:
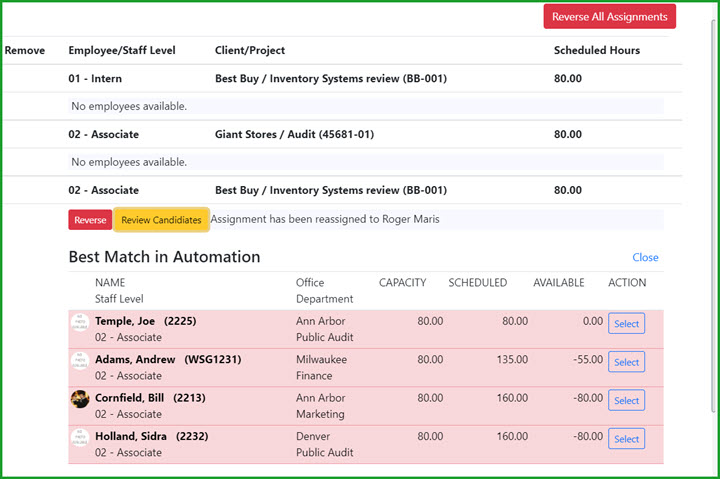
Figure 11 – Review Candidates
The candidates above shaded in pink met the assignment requirements for Staff Level, Office, Department and Skills, but did not have the necessary availability. However, users can decide to override the reassignment made by Best Match and select another employee by clicking the Select button
Date: June 15th, 2022
What’s New in Empire SUITE June 2022?
Enhancements in this Release
In addition to bug fixes and ongoing performance improvements, we’ve added the following new features to the Empire SUITE:
• Updated Sign In and Sign-Up Pages
• Improved Employee Profile page
• New Skills UI and Permissions
• Improved Empire RESOURCE UI
• Resource Requirements
• Resource Assignment Best Match
• Opportunity Management
Sign In and Sign-Up Pages
We’ve updated the Sign In page...
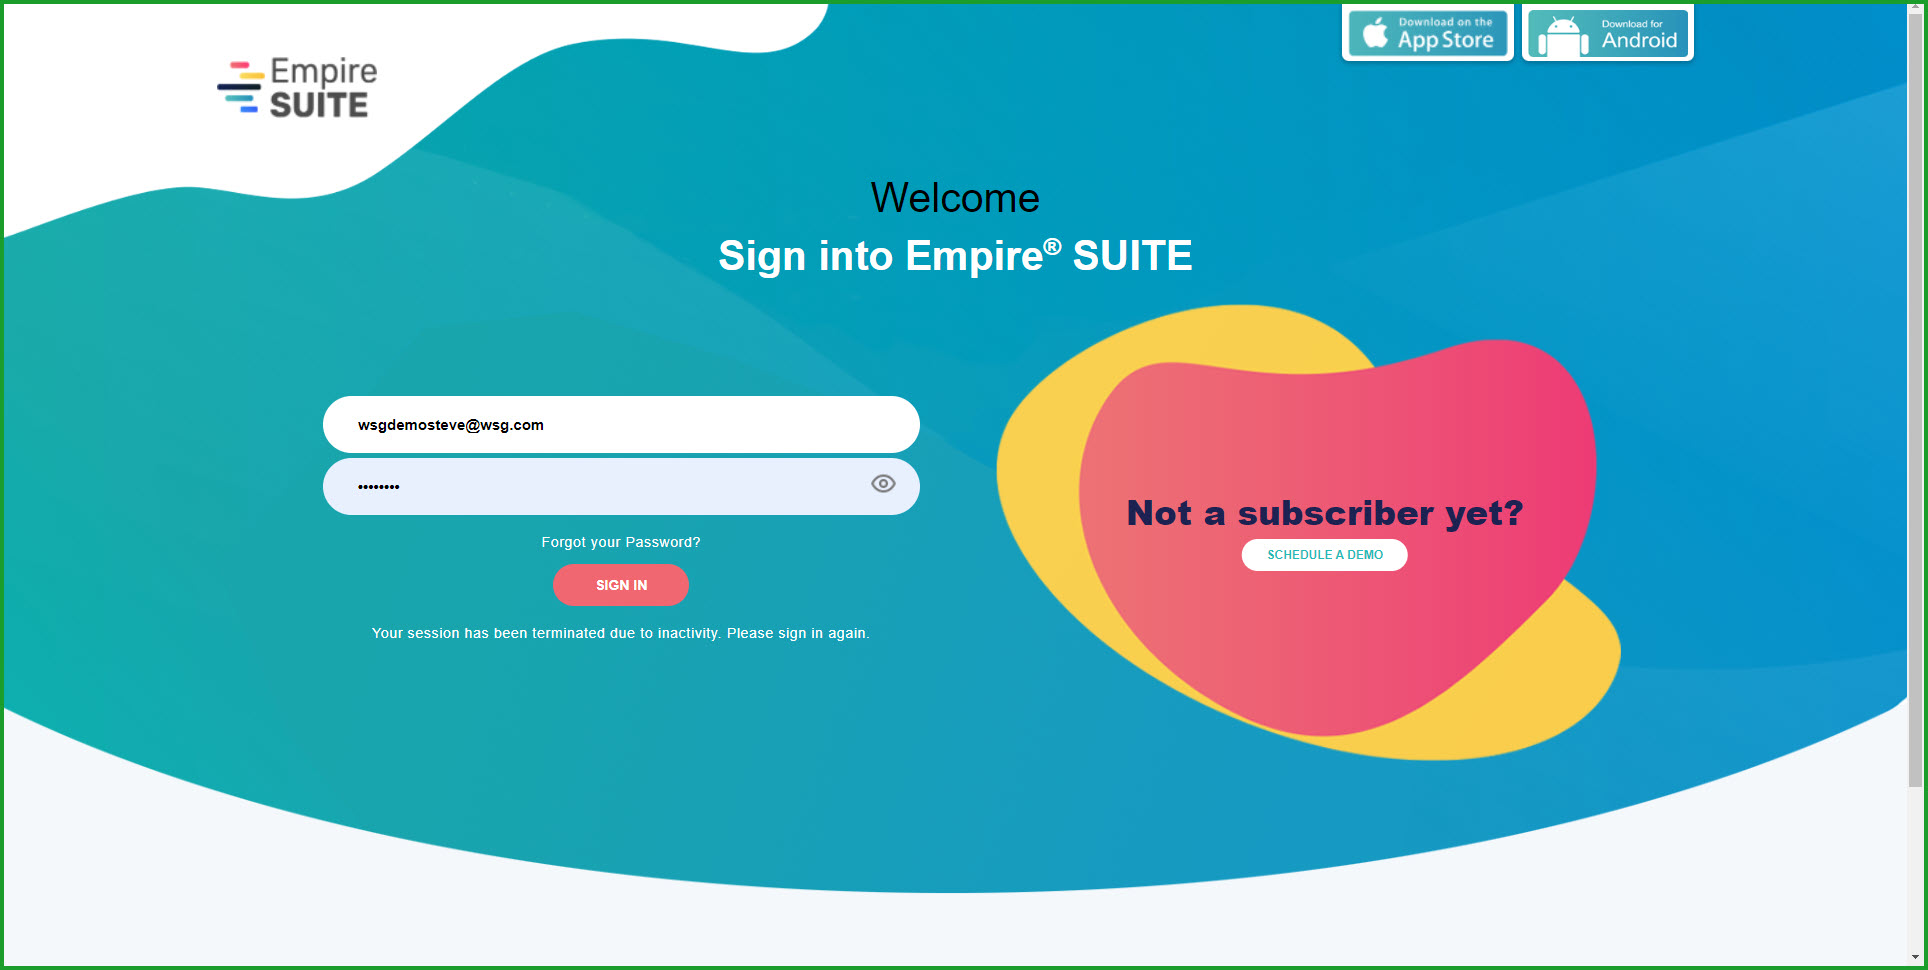
Figure 1 – Sign In Page
...and the Sign-Up page:
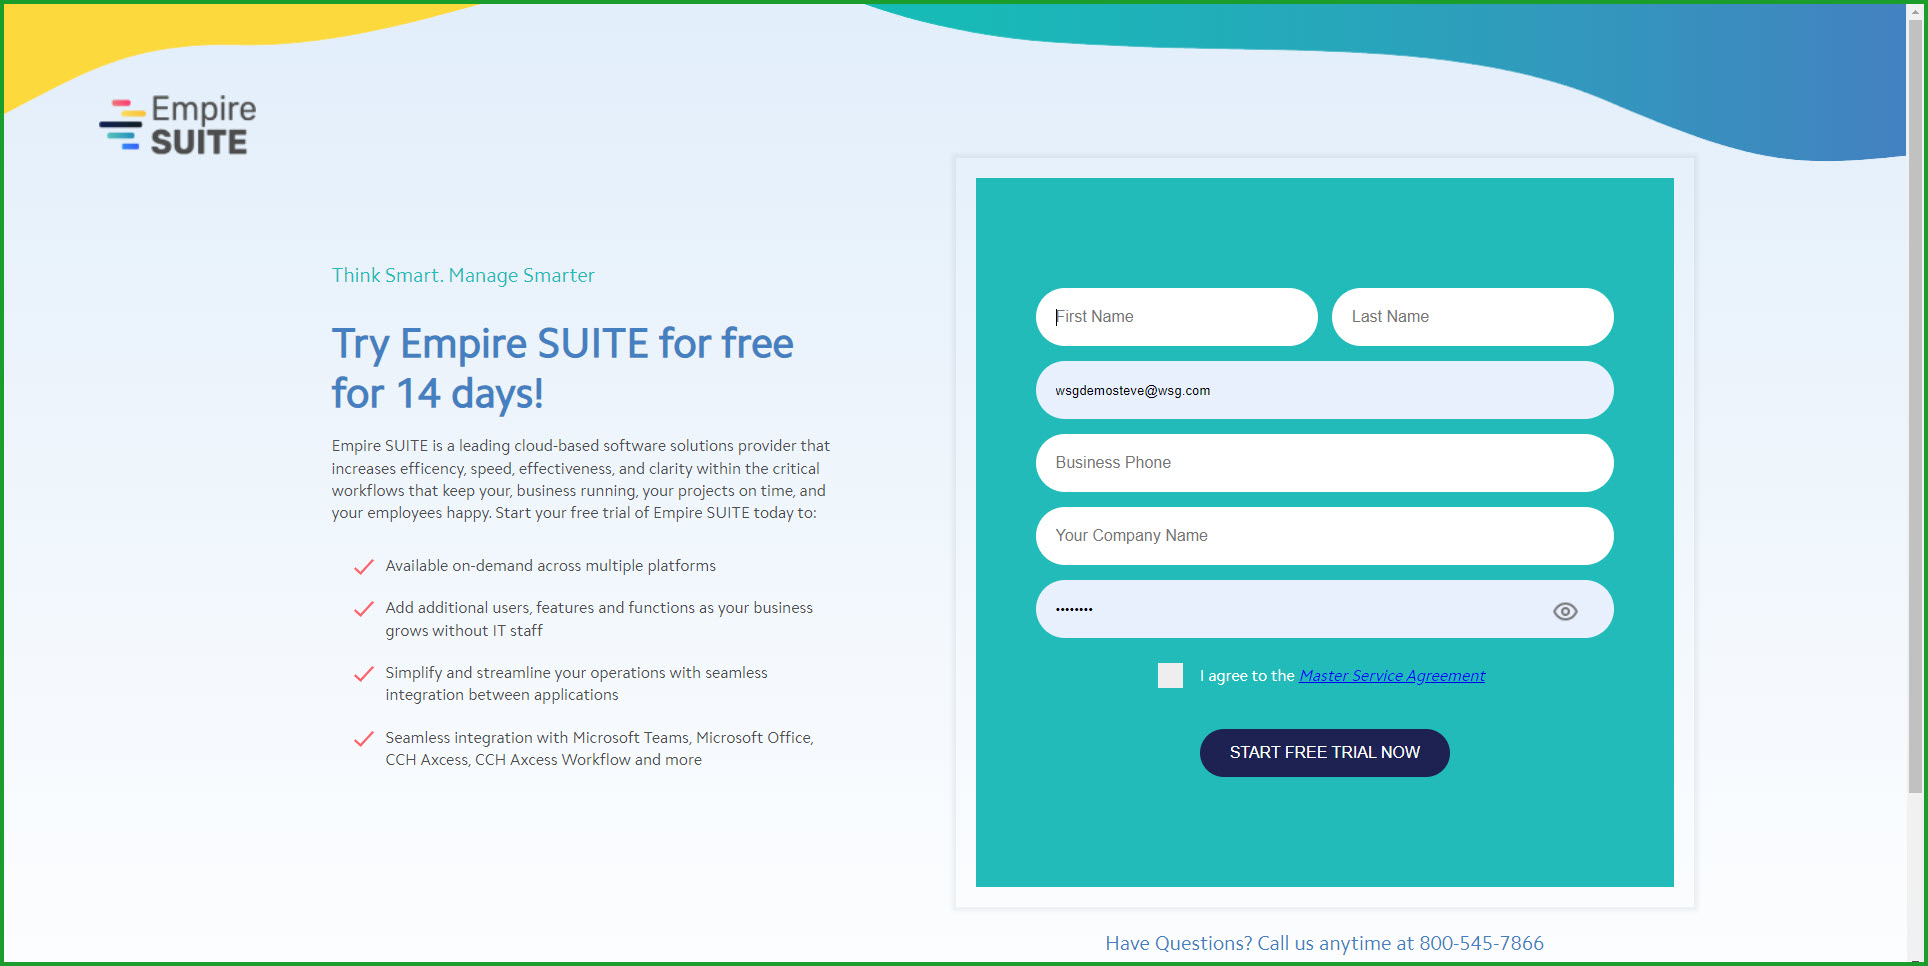
Figure 2 – Sign Up Page
Employee Profile – Displaying Address Fields
We’ve added a database setting to control whether or not users can add home address information.The default setting is enabled, which means the employee address fields are displayed:

Figure 3 – Employee Home Address Information
If you would prefer not to store employee home address information in Empire SUITE, let us know and we will modify the database to hide the address fields. In that case, we will only display the Home Address Zip Code field:
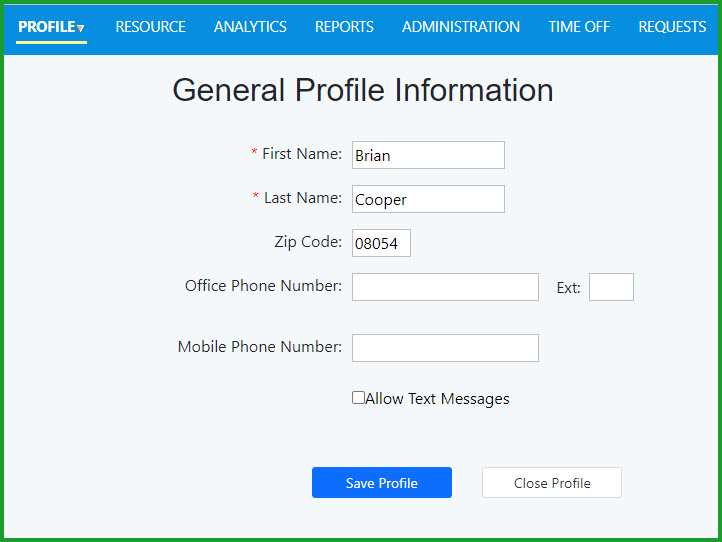
Figure 4 – Employee Home Zip Code
The zip code field is an optional field and does not have to be populated
Employee Profile – Enabling Text Messages
We’ve added an Allow Text Messages checkbox to the Employee Profile page so users without Administration permissions can configure themselves to receive text messages. From the home screen, select Profile\Edit Profile:

Figure 5 – Edit Your Profile
In addition to using text messages for requesting, approving or cancelling time off events, text messages can also be used to offer employees immediate notifications when an assignment opportunity matching the employee’s office, department and staff level (Position) is added.
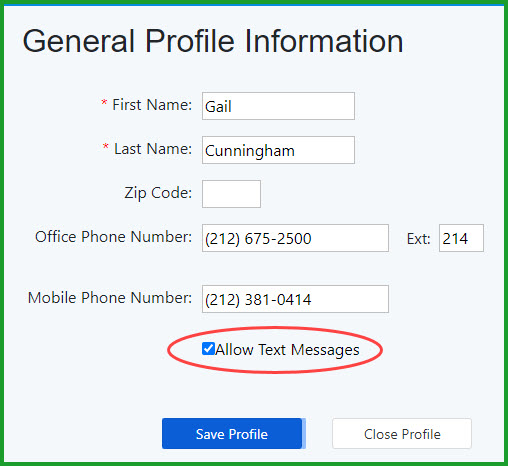
Figure 6 – Enabling Text Messages
New Skills UI and Permissions
We’ve updated and enhanced the Skills UI when assigning user skills and proficiency levels. The Skills Top Level navigation control allows you to navigate directly into the specific Skills section:

Figure 7 – Skills Top Level
Assigning user skills and proficiency levels is done by simply locating the appropriate skill and proficiency level and clicking the cell:
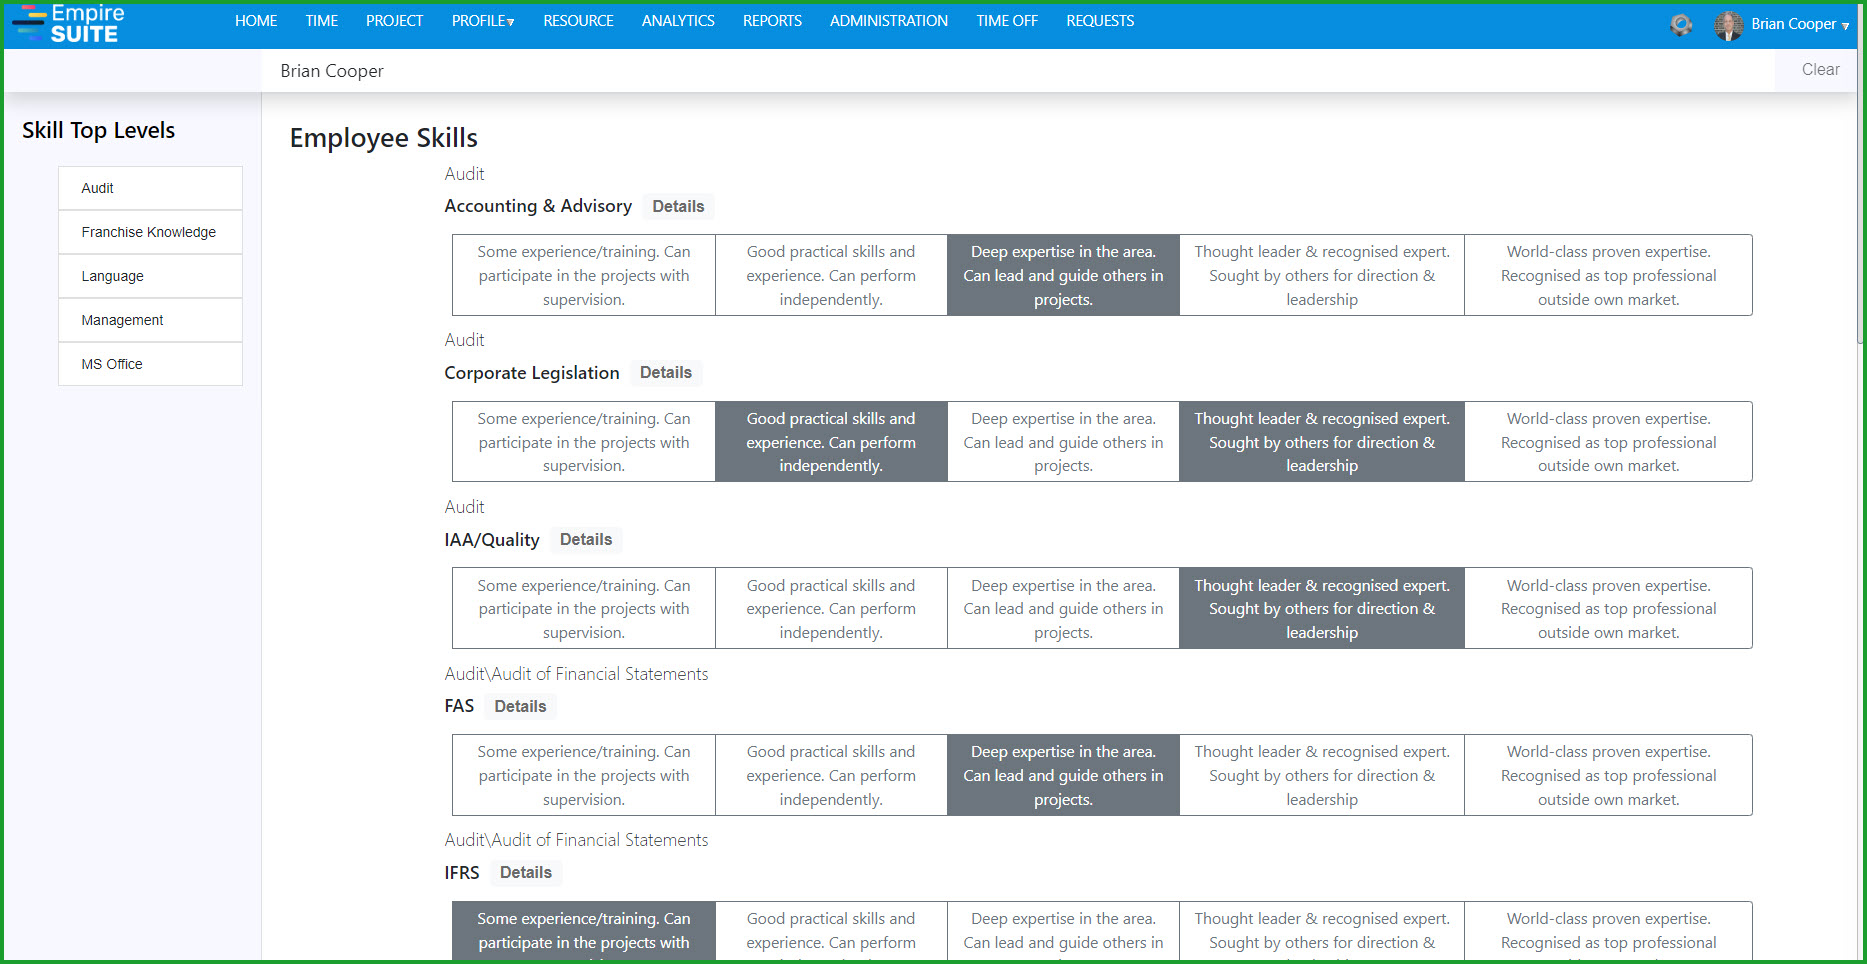
Figure 8 – Skills Page
Click the Details link for a skill to see any Opportunities for users with the skill:
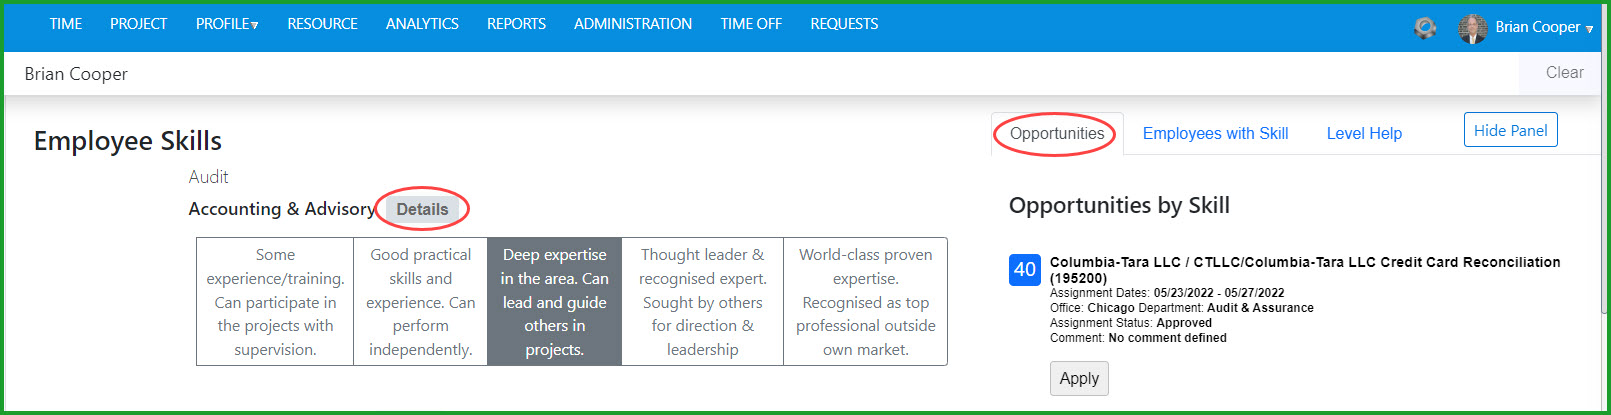
Figure 9 – Skills Detail Opportunities
You can click the Employees with Skill tab to see other employees with the same skill:
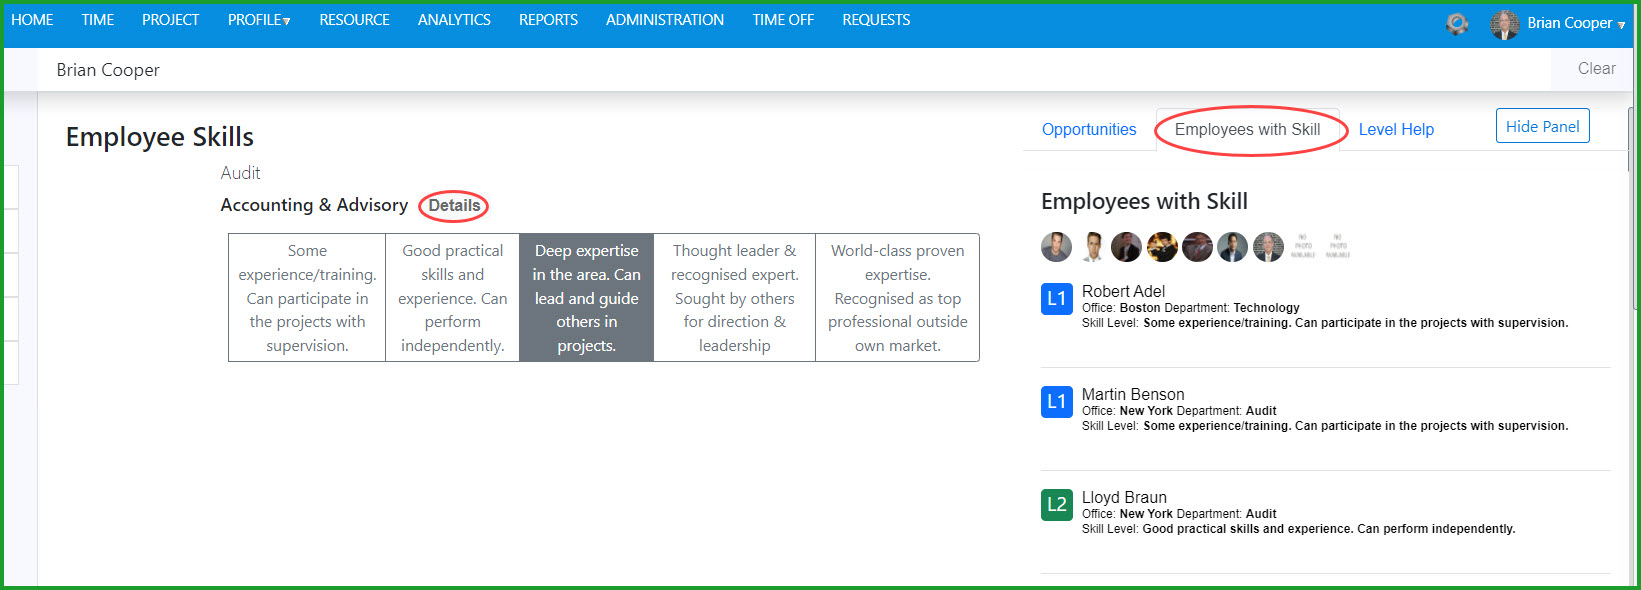
Figure 10 – Employees with the same skill
Click the Level Help tab to see how the proficiency levels are defined for the selected skill:
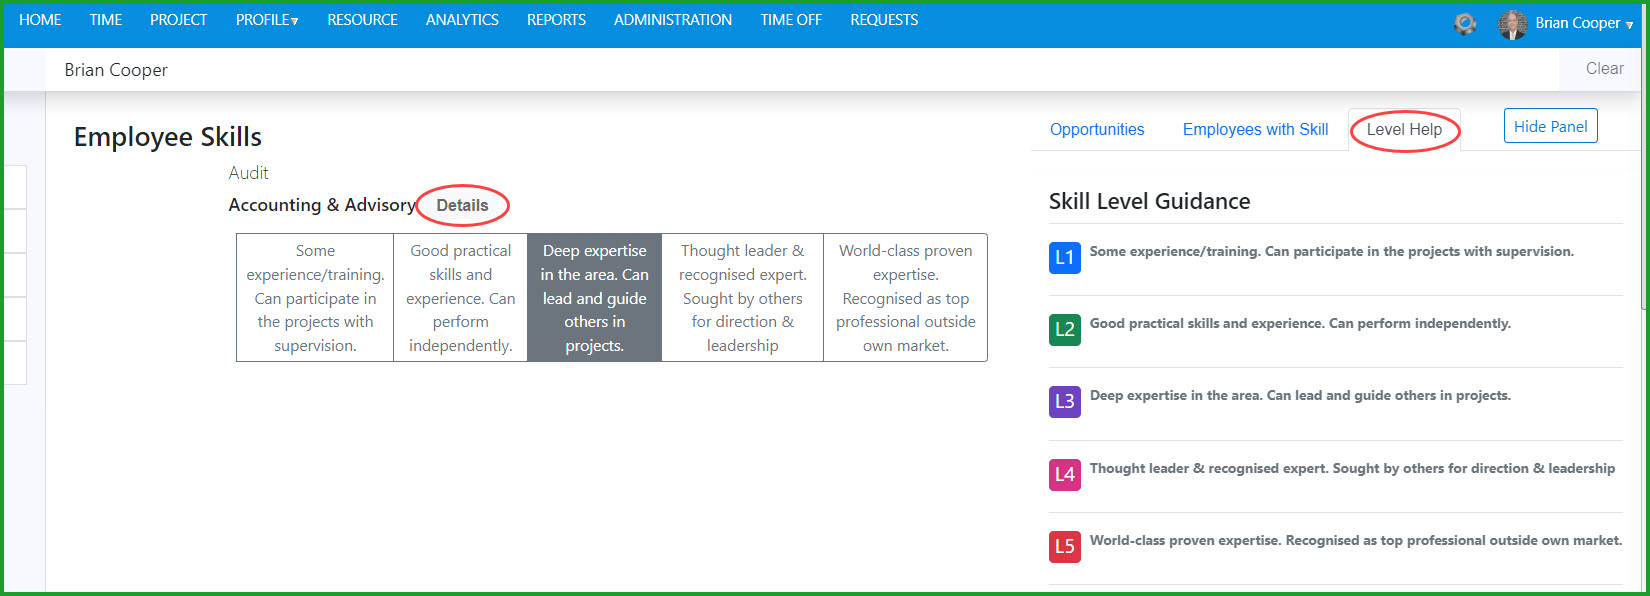
Figure 11 – Proficiency Level Definitions
We’ve also modified the different Skills-related permissions and moved them to the Resource application group. User roles which include Skills – Modify Definitions can define categories, skills and proficiency levels. Users with Skills – Change Others can modify the skills and proficiency levels assigned to other users. User roles with Skills – Modify Self can update their own assigned skills and proficiency levels
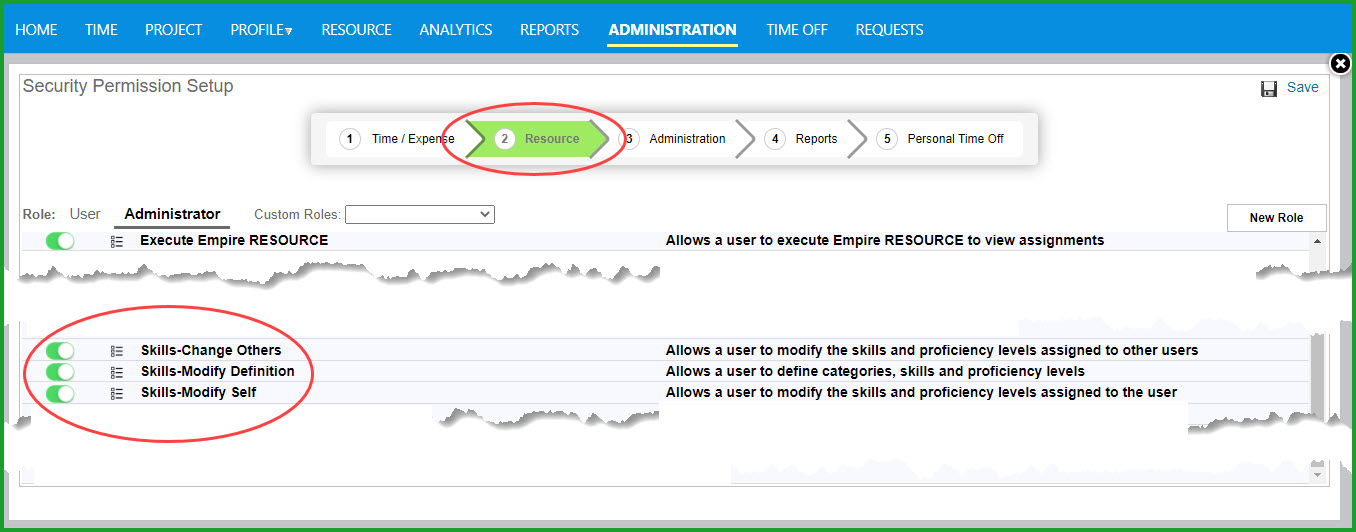
Figure 12 – Skills Permissions
In addition to assigning user skills and proficiency levels through the Employee View page...
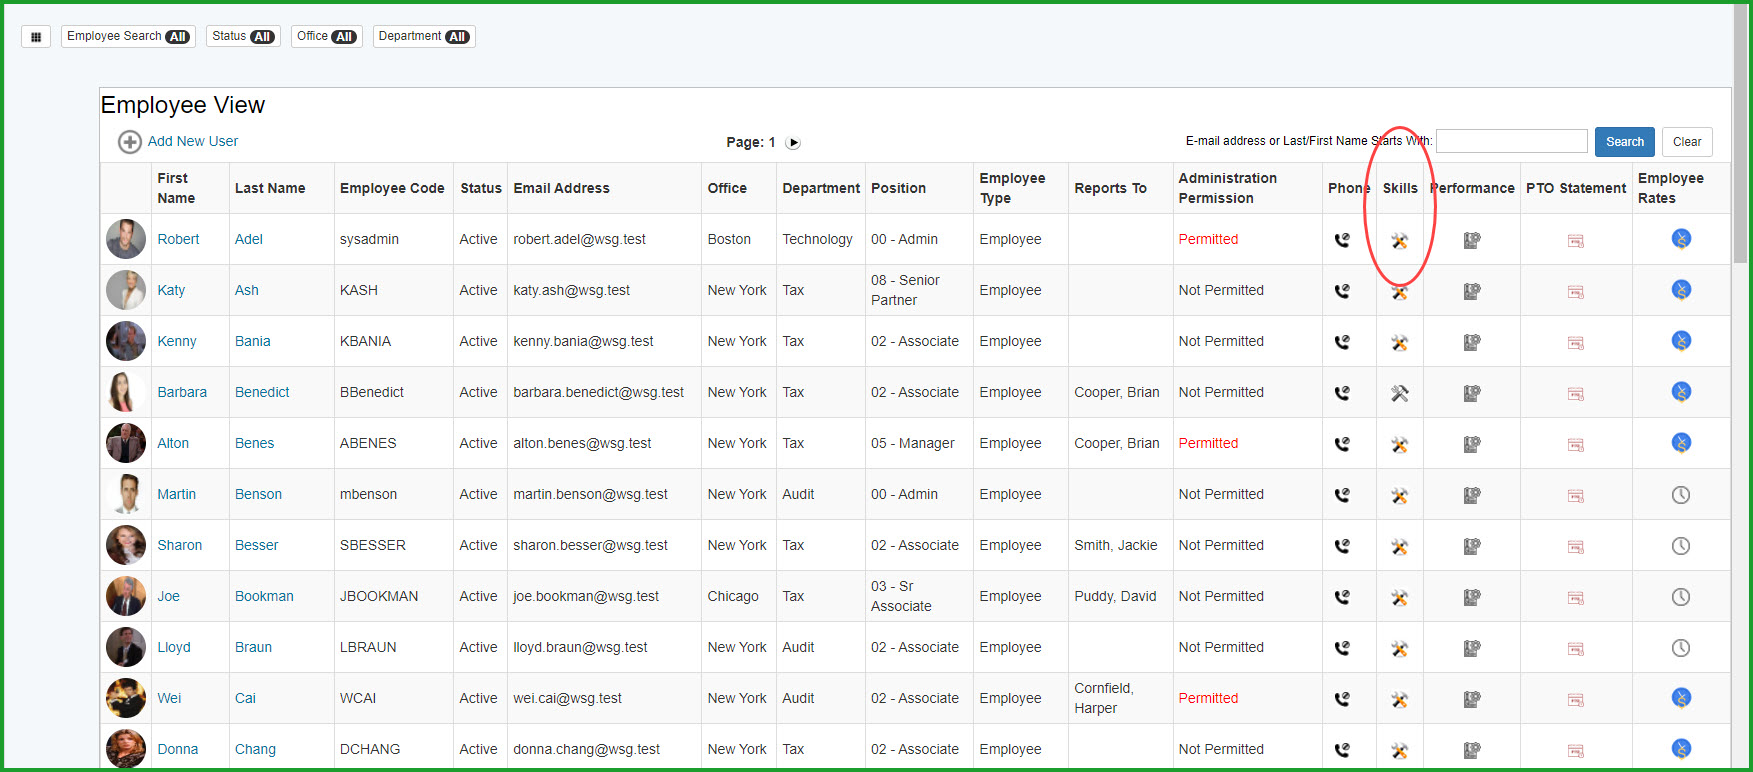
Figure 14 – Employee View Skills Setup
...Users can now modify their own skills from a link on the Profile menu, provided the user has the appropriate permissions. Select Define Your Skills to open the Skills page:
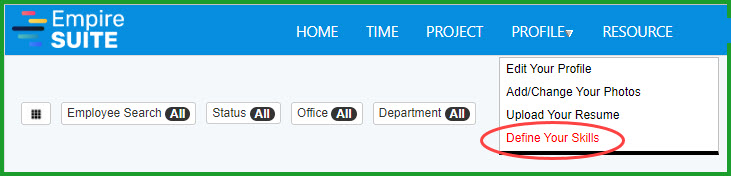
Figure 15 – Define Your Skills menu option
We have also enhanced our Skills functionality so it can be included as a requirement for resource assignments as appropriate.
Improved Empire RESOURCE UI
You can resize the panels on the Empire RESOURCE display by moving the ‘bubble’ left or right as needed:
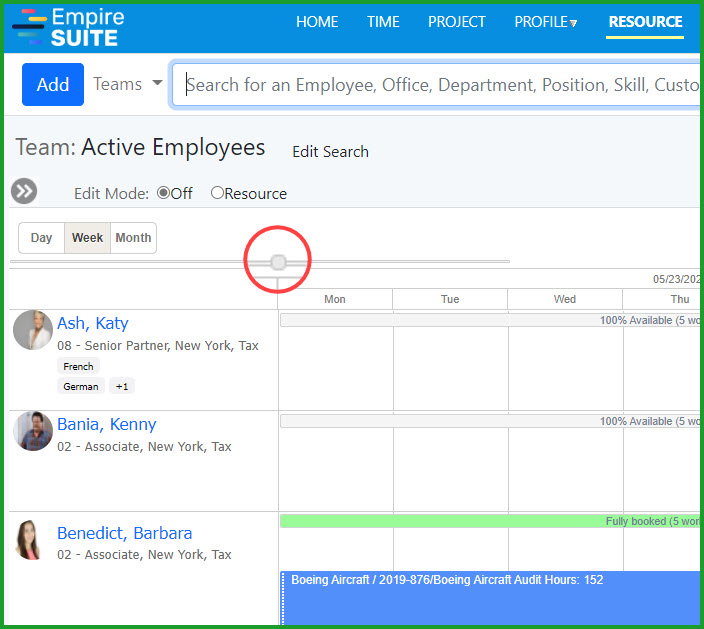
Figure 16 – Empire RESOURCE Page Bubble
You can now resize the New Assignment and Edit Assignment windows to include the left panel. Click the Arrow in the upper left corner...
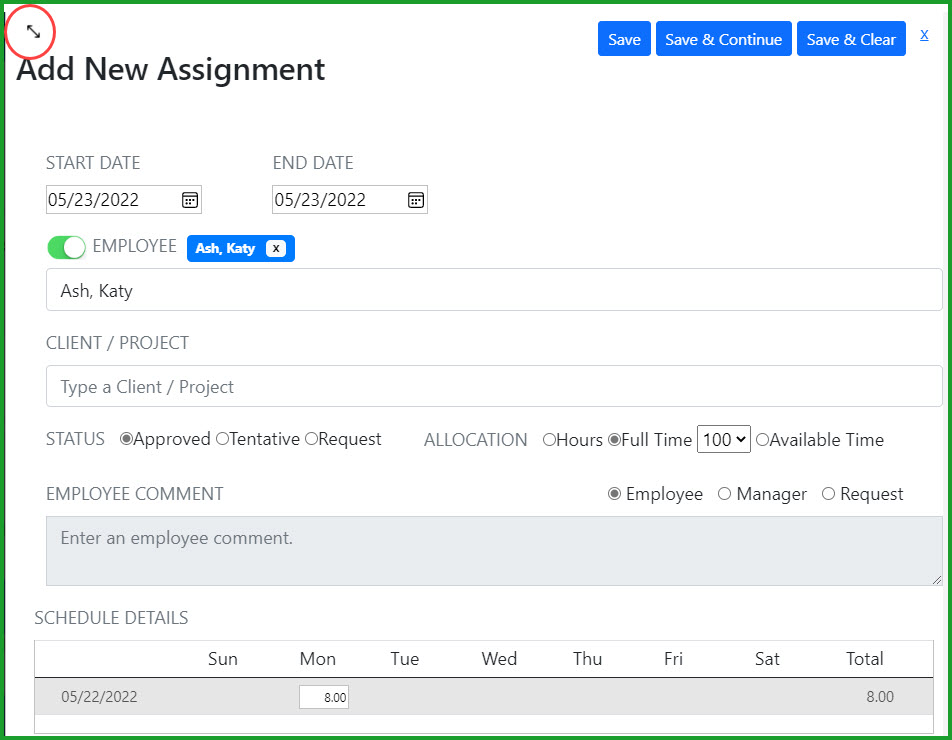
Figure 17 – Assignment Resize Control
...to include (or hide) the left panel resource list:
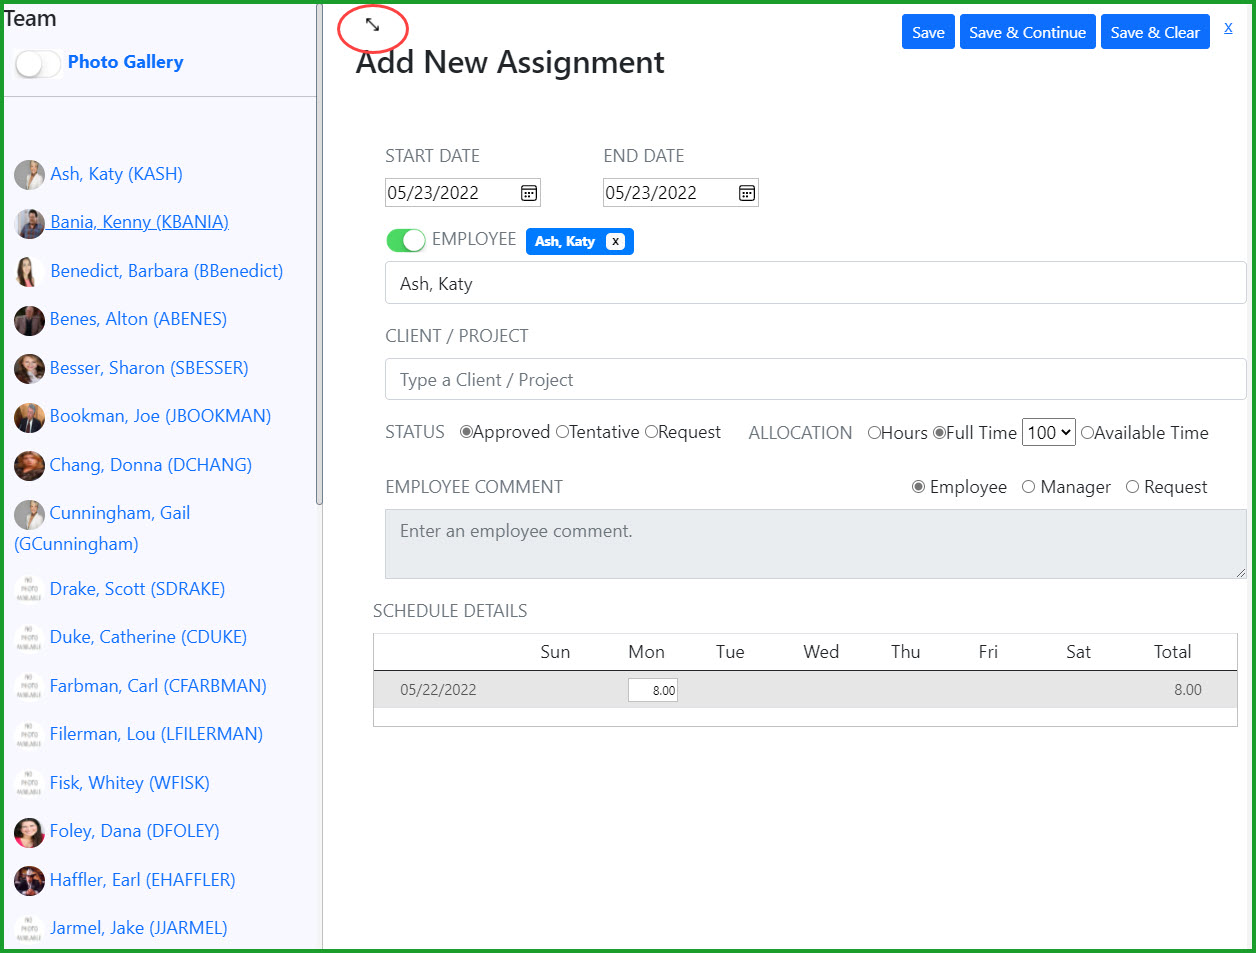
Figure 18 – Assignment Window Left Panel
The setting is saved as a user preference and the page will be displayed the same way each time by the user until the user changes the setting.
We’ve added new Display Options to the bottom navigation bar to help you customize your display:
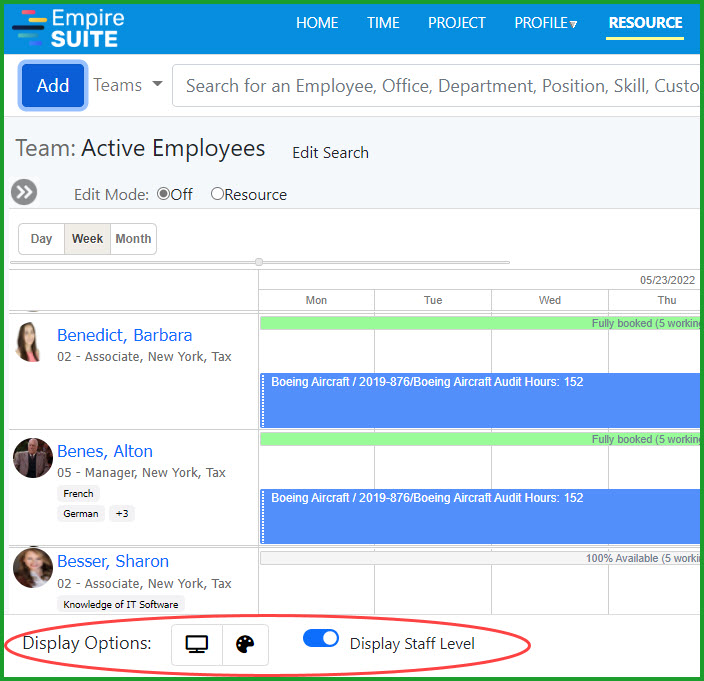
Figure 19 – Empire RESOURCE Navigation Bar Display Options
Click the Display icon to open the Options menu to set the General Options, Assignment Height, Split Assignment rules, etc.
Click the Palette icon to define your Assignment color scheme by Project Class, Approval State or Priority:
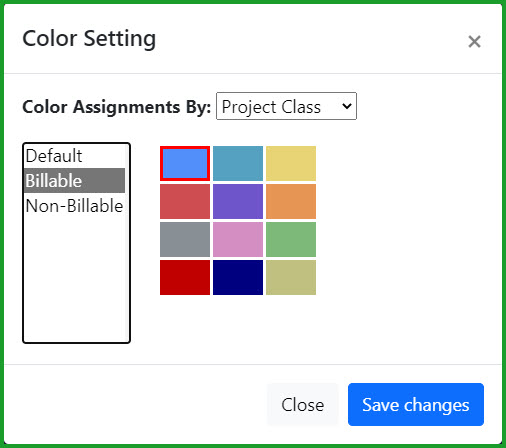
Figure 20 – Color Settings
Click the Staff Level toggle to include or hide Staff Levels in the display
Please note the Color and Staff Level options have been removed from the Settings UI.
Empire RESOURCE UI Now Includes Employee Skills
The left panel of the Empire RESOURCE page has been enhanced to show employee skills:
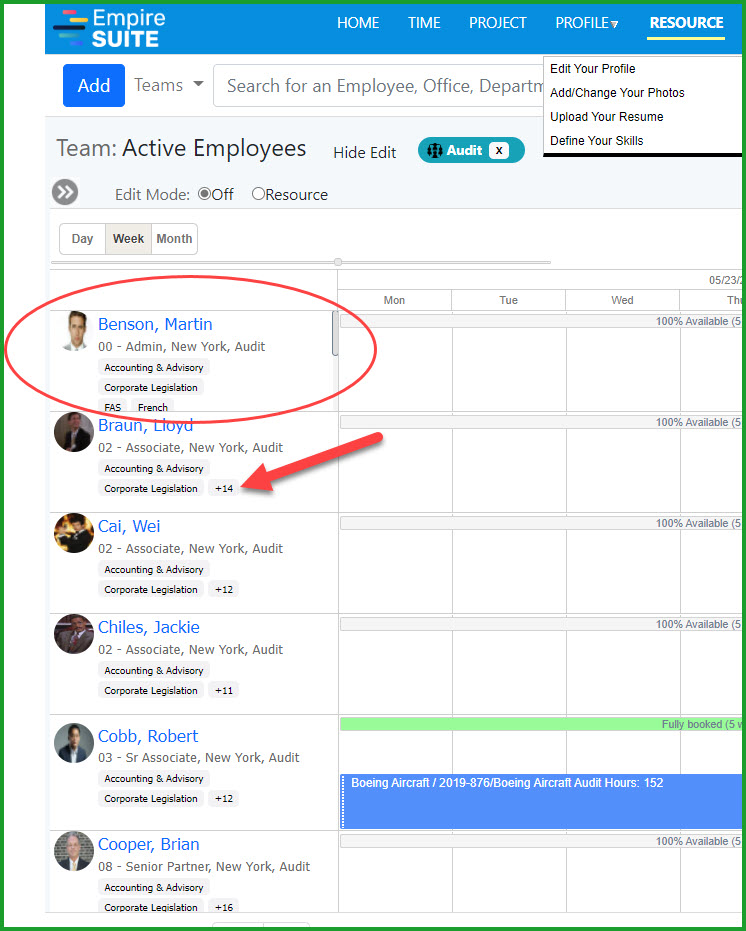
Figure 21 – Empire RESOURCE Employee Skills
Additionally, clicking a skill...
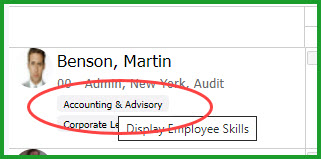
Figure 22 – Display Employee Skills
...will show you other employees with the same skill and their proficiency level in that skill:
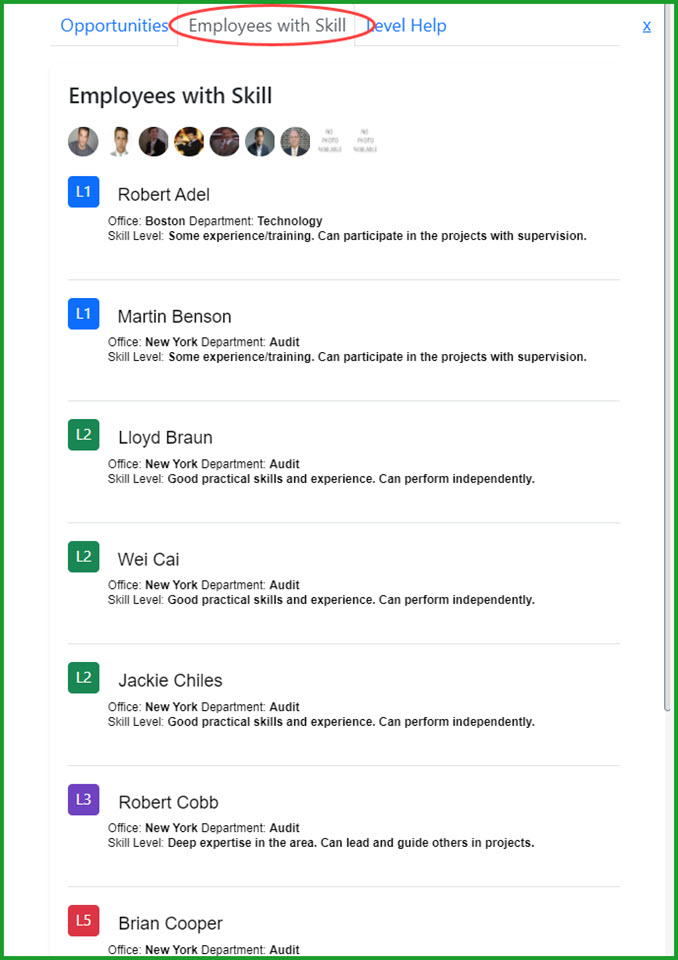
Figure 23 – Employees with the Same Skills
Empire RESOURCE Assignment Requirements
You can now add requirements to any assignment to ensure your schedulers select the best resource for the project – properly skilled and located. From the Edit Assignment or Add New Assignment page, click the Requirements button...

Figure 24 – Assignment Requirements Control
Assignment Requirements can be for any combination of:
- • Staff Level or Position
- • Office
- • Department
- • Skills

Figure 25 – Assignment Requirements
Click the arrow next to any of the Requirements to select the desired elements. For example, the Assignment Requirements are for either an Associate or a Sr. Associate:
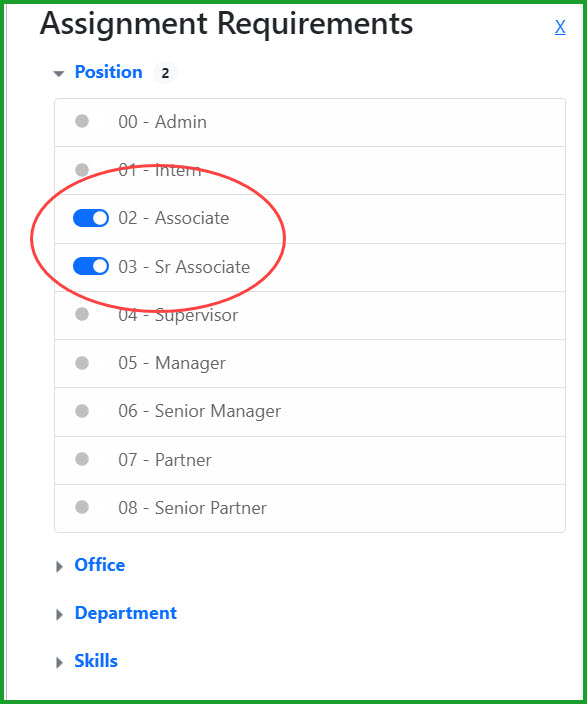
Figure 26 – Assignment Requirements by Staff Level or Position
In the example Assignment above, the scheduler is looking for a Sr Associate, but an Associate would be acceptable as well. These requirements will be noted in Opportunities on the Requests page:
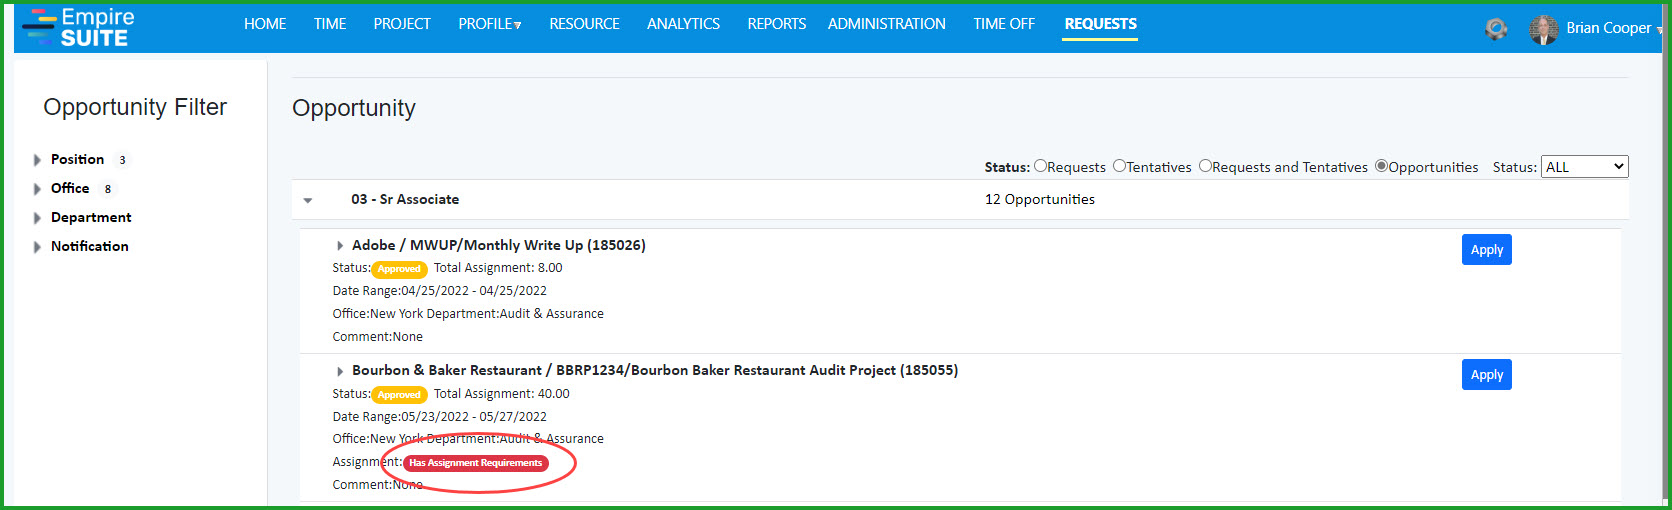
Figure 27 – Opportunity Assignment Requirements
You can click the link to see the Requirements:

Figure 28 – Opportunity Assignment Requirements Details
Resource Assignment Best Match
We’ve added Best Match capability for Staff Level or Position – Unnamed Resources – assignments and requests. If there are no defined assignment requirements, we’ll show the scheduler the best match by using the staff level and then sort by available hours descending. If Assignment requirements have been defined, we will match using the requirements.
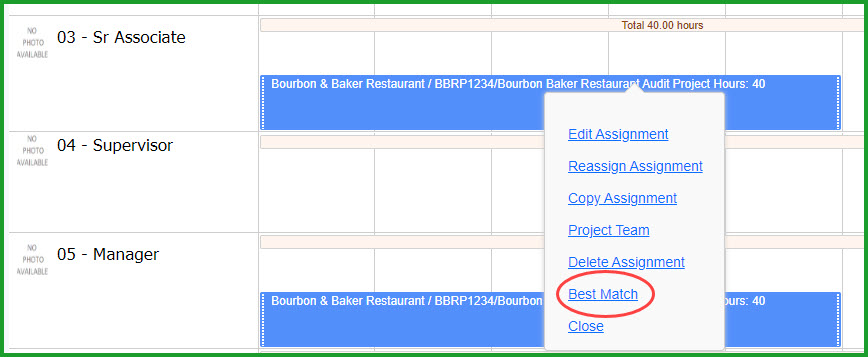
Figure 29 – Best Match
Click the Best Match link to see which resources are best matched by staff level or assignment requirements:
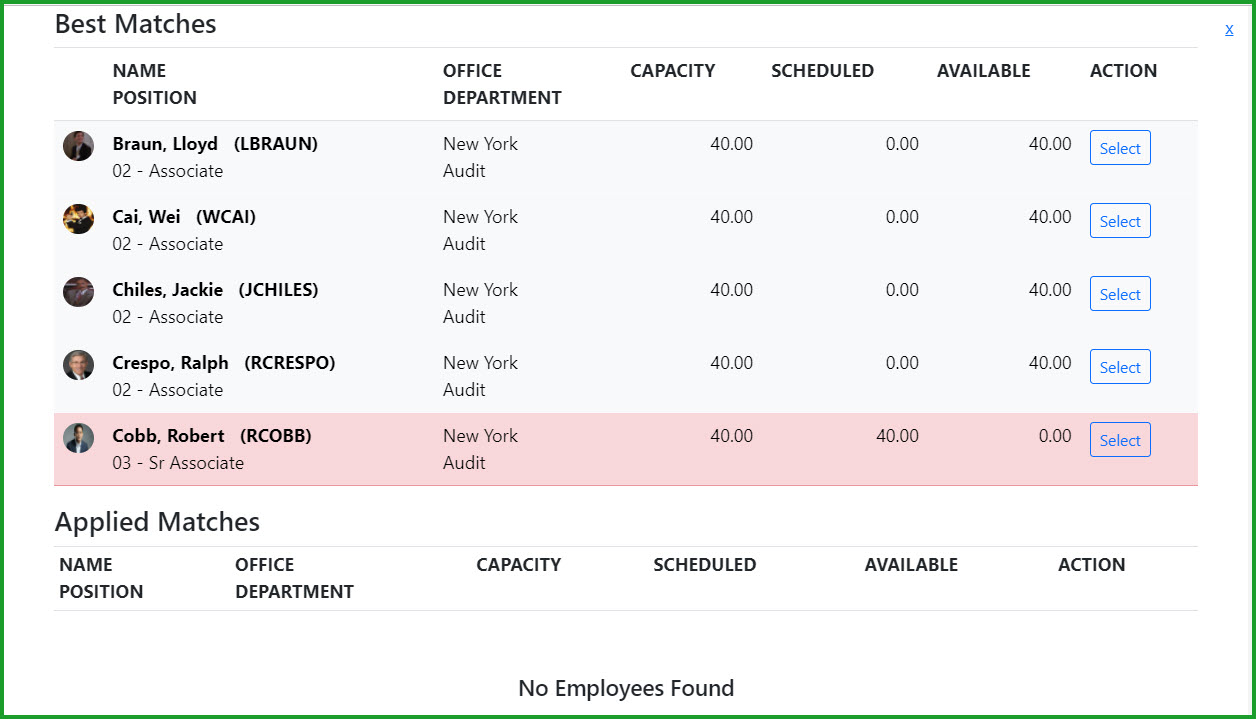
Figure 30 – Best Match Details
The Robert Cobb match above is shaded in red because Robert has no availability and would be overscheduled if he is assigned to the project.
Opportunities
We’ve added a status option for reviewing Opportunities:
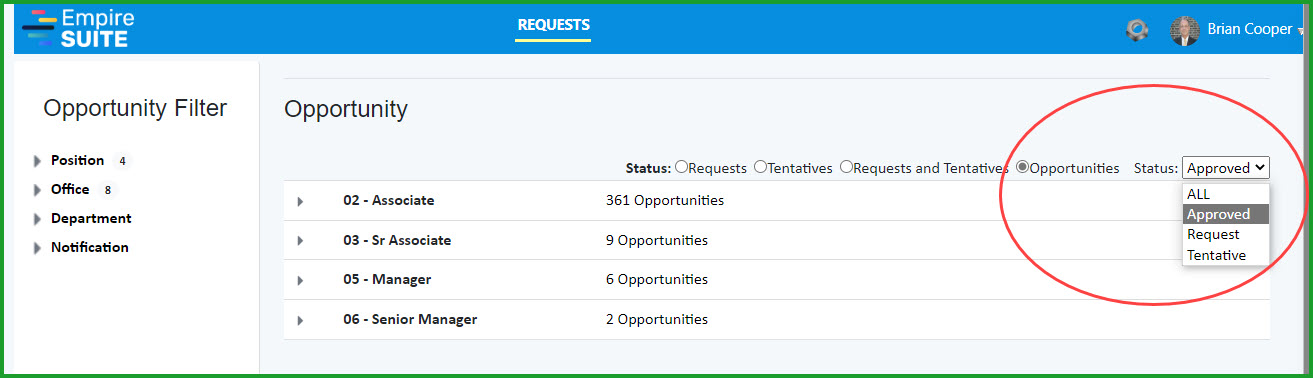
Figure 31 – Opportunity Status Options
Users with the appropriate security permissions can approve multiple assignment requests and tentative assignments with a single click. On the Requests page, select the desired Status (Requests, Tentatives, Requests and Tentatives), the Team and Filter:
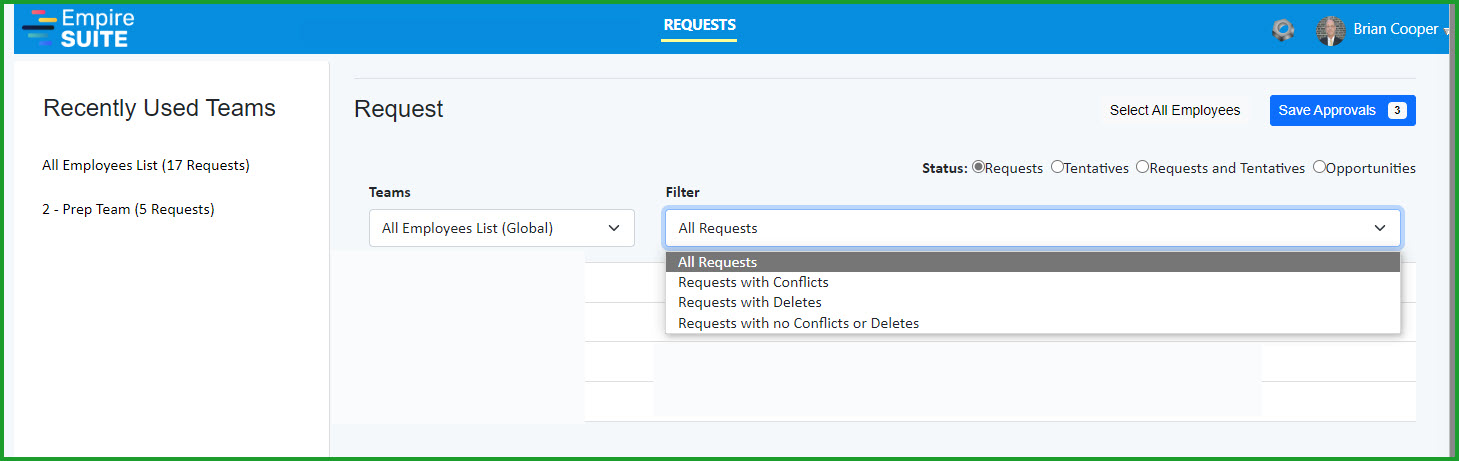
Figure 32 – Request Approval Selection Options
Click the appropriate Select All check boxes, then click Save Approvals:
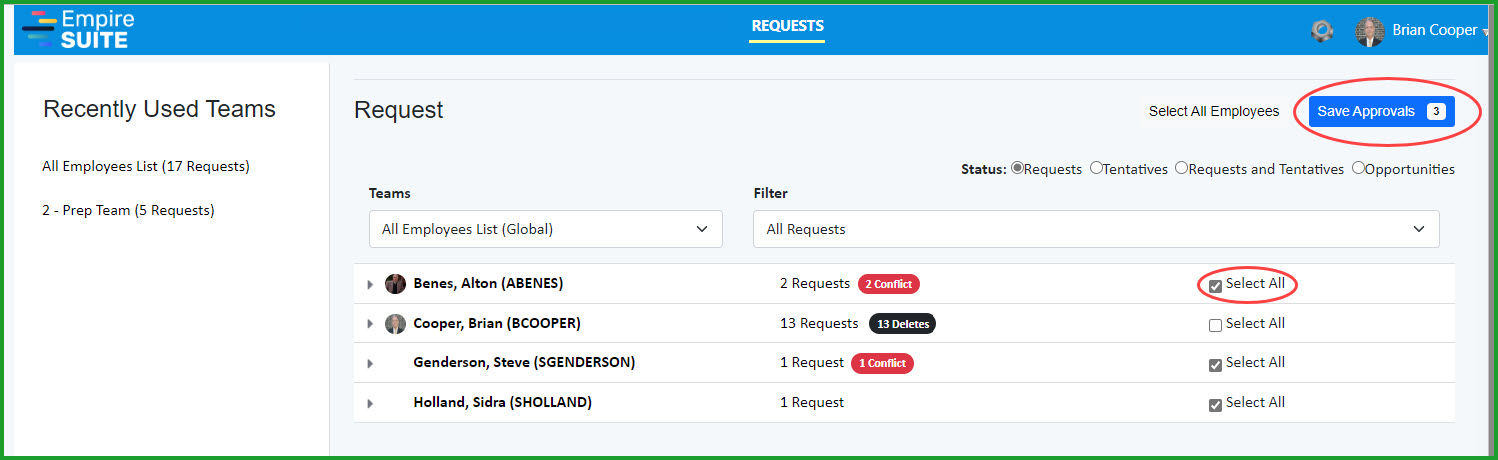
Figure 33 – Multiple Assignment Approval
Users with the appropriate security permission and a valid phone number can ask to be notified with a text message when a new opportunity matching the User’s filters is added. Add the Review Opportunities permission to the user’s Resource application role:
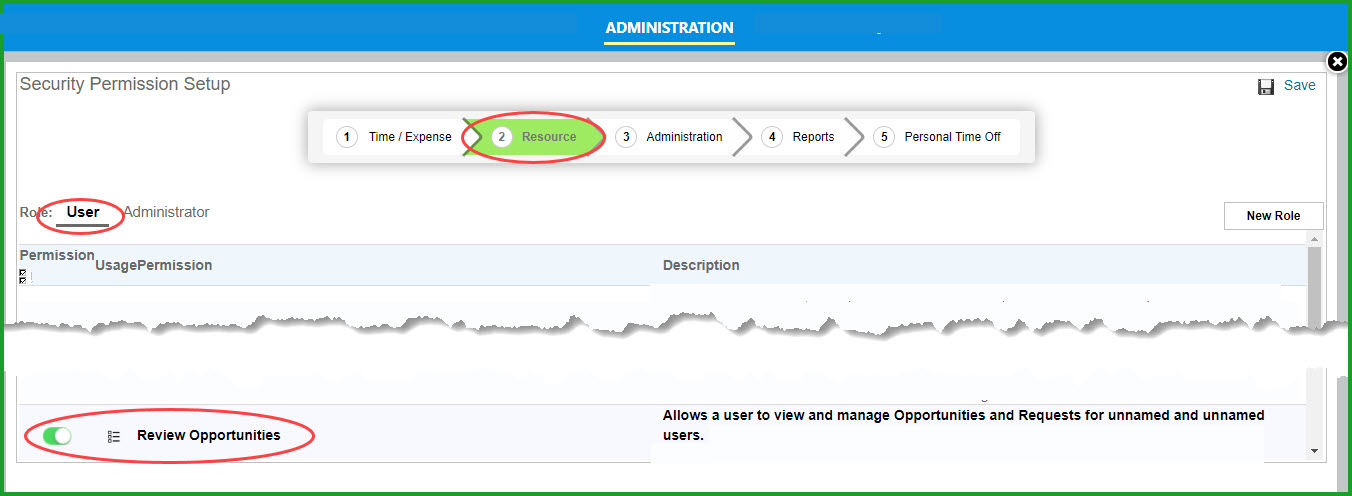
Figure 34 – Review Opportunities Permission
Add a valid phone to the user profile:
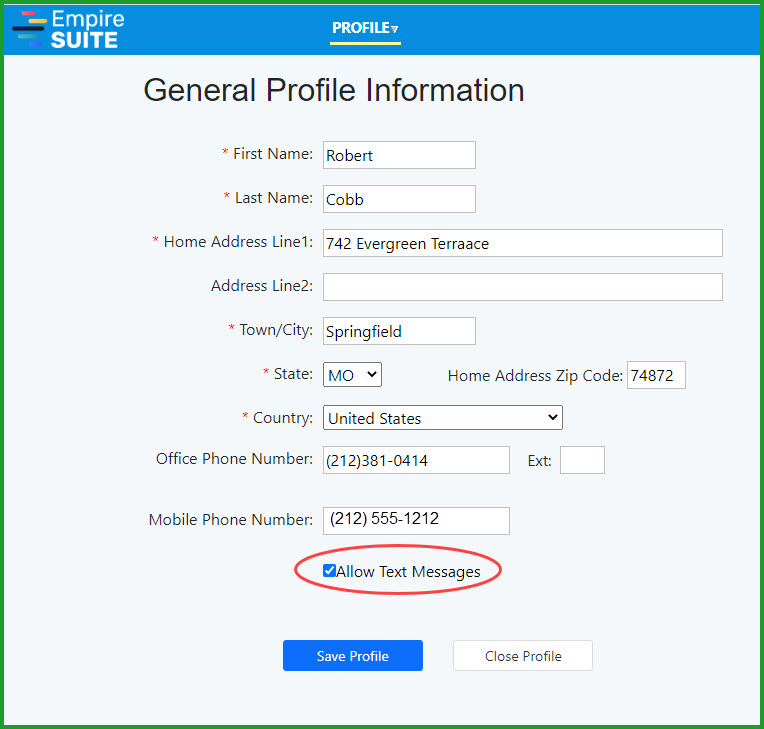
Figure 35 – Allow Text Messages Profile Information
Check the Send me a text when there is a new opportunity box
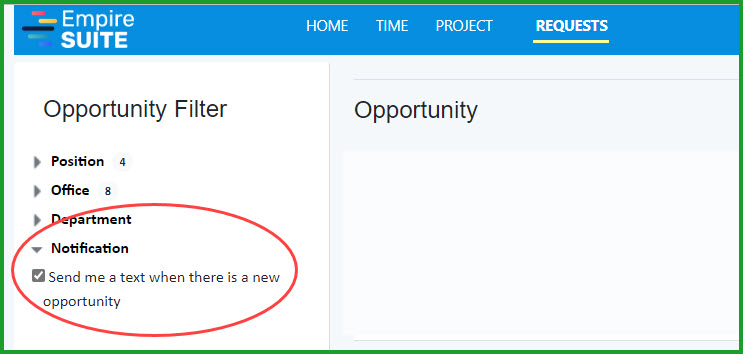
Figure 36 – Allow Opportunity Text Messages
At least one filter must be applied in order for the user to receive a text message. In the above screenshot, the user has selected four different positions and eight different offices to use as filters. Departments can also be used as filters. Any opportunity matching any of the selected attributes will trigger a text message to user:
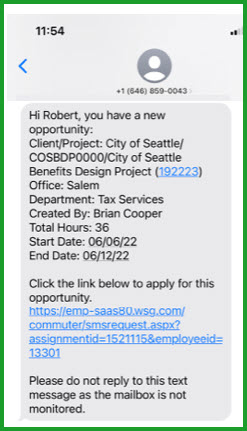
Figure 37 – Opportunity Text Message
The user can apply for the opportunity by simply tapping the link:
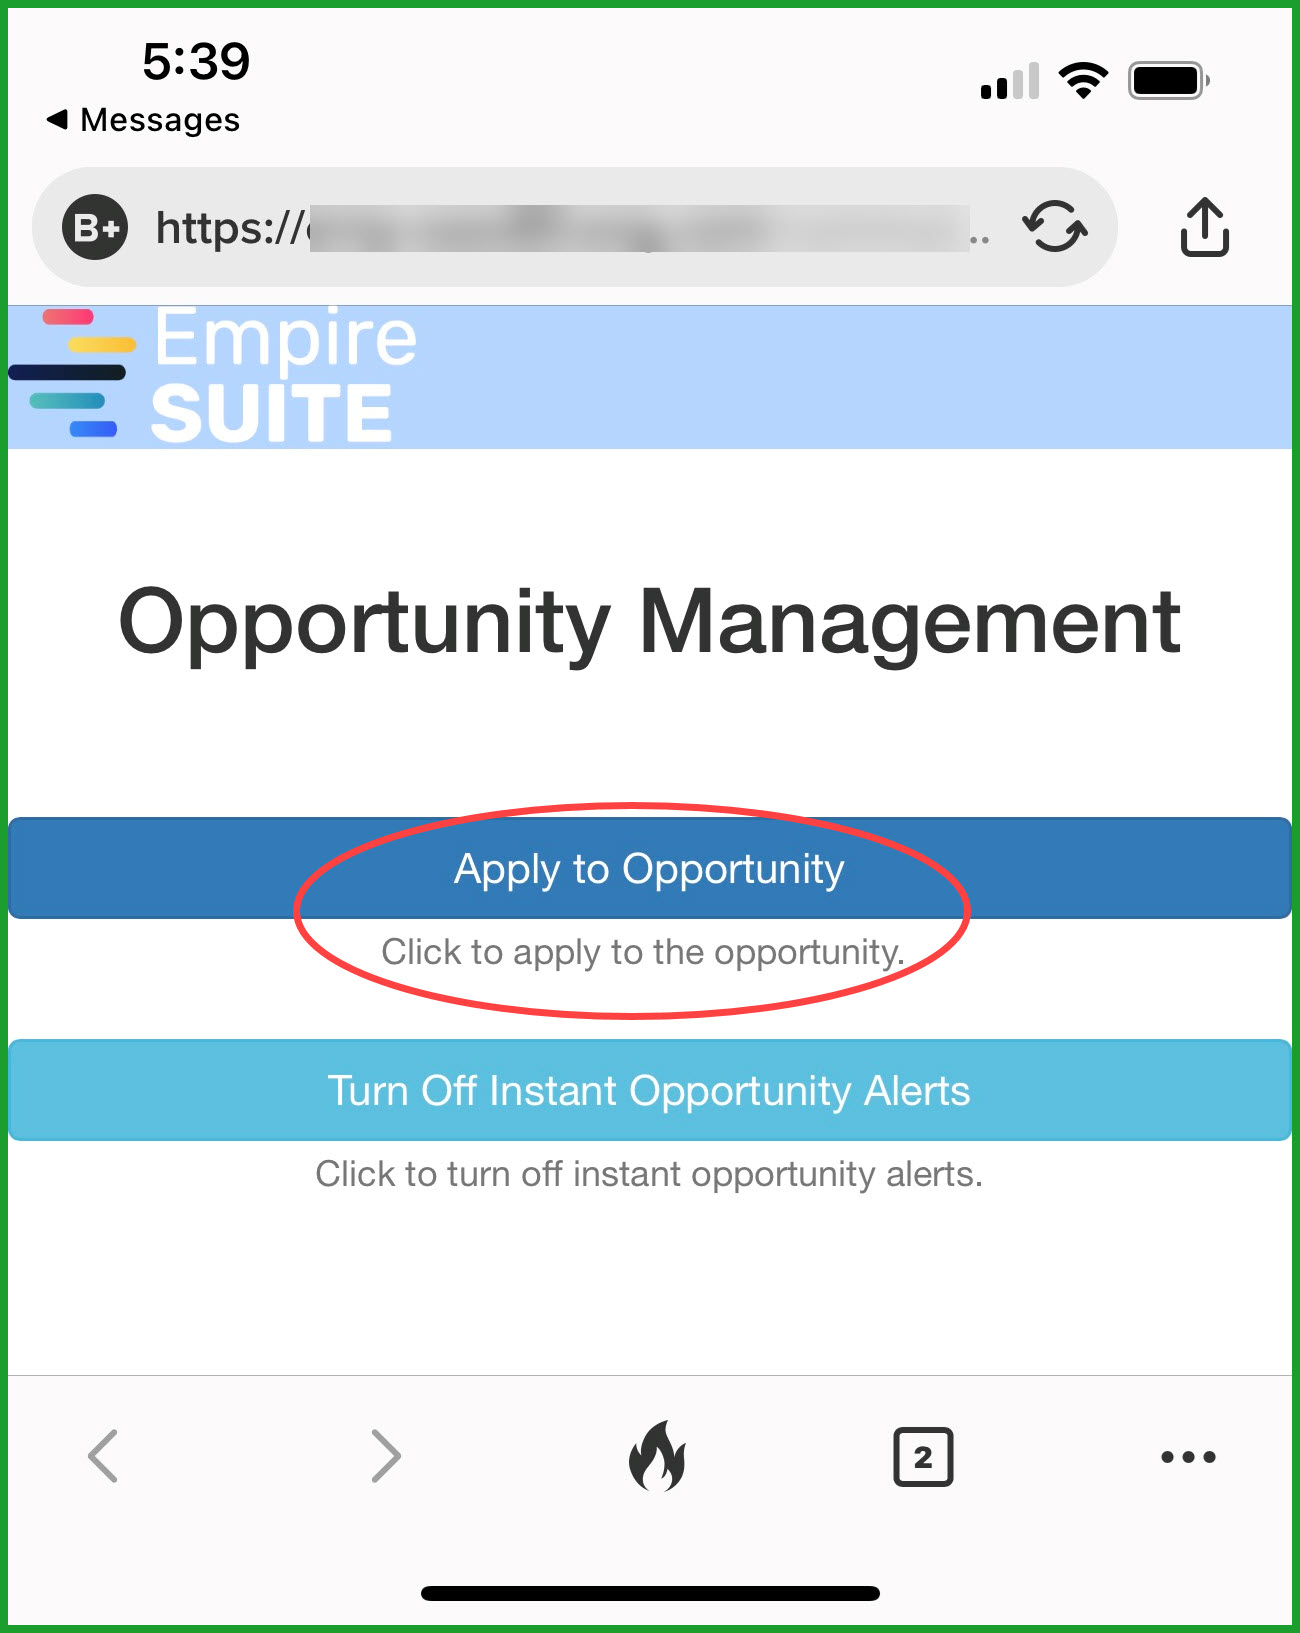
Figure 38 – Applying for an Opportunity Using Text Messaging
Date: January 24th, 2022
What’s New in Empire SUITE January 2022?
Enhancements in this Release
In addition to bug fixes and ongoing performance improvements, we’ve added the following new features to the Empire SUITE
• Empire RESOURCE Analytics page project view
• Enhanced Empire RESOURCE and Analytics Employee Profile view
• Employee profile page address information
• Resource Assignment Excel-based Import
• Improved and reformatted Empire RESOURCE Excel exports
• New “Assignment – Employee Upcoming Schedule with Comments” Email
• Employee and Project/Employee specific rates
• New Company General Settings menu option
• New Approve Assignment permission
• New Review Opportunities permission
• Timesheet Status extract now includes timesheet status information from Terminated employees
Empire RESOURCE Analytics Page Project View
Users can now view and add assignments by project in addition to the existing assignment view by resource. From the Analytics page, click the Project Type radio button to toggle the display from Employee-based to Project-based:

Figure 1 – Project View Toggle
The Project view supports user-defined project Portfolios which use similar type controls as the Teams feature in the Resource view. You can use the Custom Search button to search for projects by client, project name or code, office, department, status, or custom fields. You can save and edit your project Portfolio as you would a resource Team with any combination of the same Global, Criteria and Restricted attributes:
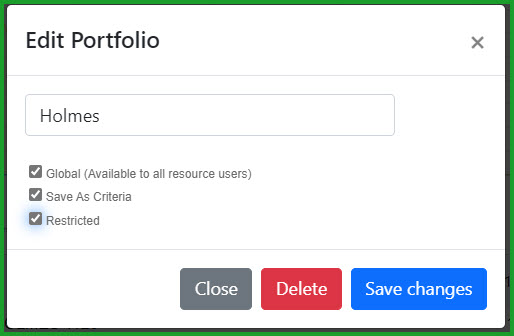
Figure 2 – Project Portfolio
In the screenshot above, we’ve created a ‘Holmes’ portfolio using the client ‘Holmes Fans’ as the criteria basis of the portfolio – that is, any project created for the client Holmes Fans will be automatically included in the Portfolio.
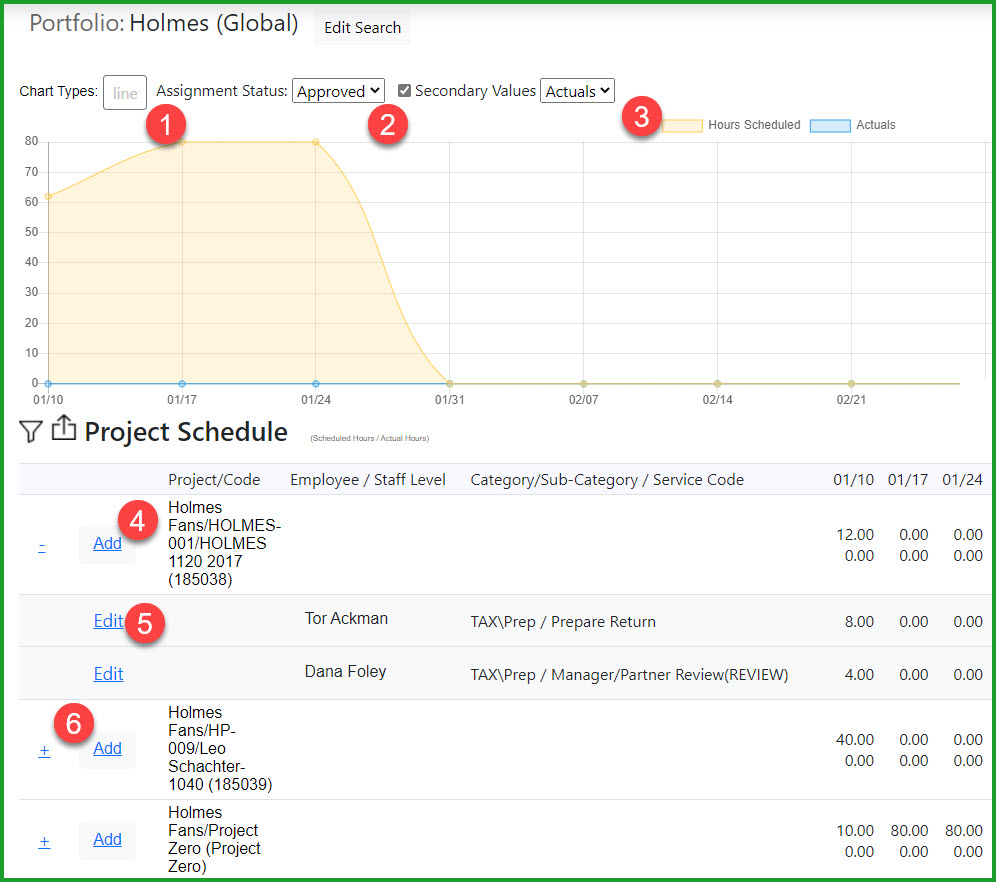
Figure 3 – Project View Analytics Page
A few things to note on the Analytics page Project View:
1. You can select from a variety of different chart types
- a. None
- b. Line
- c. Bar
- d. Doughnut
- e. Pie
- f. Radar
- g. Map
2. You can display the results based on different Assignment Status selections
- a. All
- b. Approved
- c. Tentative
- d. Request
3. You can include Actuals as a Secondary Value in the display. If there are timesheet actuals for the projects in the portfolio, you’ll see them in the chart in a different color
4. Click the Add link to open the Add New Assignment page
5. Click the Edit link to open the Edit Assignment page
6. Click the plus/minus link to expand or collapse the display to summarize the assignments or display the assignment details
Enhanced Empire RESOURCE and Analytics Employee Profile View
To see extensive details about a resource, click the resource picture in the Resource page...
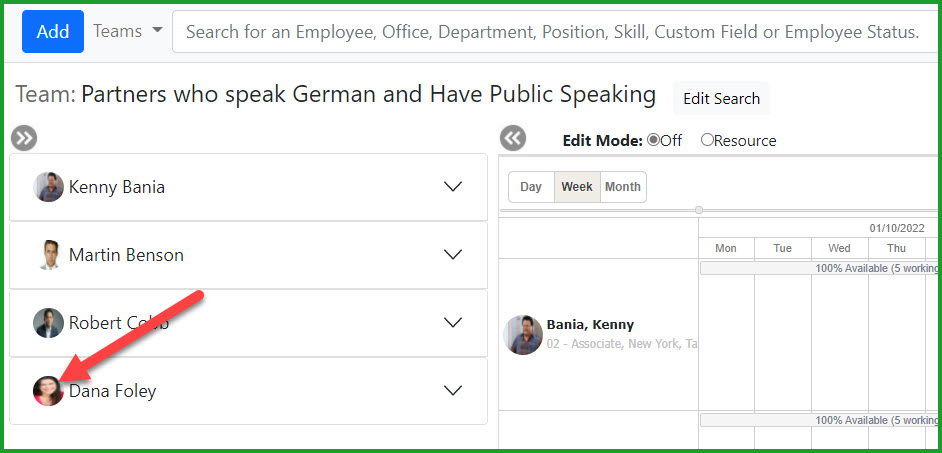
Figure 4 – Resource Profile
...and a complete Employee Profile page will launch to display basic information such as Office, Department and Staff Level information, as well as Skills and Custom Field information:
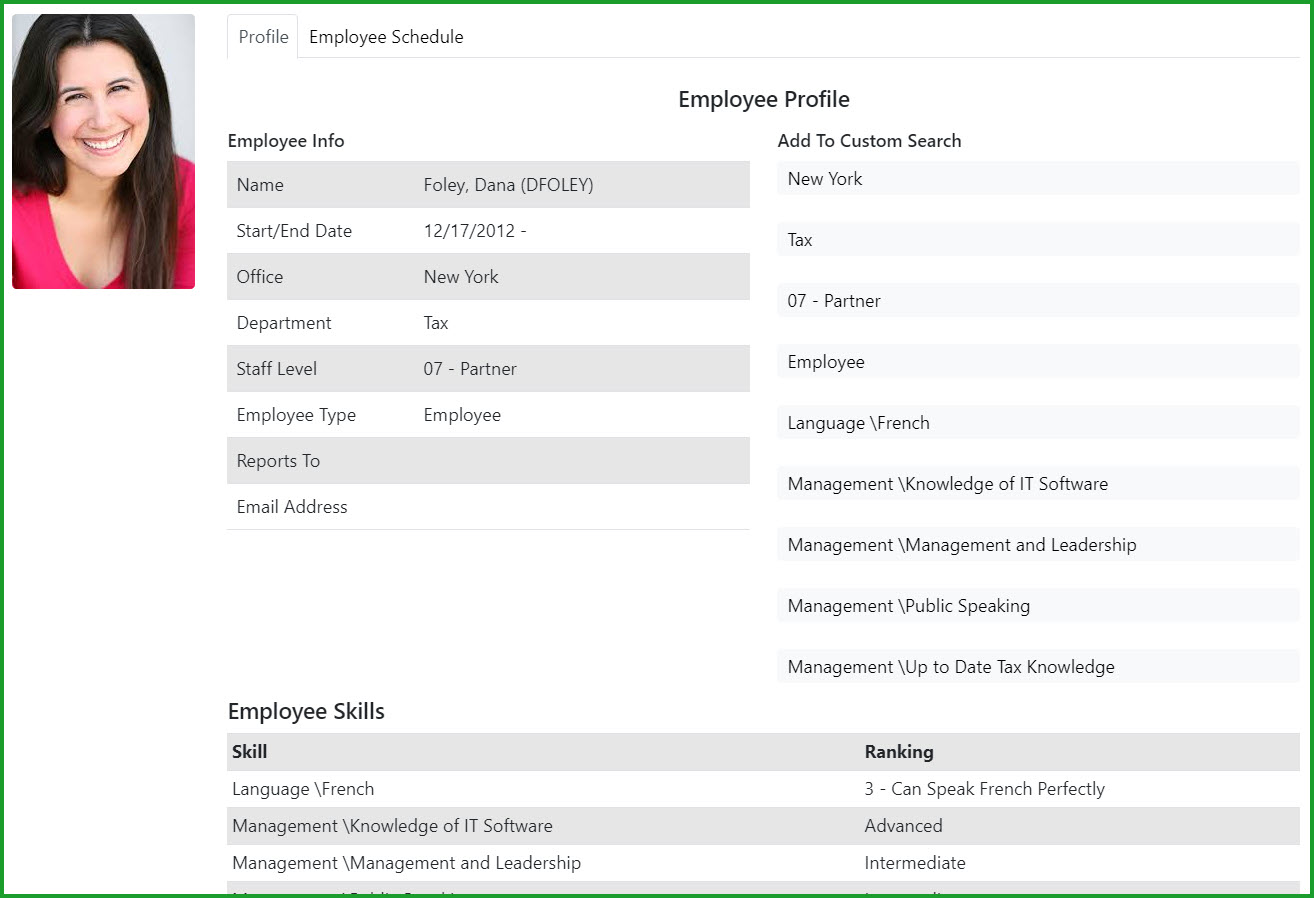
Figure 5 – Expanded Resource Profile Page
Employee Profile Page Address Information
We’ve added fields for employee address and phone information in the Employee Profile page. Click Edit Profile from the Profile option in the Main menu bar:
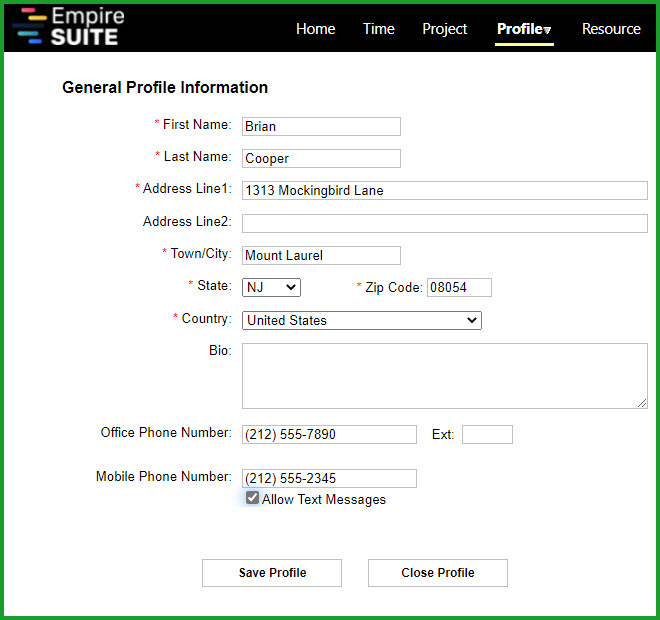
Figure 6 – Employee Address Information
Resource Assignment Excel-based Imports
If you are moving from another scheduling tool into Empire RESOURCE or have been using Excel to manage staff scheduling, you can use the Excel-based import to load assignments into Empire RESOURCE. From the Administration menu, select Loads/Integration, then select either Resource Assignment FTE load or Resource Assignment Hours Load as appropriate:
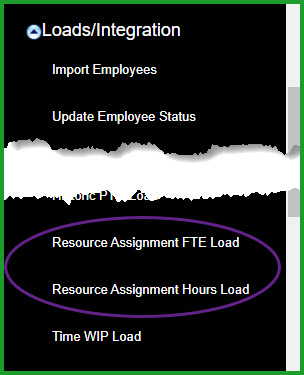
Figure 7 – Resource Assignment Load Options
As with the other imports, you can select a file from your library or download a template file from the Import page.
Improved and Reformatted Empire RESOURCE Excel Exports
We’ve added additional columns and reformatted the Excel Exports available from the Analytics page. Click the Export icon to launch the export:

Figure 8 – Analytics Page Excel Export
The export results now include schedule and actuals information, as well as Task List/Task or Category/Sub-Category/Service code details:

Figure 9 – Excel Export Details
New “Assignment – Employee Upcoming Schedule with Comments” Email
We’ve added a new email type for our customers who want staffers and managers to see comments about upcoming assignments.The Assignment – Employee Upcoming Schedule with Comments email will include comments from Managers, Requesters or Employees on an upcoming assignment.
Email setup is in under the Administration menu in Company \ Email Setup
Employee and Project/Employee Specific Rates
Employee Specific Rates
To define a rate for an employee to use on all projects, select Employee \ Employee Rates from the Administration menu:
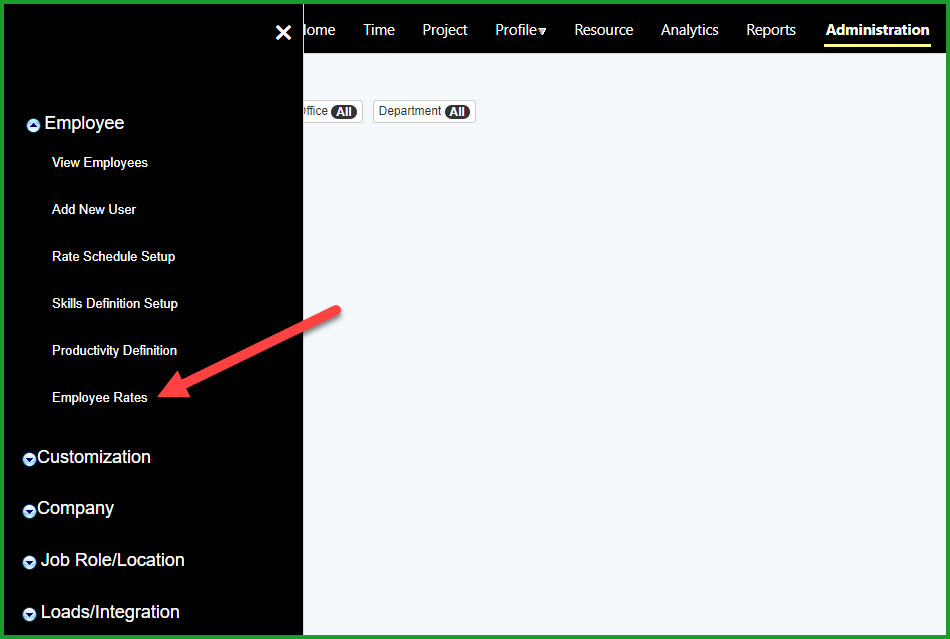
Figure 10 – Employee Rates Menu Option
Project/Employee Specific Rates
To define a rate for a specific employee on a specific project, select the desired project, then select Define Rates from the Project menu:
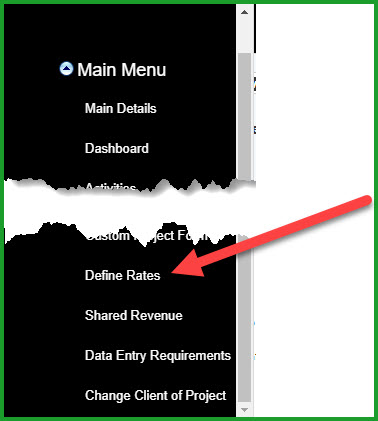
Figure 11 – Project Employee Specific Rates Menu Option
Select the appropriate employee from the drop-down list...
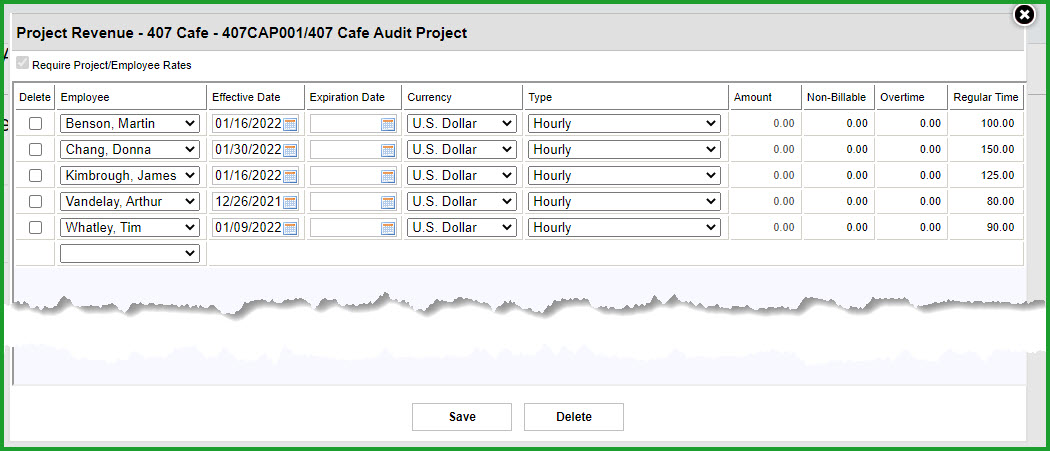
Figure 12 – Project Employee Specific Rate configuration
...and add the Effective Date, Expiration Date, Type and amounts as desired. A few notes about Rate Types and configuring Employee and Project/Employee rates are found below in the Rate Types section.
Rate Types
Hourly rates are the default rate type. A few other things to note about configuring Employee and Project/Employee Rates:
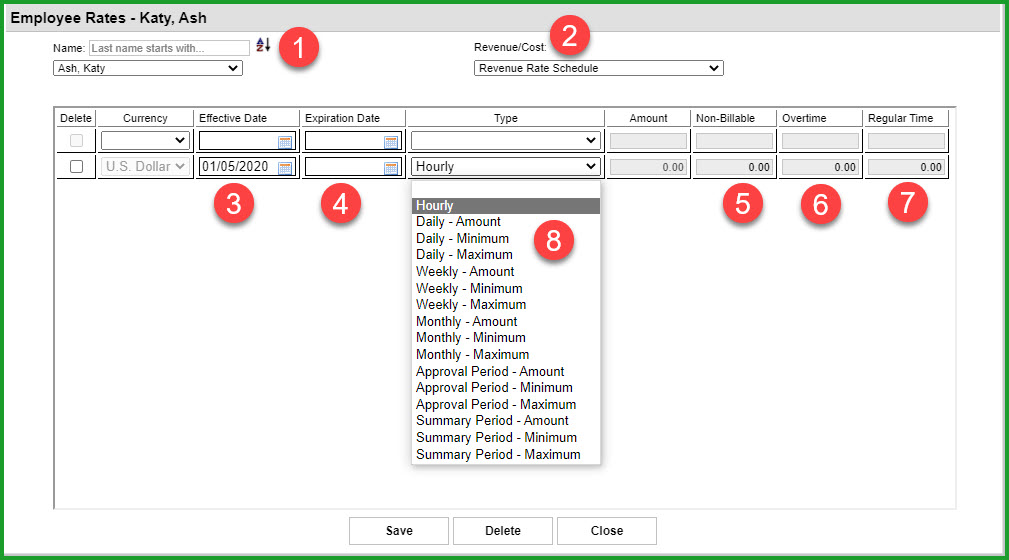
Figure 14 – Employee Rate Configuration
While the screenshot above is for Employee Rate setup, the same rules apply for Project/Employee rates:
1. Use the Last name starts with option to find the desired staffer, or use the drop-down list to pick from the list of employees
2. Use the drop-down list to select either Revenue or Cost rates
3. Enter a date or use the date control to select the rate effective date. Please note rates must start on the first day of a timesheet approval period, and if you select a date other than the first day of an approval period, the effective date will change automatically to the first day of the approval period which includes the selected date. In other words, if your timesheet approval periods start on Sunday and you select a Tuesday as the rate effective date, the application will change the rate to start on Sunday automatically
4. You can enter an expiration date, or leave the expiration date field empty if you would like the rate to be applied indefinitely. As with effective dates, if you enter an expiration date, the selected date must be the last day of an approval period or the application will change the date automatically to be the last day of an approval period
5. If applicable, enter a Non-Billable hourly rate
6. If applicable, enter an hourly Overtime rate
7. If applicable, enter an hourly Regular Time rate
8. If applicable, select the desired Rate Type. In addition to Hourly rates, you can also define rates by day, week and month.Please note Rate Types such as Daily Amount, Daily Minimum, etc., apply only to Revenue rates. Only the Hourly Rate type is available for Cost rates. In all cases, differences between the Amount specified and an extended amount based on the hours worked for the selected period and the regular time hourly rate will be captured as an Unplanned adjustment. To illustrate what mean by Daily Amount, Daily Minimum and Daily Maximum, consider the following example where the hourly revenue rate for a resource is $150 per hour and the defined value for each daily type is $1,000:
- a. Amount – Regardless of the hours recorded for the selected period, the total revenue or cost for the period will be the defined amount. If the resource worked 8 hours, the revenue for the day will be $1,000 and $200 will be written off as an unplanned adjustment. If the resource worked 6 hours, an additional $100 write up will be applied so the daily amount is $1,000
- b. Minimum - Approved time of any amount will generate $1,000 in revenue for the day
- c. Maximum – Irrespective of the total hours approved, the maximum amount of revenue recorded for the day will be $1,000
New Company Menu Item – General Options
The options associated with the Tenant Owner – Time and Expense Approvals, Time and Expense Corrections, Rate Types and Self Schedule Default Status – have been moved to a separate menu option, available from Administration \ Company \ General Options:
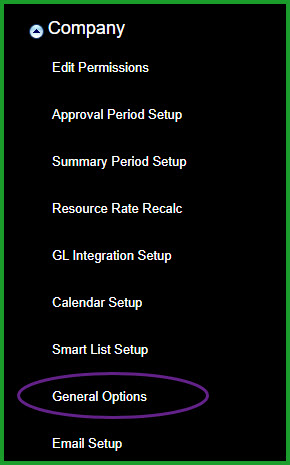
Figure 15 – General Options
Here’s a screenshot of the General Options page:
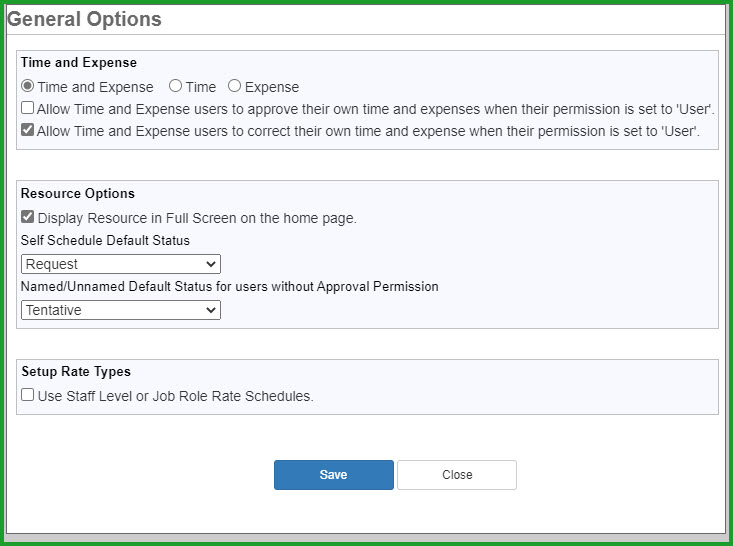
Figure 16 – General Options Controls
New Approve All Resource Assignments Permission
We’ve added a new permission called ‘Approve All Resource Assignments’ to address instances where firms want to allow self scheduling and manager created requests and tentative assignments, but want to reserve the ability to approve assignments to an administrator or a scheduling manager.
This new permission works in concert with the existing Add, Modify and Delete assignment permissions for self-scheduling, named and unnamed resources.
Additional information on the new permission and how it interacts with other permissions, the resource options defaults shown in the General Options Controls screenshot above and other system features is provided below:
Add New Assignment/Edit Assignment Page
If a user’s Security Role is configured as below...
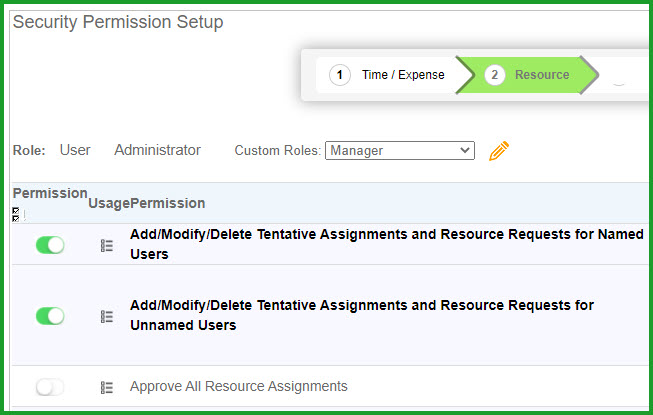
Figure 17 – Resource Security Permissions
...and the Resource Options default status is set as below...
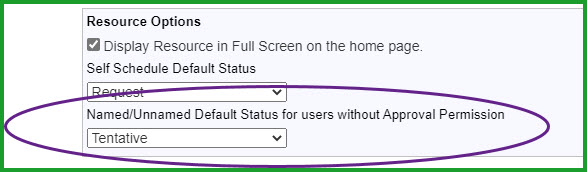
Figure 18 – General Options Resource Assignment Defaults
...the available assignment statues in the Add New Assignment and Edit Assignment pages will be limited to Tentative only:
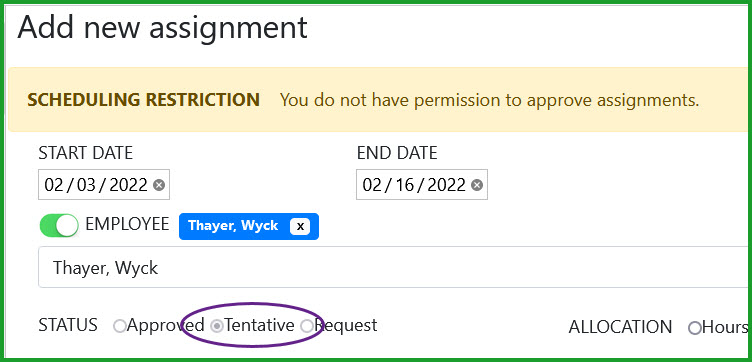
Figure 19 – Add New Assignment Limits
For this user, the same rules apply to creating assignments for unnamed resources – the user would be limited to creating Tentative assignments.
Users with the Approve All Resource Assignments permission...
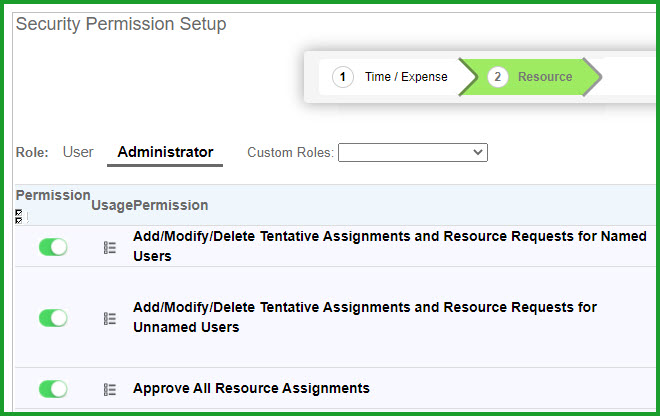
Figure 20 – Approve All Resource Assignments Permission
...can create Approved or Tentative assignments, as well as requests:
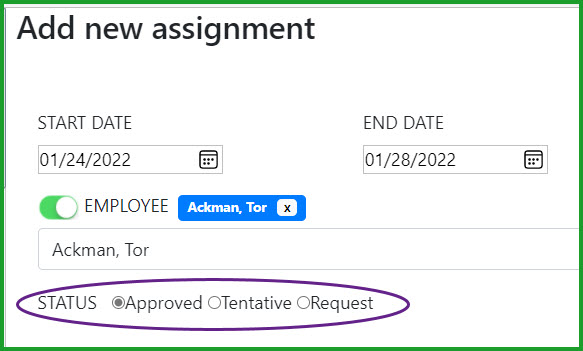
Figure 21 – Add New Assignment – All statuses
A couple of other items to note:
• When dragging or extending an assignment for either named or unnamed users, users without the Approve All Resource Assignments permission will have the assignment saved in the status set by the default self-scheduling permission setup in General Options. If they have the approval permission then we will leave the assignment status as is.
New Review Opportunities Permission
We’ve added a new Review Opportunities permission in conjunction with the new Approve All Resource Assignments permission to give users more options for viewing and managing requests and opportunities.

Figure 22 – Requests Menu Option
The Requests menu item is associated with two permissions:
• Review Opportunities
• Add/Modify/Delete Tentative Assignments and Resource Requests for Named Users
If the user has either one of the above two permissions in their Resource security role, the Requests menu option is enabled.
Requests Page Behavior Changes
We have also modified the Requests page behavior to better conform with the new Approve All Resource Assignments and Review Opportunities permissions.
• If the administrator has set the General Options page Resource Options for Named/Unnamed resources to ‘All Statuses Available’ or if the user has the ‘Approve All Resource Assignments’ permission, then the user will be able to use any of the status radio buttons. The user can select any assignment, request or opportunity, regardless of status. The user will be able to approve, change an assignment to Tentative or Request status, as well as reject modifications made by another user. The ‘Select All’ button will also be available as well which will allow the user to approve all selected items in a single save.
• Users with the Add/Modify/Delete Tentative Assignments and Resource Requests for Named Users permission alone also gives them the ability to manage the opportunity view
• Users with the following configuration will be able to launch the Requests page, but will be limited to Opportunities only. These users can set their filters (staff levels, offices, etc. ) and can Apply or Unapply for the displayed assignments, but will not be able to drill down into Best Matches or see other users who have applied for the same assignment:
- ♦ Review Opportunities permission enabled
- ♦ Add/Modify/Delete Tentative Assignments and Resource Requests for Named Users permission disabled
- ♦ The Resource Option in the General Option page for ‘Named/Unnamed Default for users without the Approve All Resource Assignments permission is
not set to us is not ‘All Statuses’ but they do have the ‘Review Opportunities’ permission they will have access to an opportunity only view.
If you have questions about your specific requirements and how the various options should be configured to best match your needs, please contact your WSG Support resource.
Timesheet Status Extract Now Includes Missing Timesheets from Terminated Employees
The Timesheet Status Extract, available in Administration \ Loads/Integrations, provides an Excel-based spreadsheet with Timesheet status results based on user-selectable criteria for:
• Timesheet Status
- ♦ Not Yet Active
- ♦ Active
- ♦ Submitted
- ♦ Approved
- ♦ Rejected
• Employee Type
• Approval Period Range
The extract now includes timesheets from all employees, regardless of employee status, during the selected approval period range.
Date: October 25th, 2021
What’s New in Empire SUITE October 2021?
Enhancements in this Release
In addition to bug fixes and ongoing performance improvements, we’ve added the following new features to the Empire SUITE
• Saved Criteria Searches in Empire RESOURCE
• Employee Status and Skills are now Custom Search attributes
• Microsoft Teams Empire SUITE Bot for time off management
• Excel-based imports for updating employee status and Reports To managers
• Team names can be edited in the All Teams page
• New ‘View Others’ permission for the My Schedule portal
• Current Period v Last Unfinished Period Timesheet entry option
• Future Exception Time events now available in Empire RESOURCE
• Updated Tenant Owner page
• Requests and Opportunities View
• Post Time from the Resource Page
Empire RESOURCE Saved Teams with Saved Criteria Searches
Users with the appropriate security permission can now create and save Teams while using either the Resource or Analytics views, and can also save teams using saved criteria searches. For example, you can create an ‘Active Chicago Tax’ team using the ‘Active’ employee, ‘Chicago’ office and ‘Tax’ department filters:

Figure 1 – Saving Teams from Resource View
When you have the desired search criteria selected, click the Save as Team button
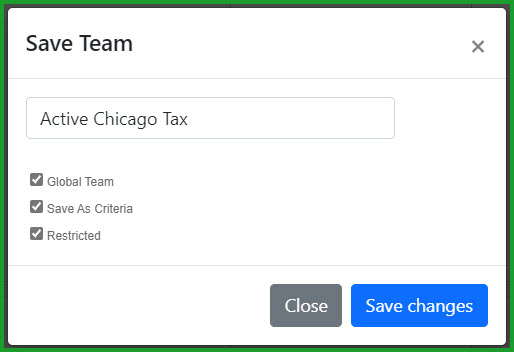
Figure 2 – Saving Team
When saving a team from the Custom Search feature, you have a few options to select from:
• Global Team – if you enable Global Team, any user with the View Global Team permission can select the team into the Resource or Analytics page view
• Save as Criteria – If Save as Criteria is enabled, any new active resource assigned to the Chicago Tax department will be automatically added to the team. This eliminates the need to repeat the same search to ensure new team members are included in the view
• Restricted - You can also set the results returned from a Saved Criteria search to be ‘Restricted’ – this will prevent anyone except the owner from modifying the saved criteria used in the search
As configured above, other users can view the Active Chicago Tax team in Resource or Analytics...
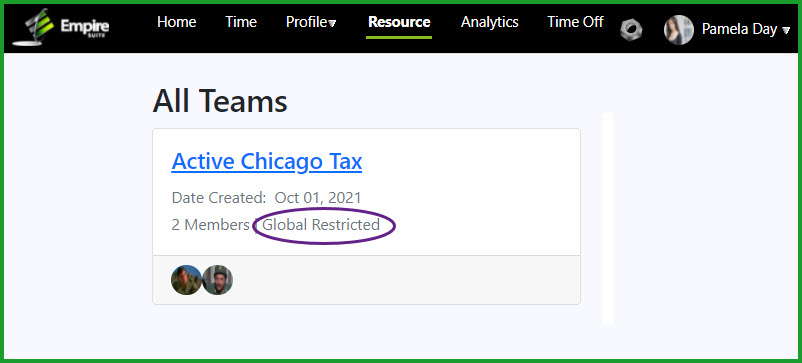
Figure 3 – Restricted Teams
...but other users cannot make any changes to the team. Note the user can click the Edit Team button...

Figure 4 – Restricted Team View
...but other users cannot make any changes to the team as all of the available controls are locked:
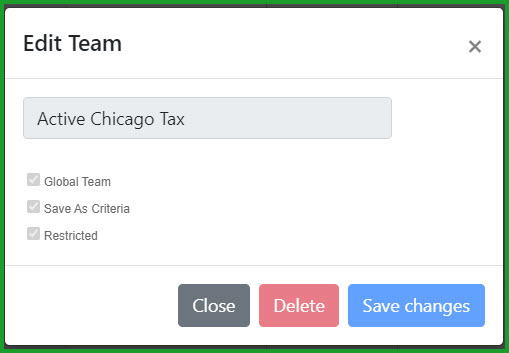
Figure 5 – Editing Restricted Teams
Employee Status and Skills are now Empire RESOURCE Custom Search attributes
In addition to employee name, office, department and staff level, you can now add Employee Status to the searchable attributes in the Empire RESOURCE Custom Search field. Simply add ‘Active’ to your list to limit the search results to only Active employees:

Figure 6 – Custom Search Employee Status
You can search for resources by Skills also. For example, if you need a list of resources who have defined skills in preparing 1040 or 1120 tax returns, you can search for them by skill category (Tax Preparation) or specific skill set (1040 or 1120):
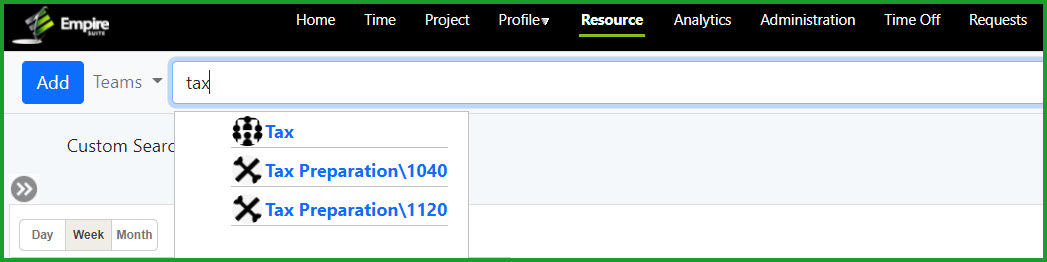
Figure 7 – Custom Search by Skills
Microsoft Teams Empire SUITE Bot
We’ve added a Microsoft Teams bot to give resources and managers yet another way to request and manage time off. In addition to a PTO request form, the Microsoft Teams Empire SUITE bot recognizes time off related short phrases such as ‘I want to take vacation next week’ or ‘I need to take a day off tomorrow’ added as chat messages.
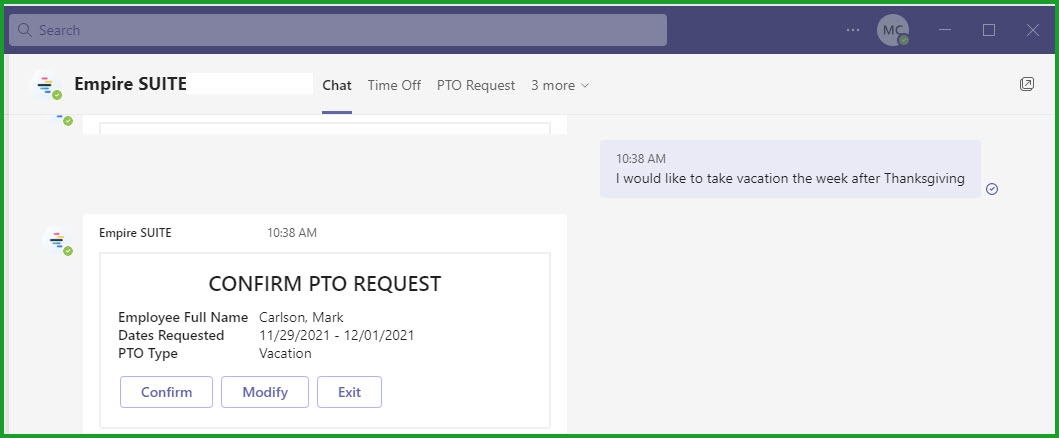
Figure 8 – Empire SUITE Bot Chat Messages
Please contact WSG for more information about the Microsoft Teams Empire SUITE bot. We’d be happy to work with you to install the bot in your account.
Excel Imports for Employee Status and Reports To Manager Updates
We’ve added two new imports to make managing your employees and other resources easier: you can now update multiple employees’ status and reports to manager using Excel imports. We’ve added security permissions for the imports. From the Administration\Company\Edit Permissions menu, click Administration and Imports to add the permissions to the appropriate Security Group:
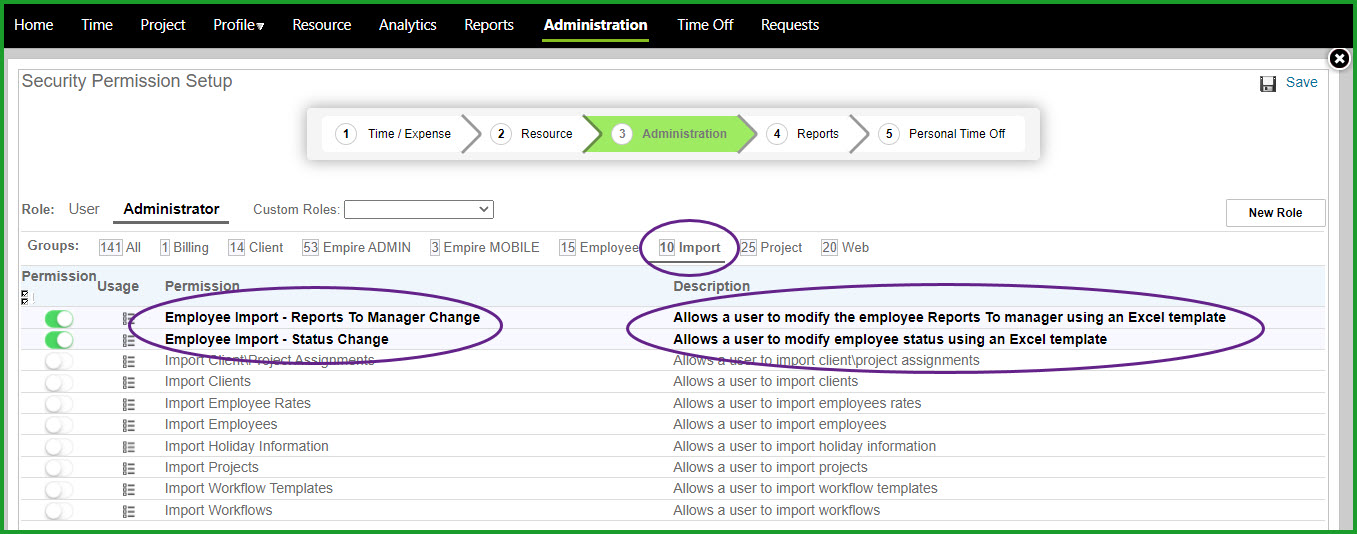
Figure 9 – Employee Status and Reports To Manager Security Permissions
As a reminder, you’ll need to log out and log back in for the permissions to be added to the user profile.
The imports are located in the Administration\Loads/Integration menu:

Figure 10 – Employee Status and Reports To Options
As with the other imports, you can select a file from your library or download a template file from the Import page.
Three fields are required for the Employee Status Update:
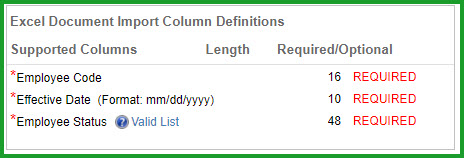
Figure 11 – Employee Status Update Fields
Three fields are required for the Employee Reports To manager update:
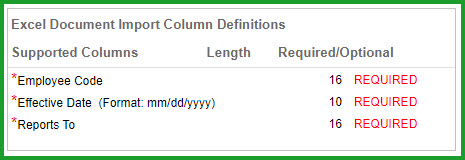
Figure 12 – Reports to Manager Update
Editing Team Names in All Teams View
We have removed the Teams option from the menu bar. Creating and managing Teams is now done in either the Resource page or the Analytics page, and you can edit team names in the All Teams page. From the Resource page, click Teams, then click Display All Teams:
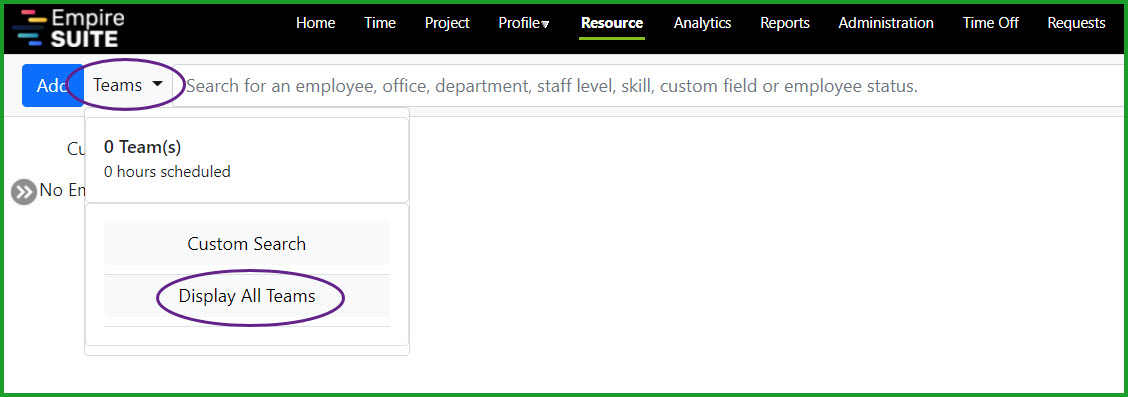
Figure 14 – Display All Teams
Select the appropriate team from the page...
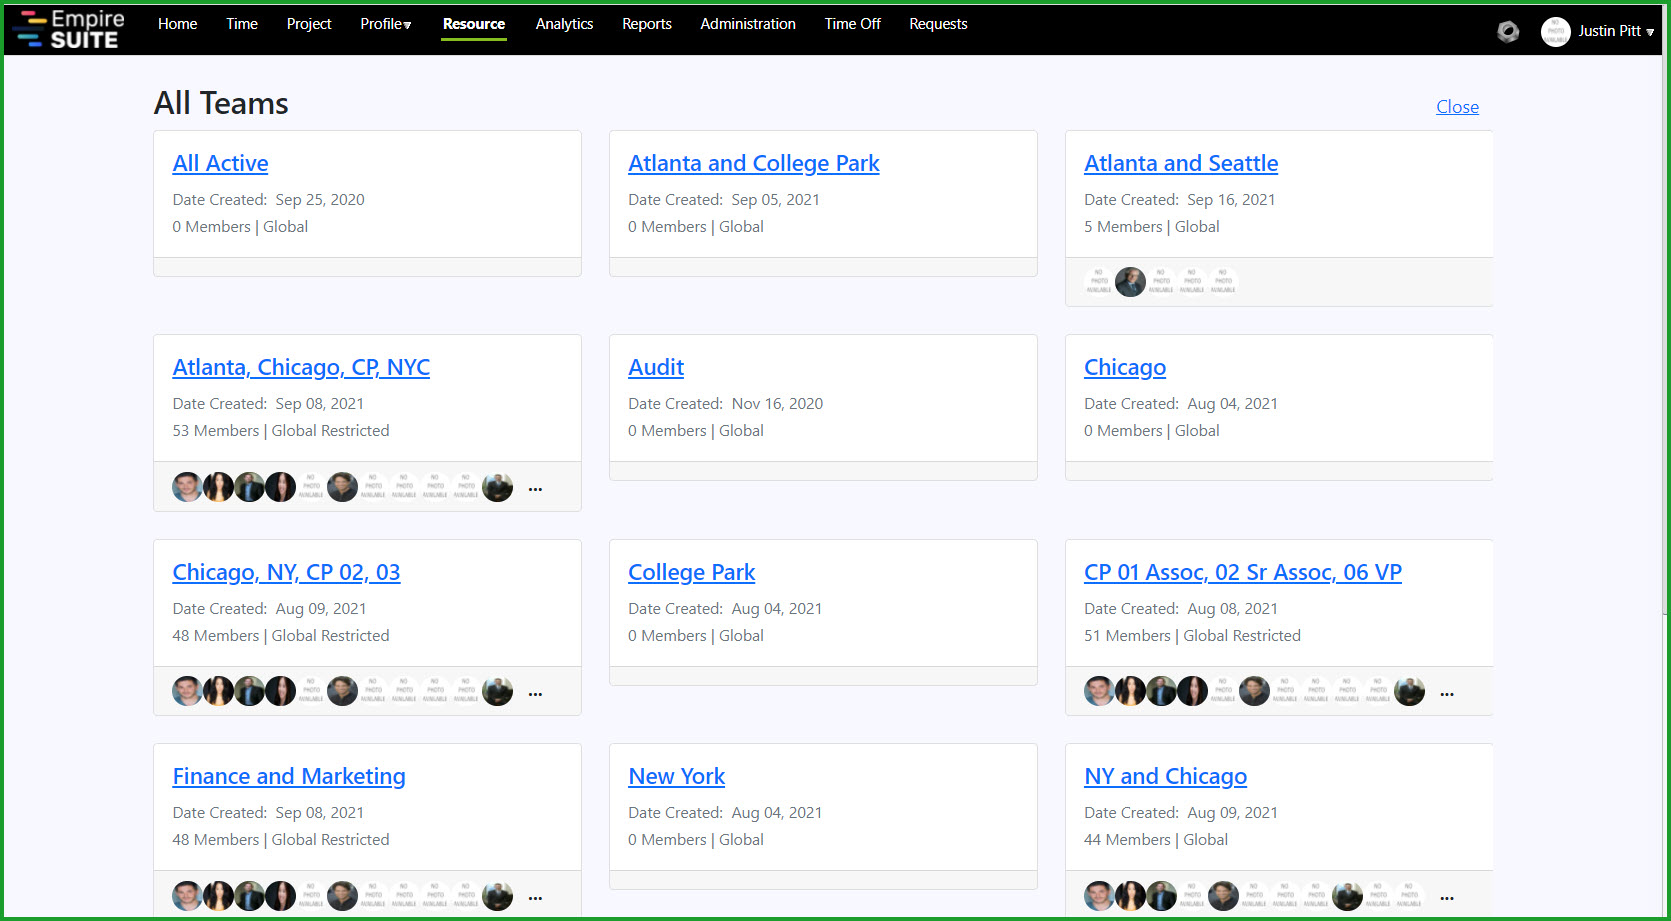
Figure 15 – All Teams View
...and click Edit Team
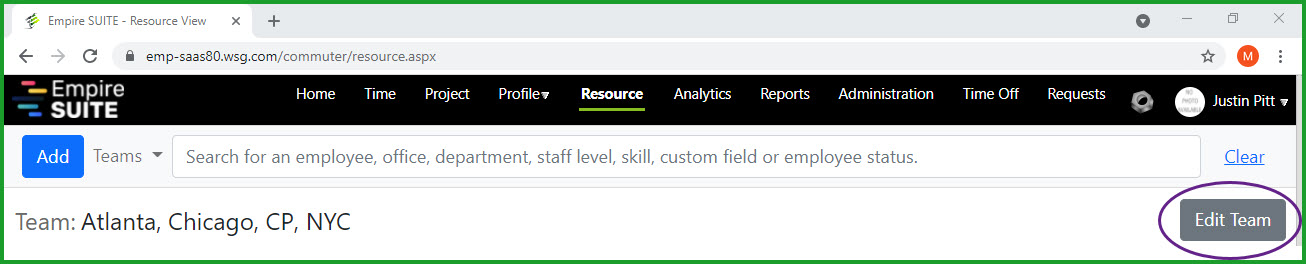
Figure 16 – Edit Team
Users with the appropriate security permissions can edit the Team information. Click Save changes to update the team information:
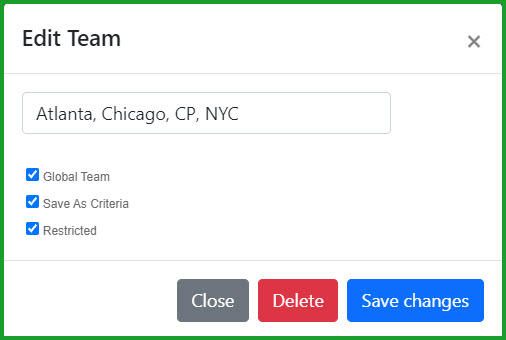
Figure 17 – Editing Team Information
My Schedule Portal View Others Permission
We’ve added a new permission which will allow administrators to control whether or not employees can see other employee schedules from the My Schedule page. Previously, any My Schedule user could see any other user’s schedule by clicking the Change Employee link. That link is gone, unless the user has the My Schedule Portal – View Others Permission:
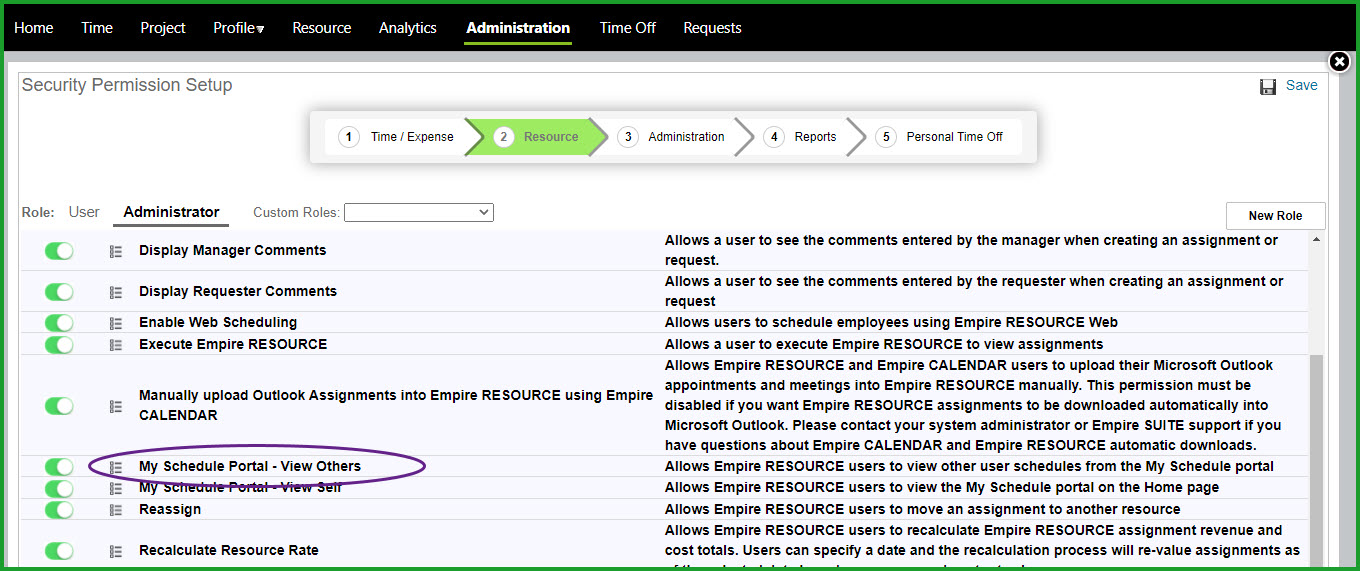
Figure 18 – My Schedule Portal – View Others Permission
Users without the My Schedule Portal – View Others permission will now see this view...
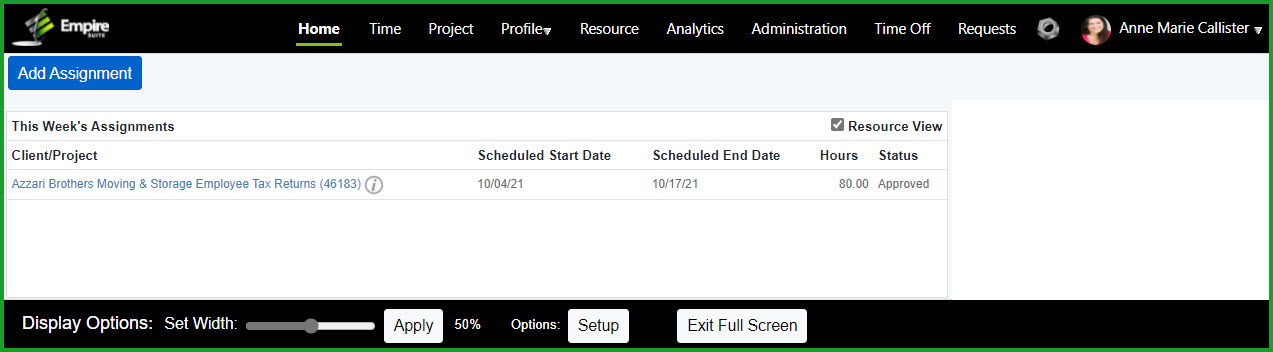
Figure 19 – My Schedule Portal without Change Employee link
...while users with the My Schedule Portal – View Others permission will see this view:
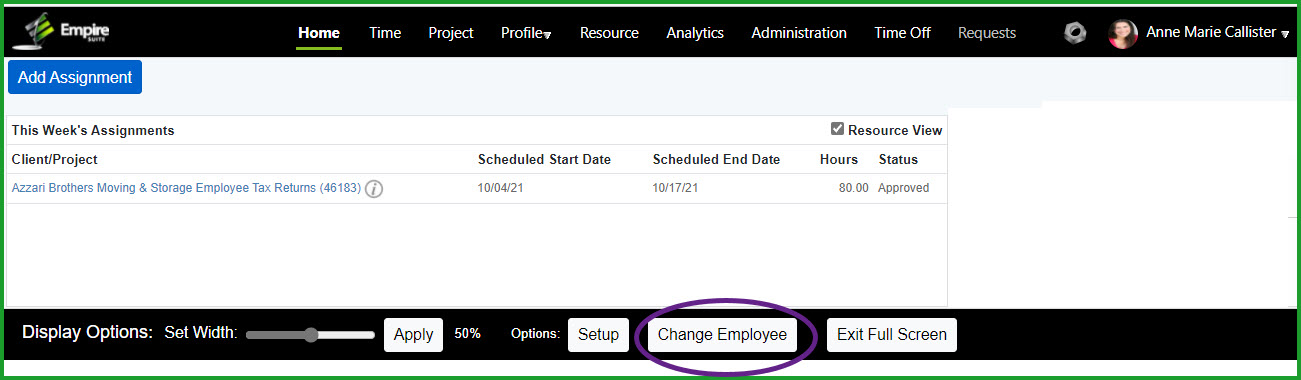
Figure 20 – My Schedule Portal with Change Employee link
Current Period v Last Unfinished Period Timesheet Option
You can now decide whether you want your timesheet to open to your last unfinished period or to the current period. From the timesheet, click the gear icon to open the Timesheet Setup page. Select the preferred option:
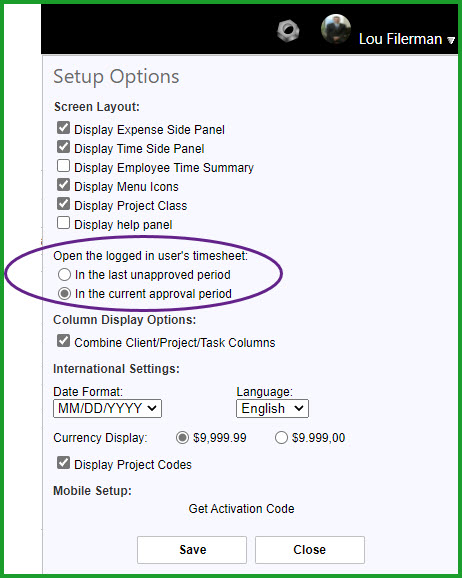
Figure 21 – Current Period or Last Unfinished Period Option
Please note if you switch from Last Unfinished to Current period, we will refresh the timesheet to the current period when you save the change and close the page.
Exception Time Entries in Future Periods
Administrators can now decide whether or not to include future time off ‘Exception’ items in the resource schedule. For example, if a user has approved intermittent FMLA, the user’s future scheduled events can be included in the resource schedule display. Previously, exception time entries were only added to timesheets.
We will be adding a UI in an upcoming version to allow your administrators to set the time periods for each Time Off type. In the interim, please contact WSG and we’ll work with you to update your account to cover the desired time periods.
Updated Tenant Owner Page
We’ve added a couple of options related to Empire RESOURCE to the tenant owner page. For our clients who allow their users to create their own resource assignments, the tenant owner can set the default status for an assignment, or allow the user to make a request or create a tentative assignment.
We’ve also added an option to set the Resource display for users to full screen on the home page:

Figure 22 – Updated Tenant Owner Page
Please note the Display Resource in Full Screen on the home page option works when resource scheduling is the only application used in your account. If you use time and expense entry or time off, users will see their available portals on the home page rather than the full screen resource display
Requests and Opportunities Page
An emerging trend for professional services firms is ‘self scheduling’ by employees, that is, employees can see a list of opportunities and schedule themselves on selected assignments, or employees who have been scheduled on an assignment can ‘reject’ the assignment. To support this process, we’ve added a new page where resources can schedule themselves against available assignment requests, or reject a planned assignment.
The Requests menu option is associated with the Add/Modify/Delete Named Resources permission. Users with this permission will see Requests in the menu bar
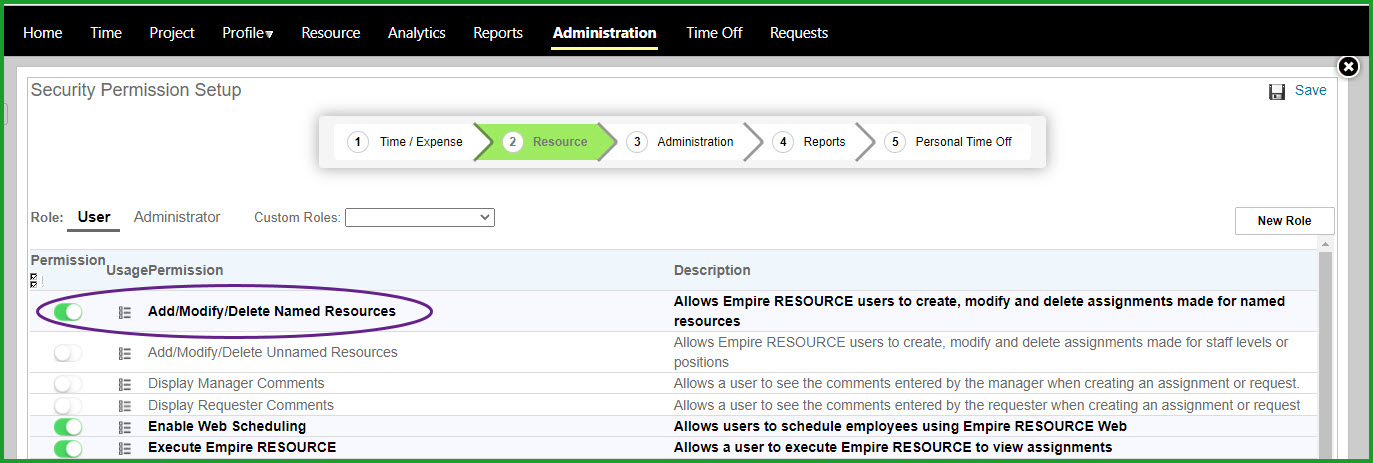
Figure 23 – Requests Menu Option Permission
Resource Requests and Tentative Assignments are user selectable by Team. Recently used Teams are displayed in the left panel of the page.
There are several radio buttons in the upper right corner of the Requests page. These radio buttons determine whether the page displays Requests or Opportunities:

Figure 24 – Requests Page
Requests
There are three different statuses for resource assignments
• Approved
• Tentative
• Request
The Requests page includes only tentative resource assignments and resource requests. From the radio buttons above, you can display tentative assignments, assignment requests or both. (Please note Opportunities will be discussed in the Opportunities section)
Below is an example screenshot displaying requests and tentative assignments for named resources belonging to the All Active team:

Figure 25 – Resource Requests
Click the arrow icon next to a resource name to see the request and conflict details. For Lou Filerman below, we can see he has a tentative assignment with a conflict, and a two-week assignment request with one of the weeks generating a conflict:
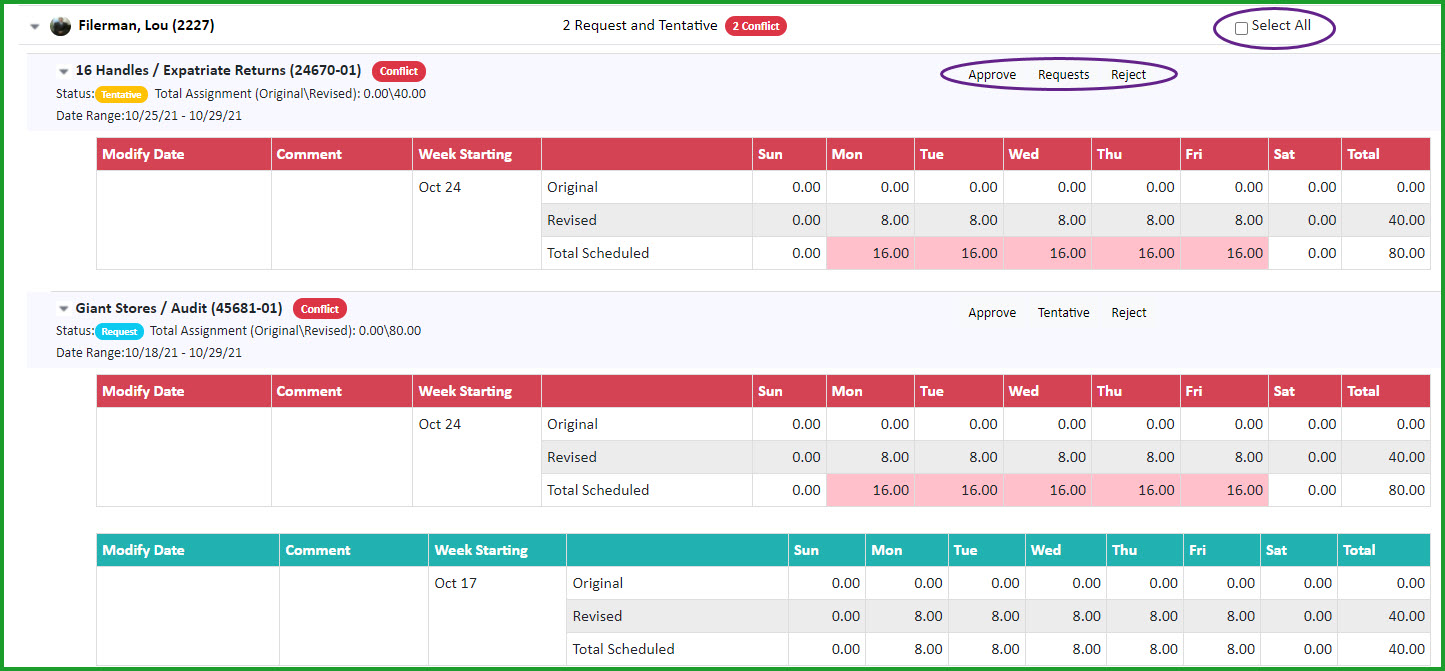
Figure 26 – Request and Tentative Details
Users with the appropriate permissions can create an approved assignments from the request, change the status of the request to a Tentative assignment or reject the request entirely. If the Select All checkbox is enabled, the user can apply the desired action to all of the Requests and Tentative assignments for the selected user.
A quick note about ‘Rejecting’ an assignment: If a user has the ability to get to the Requests page the user can see the assignments they’ve been assigned to tentatively or requested to work on. If the user also has the Web – Edit Assignment Self permissions, the user can Reject the request or tentative assignment:

Figure 27 – Rejecting a Tentative Assignment or Request
Rejected assignments will disappear from the user’s list
Another use of the Reject feature is for a resource or project manager to restore an assignment back to the original hours after it has been modified by the resource. For example, Mickey Abbott was originally assigned 8 hours per day on the Shell Oil/Executive Returns project, but he has informed his manager he can only spare a couple of hours per day:
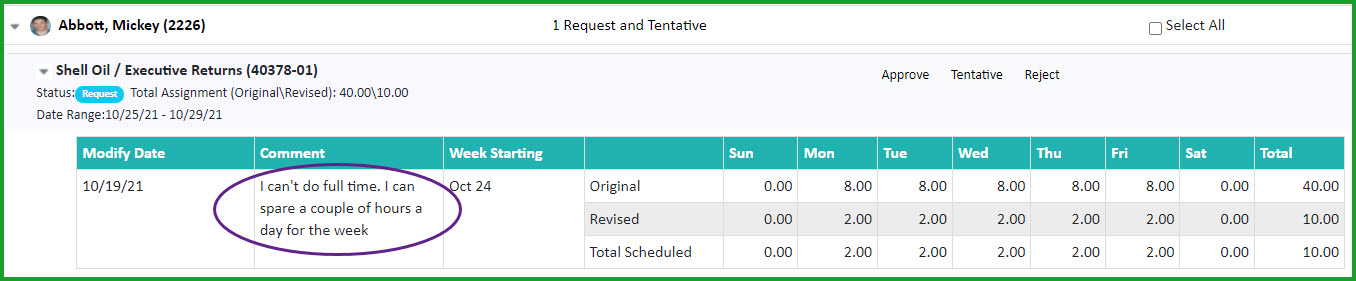
Figure 28 – Restoring a Modified Assignment
The resource or project manager can approve the request, set the request to tentative or reject the change made by the user to restore the assignment to its original hours by clicking Approve, Tentative or Reject as appropriate.
Opportunities
Opportunities are outstanding requests for unnamed resources, or Staff Levels. Click the Opportunities radio button to see a list:
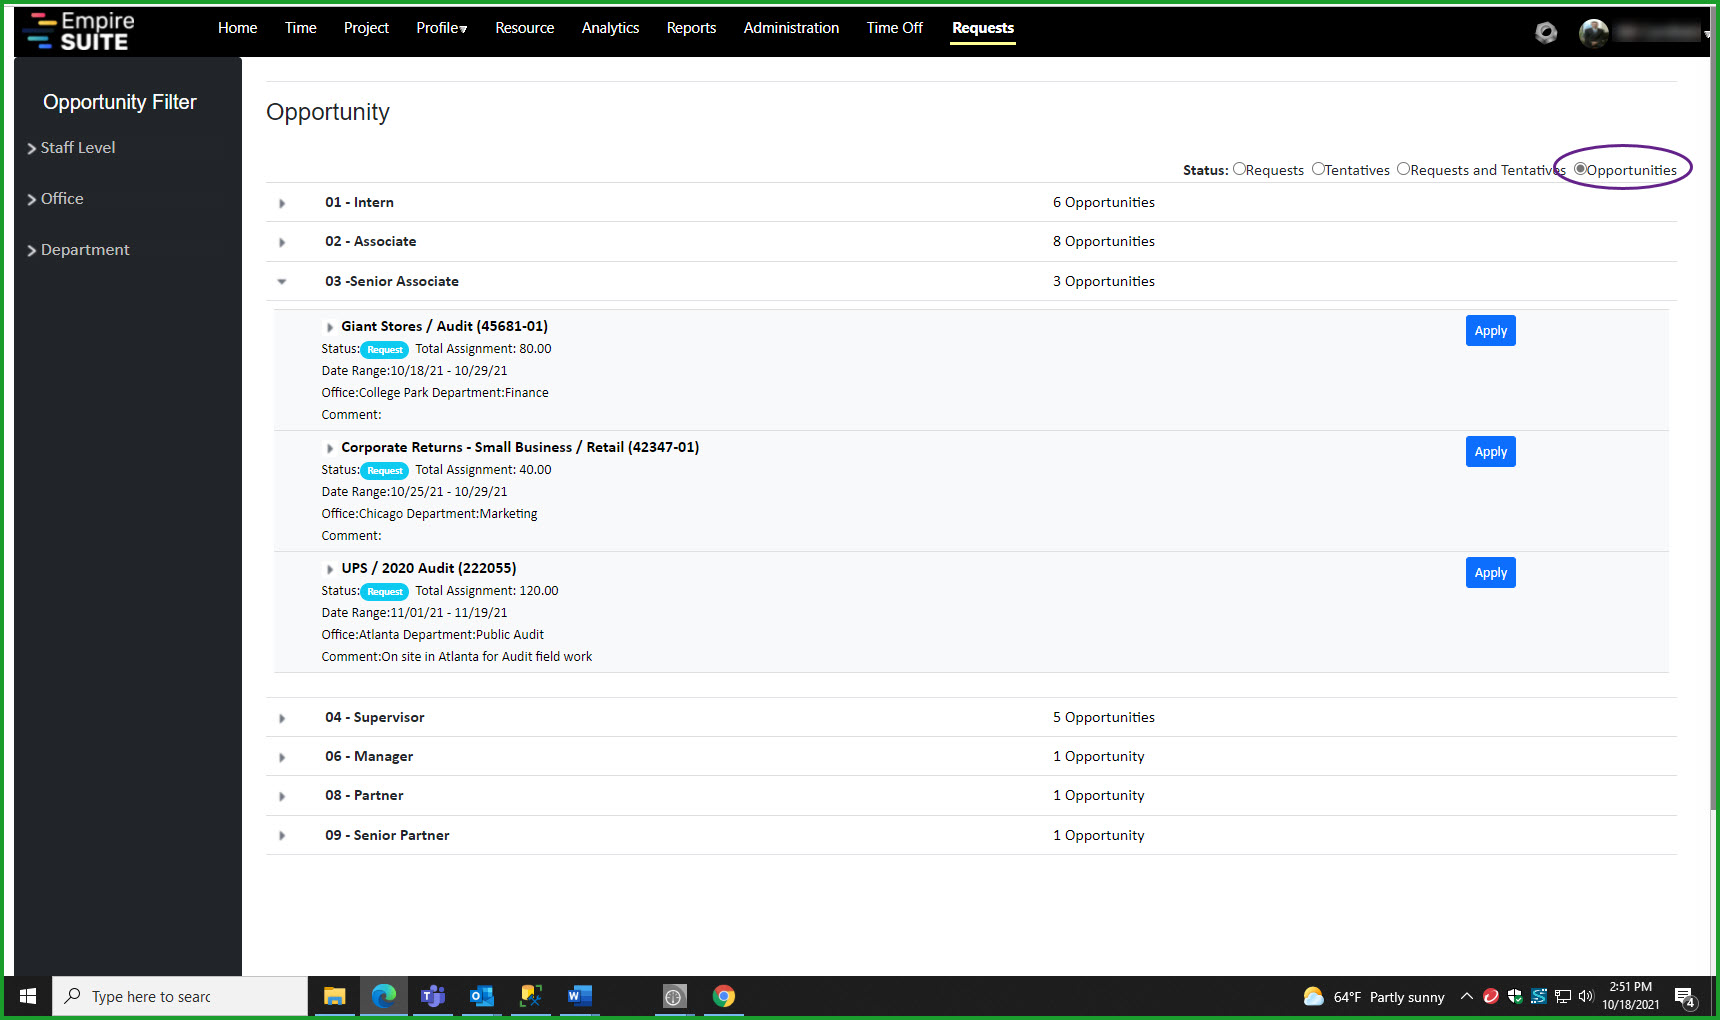
Figure 29 – Opportunities
You can filter Opportunities by Staff Level, Office and Department. Users with the appropriate permissions can apply for the assignment by clicking the Apply button.
Resource managers can expand a request to see who the system generated best matches are, along with users who have applied for the assignment:
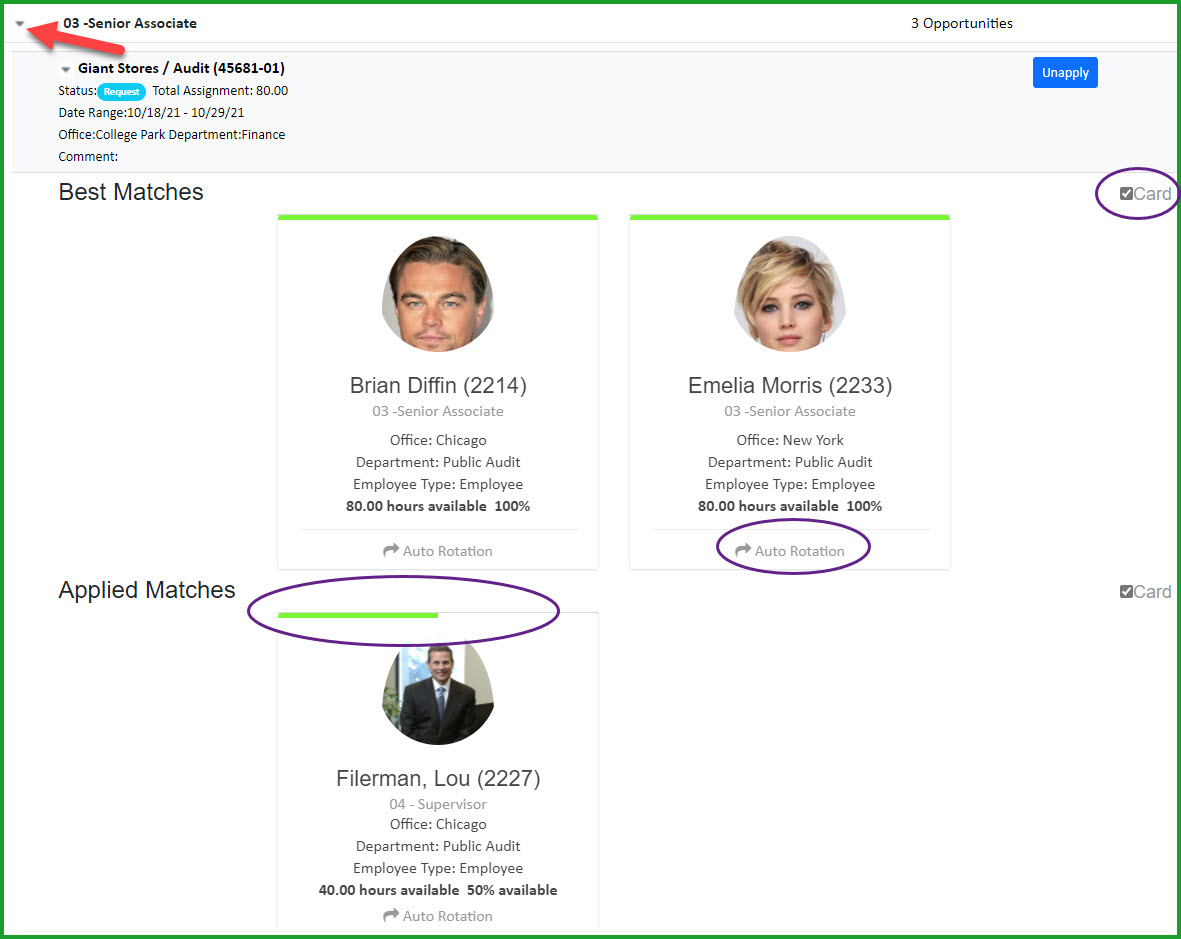
Figure 30 – Opportunity Matches
The Best Matches are based on the requested staff level, office, department and availability.
The GREEN line above each match indicates the user’s availability for the assignment. As you can see, both Brian and Emelia are 100% available for the 80 hours, but Lou has another assignment so he is only 50% available.
The Auto Rotation link will flip the card to show you the resource’s skills, as well as the resource’s capacity, scheduled and available hours. You can click the View Profile link to see detailed employee information, and the Schedule, Email and Text links will save the selected user to the assignment, open an email window so you can send the resource an email about the assignment or send the user a text message if the user is configured to accept text messages:
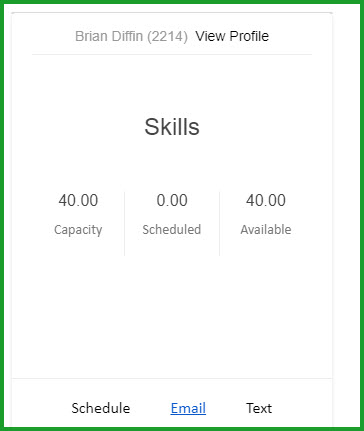
Figure 31 – Card View Auto Rotation
The Card check box on the right side changes the view from the card view as shown above to a grid view:
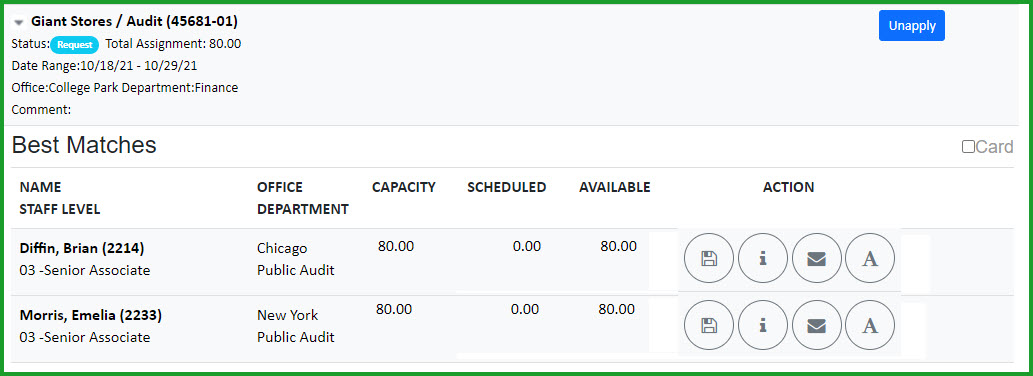
Figure 32 – Opportunity Grid View
Clicking the disc icon will save the assignment for the selected resource and close the grid view.
The i icon will display detailed user information:
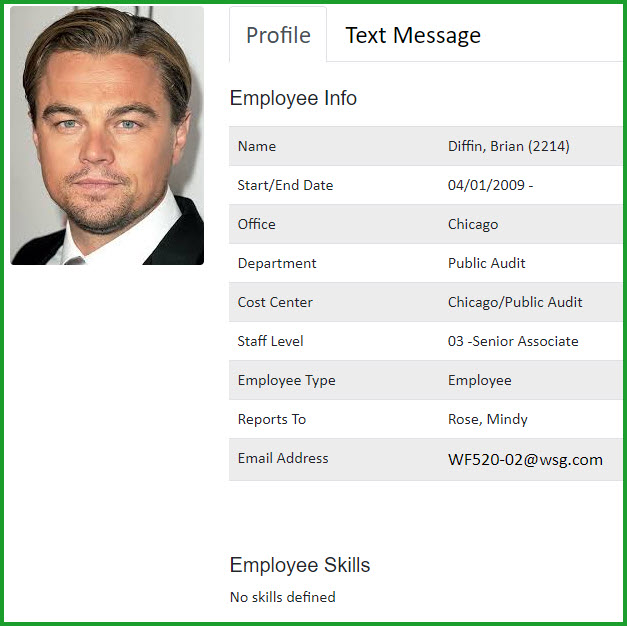
Figure 33 – Grid View Employee Information
You can also see the employee profile information from the card view by mousing over the Auto Rotation link below the resource availability
The mail icon will open an email window so you can send an email about the assignment to the selected resource
The A A icon will open the profile page to the Text Message tab so you can send a text message to the selected resource about the assignment, if the resource is configured to accept text messages:
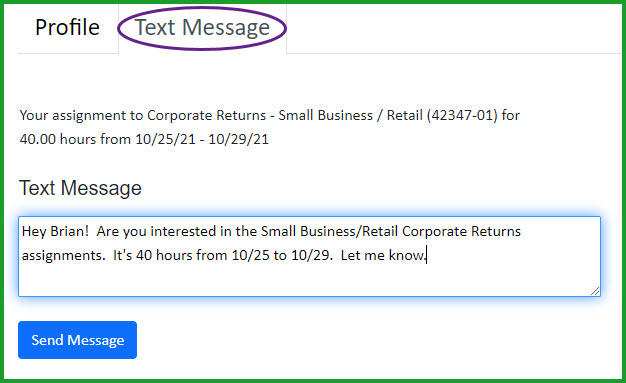
Figure 34 – Opportunity Match Text Message
Resource Assignment In Cell Editing
We’ve added the ability to modify an assignment’s duration using in cell editing. From the Resource page, click the Edit Mode Resource radio button:
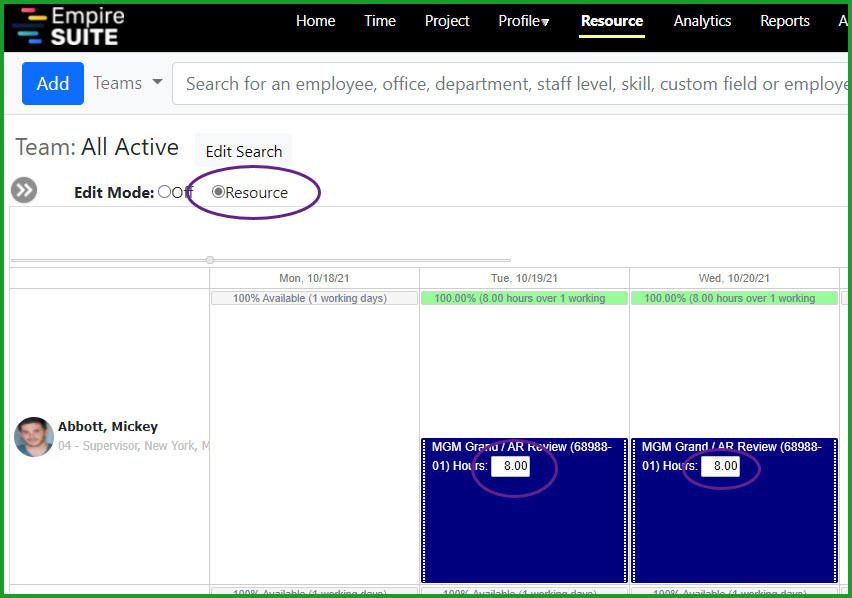
Figure 35 – Resource Edit Mode
Note the 8.00 hours in the above assignments are open for editing. Users with the appropriate security permissions – Web – Edit Assignment Self – can modify the hours value:
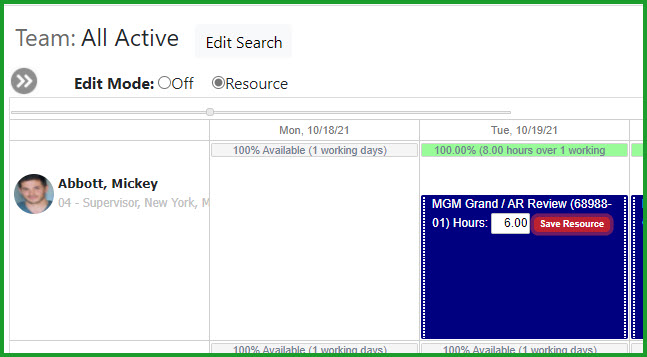
Figure 36 – Editing a Resource Assignment
Click Save Resource to save the changes
Add Time from the My Schedule Page
Users with the appropriate security permissions can now add time to their timesheets directly from the My Schedule page. Click the Edit Mode Time Entry radio button:
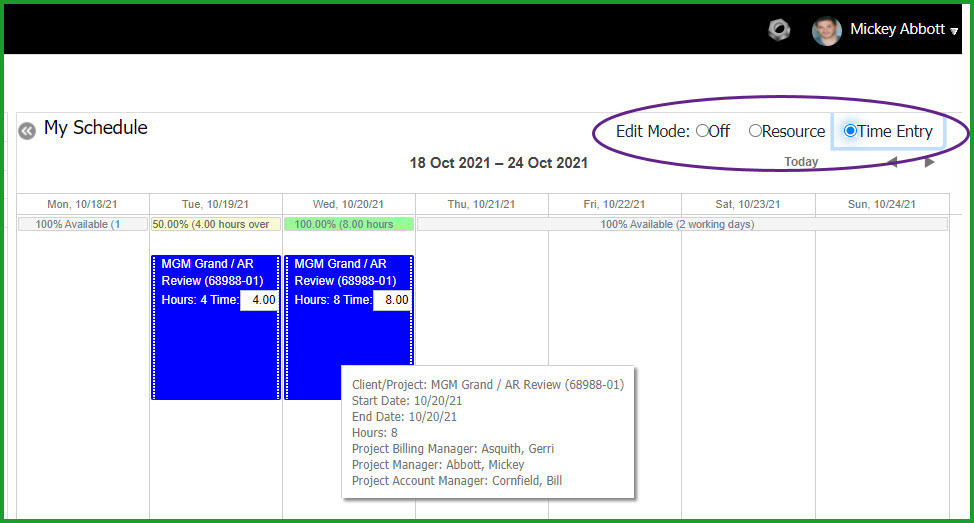
Figure 37 – My Schedule Time Entry
You can accept the scheduled time by mousing over the value, or you can make a change to the scheduled hours as appropriate. Click the Post Time link to move the time into the timesheet.

Figure 38 – Adding Time from the My Schedule Page
Please note time entry is only allowed when the My Schedule page view mode is set to Daily mode.
Date: June 14th, 2021
What’s New in Empire SUITE June 2021?
Enhancements in this Release
In addition to bug fixes and ongoing performance improvements, we’ve added the following new features to the Empire SUITE
• Redesigned Empire RESOURCE UI
• Additional Security Permissions for Empire SUITE administrative functions and Empire RESOURCE assignments
• New system generated assignment emails
• Empire TIME OFF added features
• Teams for Email Setup
Redesigned Empire RESOURCE UI
The Empire RESOURCE page has been refreshed and several new features have been added.
Better Search and Save Options
The Filter Bar has been replaced with improved search, sort and save options. You can now include multiple search criteria – Employee, Office, Department, Staff Level, Skill and Custom fields – to better refine your search and even save your search results as a Team:
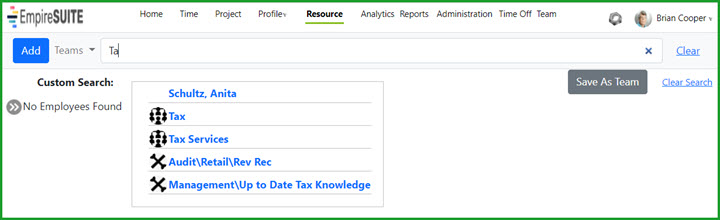
Figure 1 – Search and Save as Team
Redesigned Resource User Interface
We’ve designed and refreshed the Empire RESOURCE user interface with several new features and controls.
Resizing
Use the double arrows to display or hide a list of resources on the left-hand side of the page or to show the resource wall chart view:
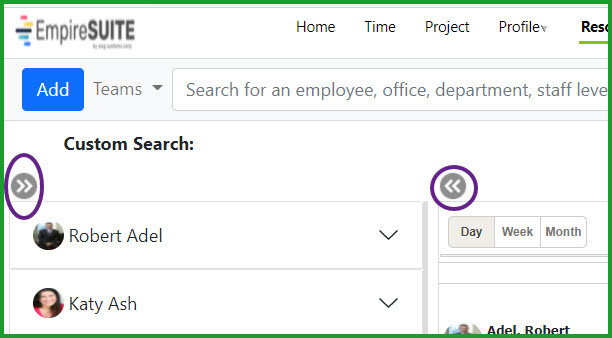
Figure 2 – Resizing
List View Options
Several new options are available when viewing Resource in list view:
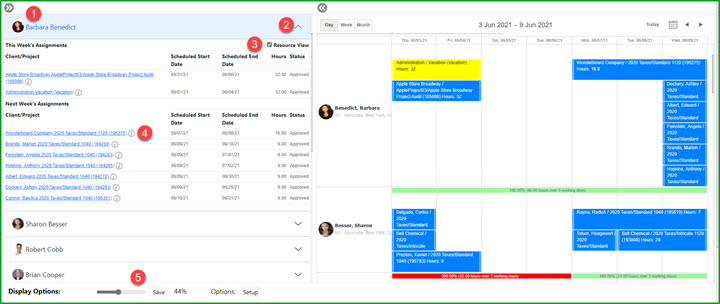
Figure 3 – List View Options
1. Click the employee picture to see the employee’s profile information
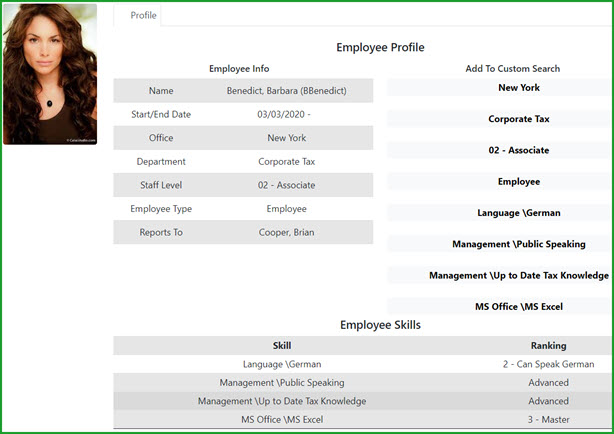
Figure 4 – Employee Profile
2. Click the arrow to display or hide the resource’s assignments
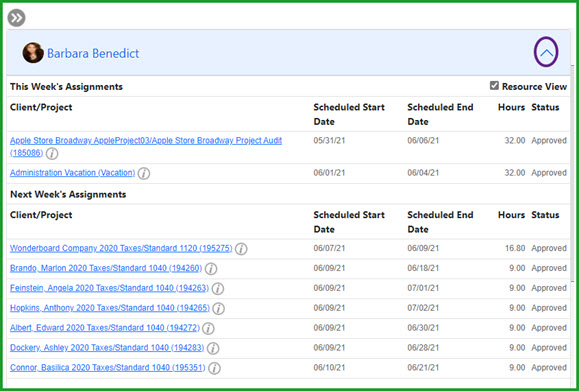
Figure 5 – Assignment List
3. Toggle between the Resource View and the Workflow View
In the screenshot above, the assignments are shown in Resource View. If workflow is used when scheduling, unchecking the Resource View checkbox updates the display with detailed workflow and work step information
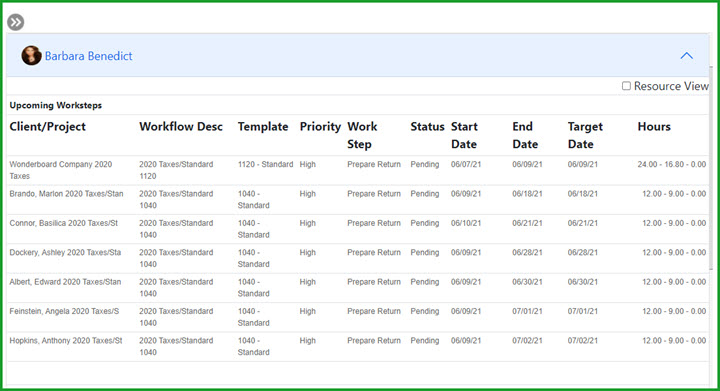
Figure 6 – Workflow View
4. Click the circle ‘I’ icon to see the project main details page
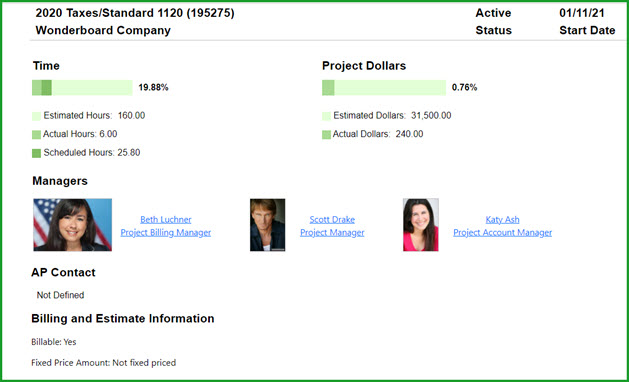
Figure 7 – Project Information
5. The slider lets you determine the width of the List contents and the wall chart. You can disable the wall chart view by moving the slider all the way to the right for a 100% List view
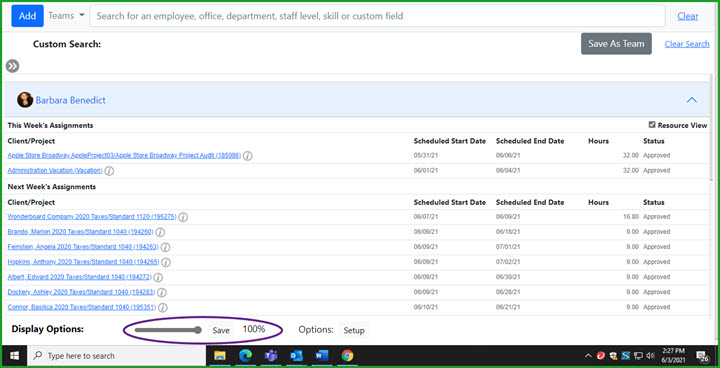
Figure 8 – Slider Control
Display Setup Options
The Setup options link lets you control how the content is displayed – whether or not weekends are included, and whether assignments are displayed as continuous or intermittent depending on the number of consecutive non-work days in the assignment
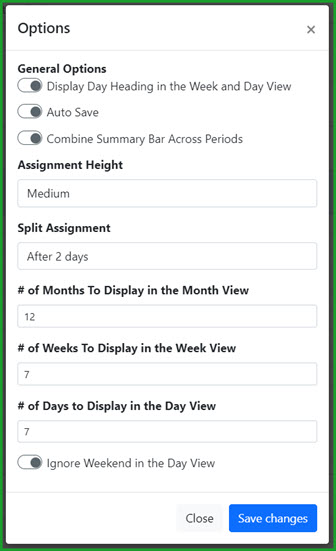
Figure 9 – Display Setup Options
Assignment History
We’ve added an assignment history view when editing assignments:
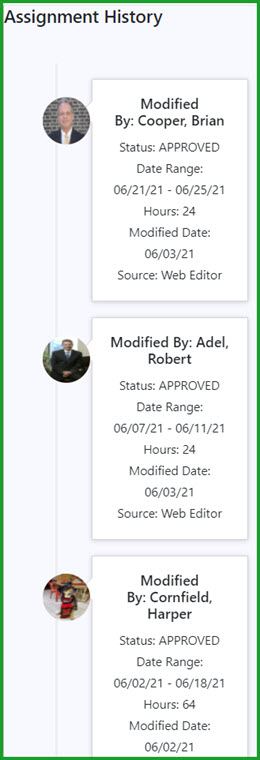
Figure 10 – Assignment History
New Administrative Security Permissions
Several new security permissions were added to secure the ability of users to modify administrative settings, and for creating, modifying and deleting assignments. Below is a list of the newly added administrative permissions and what they do:
.png)
Figure 11 – New Administrative Security Permissions
New Resource Scheduling Permissions
Several new permissions were added to give users and schedulers flexibility and control when self-scheduling is allowed:
.png)
Figure 12 – New Resource Scheduling Permissions
New System Generated Assignment Emails
We’ve added two new system generated emails related to assignments:
• Upcoming Assignments
• Availability
Upcoming Assignments
The Upcoming Assignments email displays assignment information for the upcoming three weeks
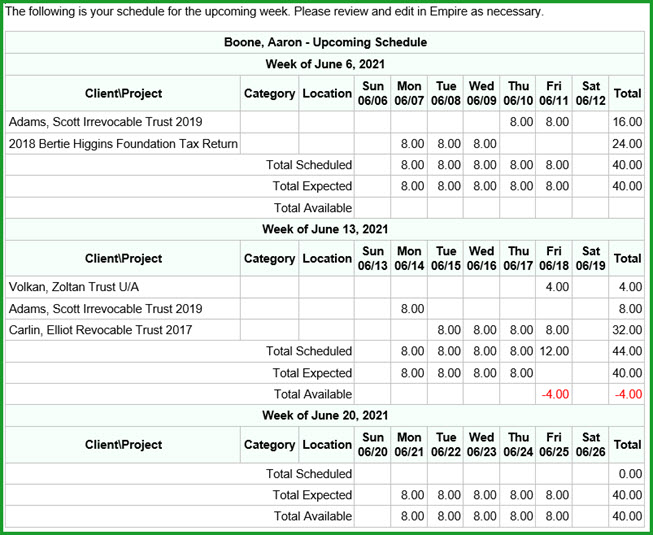
Figure 14 – Upcoming Assignments
Availability
The Availability email displays day by day availability for the upcoming week, and then summary availability numbers for the next three weeks, with a total for all four weeks:
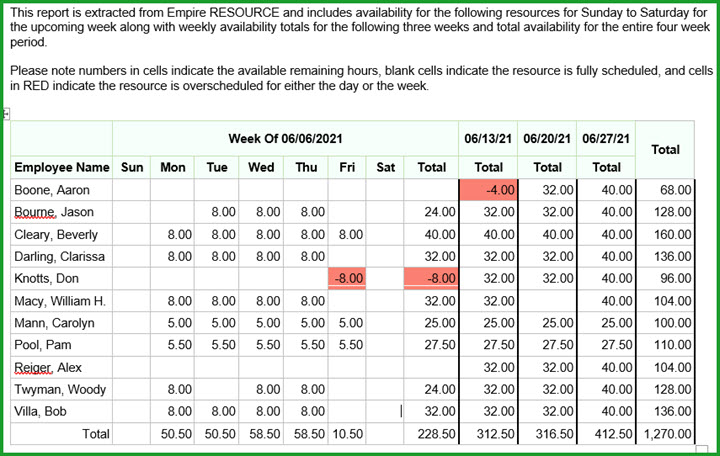
Figure 15 – Availability Email
New Empire TIME OFF Features
We’ve added several new features to Empire TIME OFF to improve information for managers and administrators when evaluating time off requests, and to give managers and administrators better control of time off availability for users.
Overlaps
We’ve redesigned time off Overlaps to include user configurable definitions of Overlaps, and allow users to define the maximum number of overlaps for a given organizational node and/or by manager. The resource manager can be ignored, or you can define an overlap for the immediate Reports To Manager, or the Reports To Manager plus one level up:
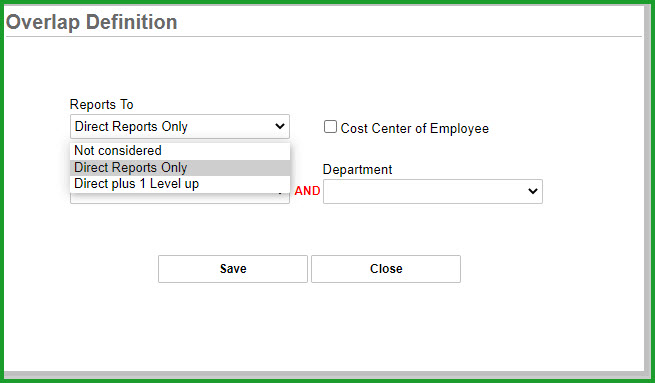
Figure 16 – Overlap Definitions
Overlaps can be determined at the organization level also – by the employee cost center, and by office and department.If your account is configured with more than one level in either office or department hierarchies, the overlap can be defined at any level of your organizational hierarchy.
You can define a maximum number of allowable overlaps based on your definition. For example, assume you’ve set your Overlap policies as this. . .
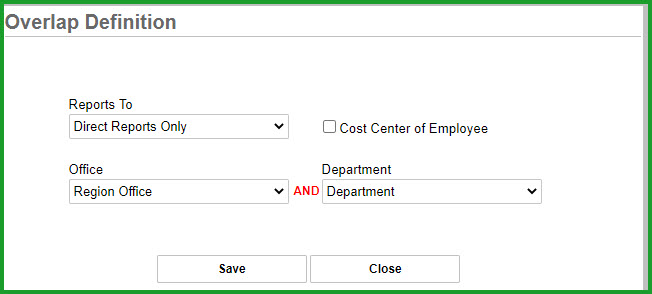
Figure 17 – Overlap Definition Example
. . .and your Maximum Allowable Overlaps as this:
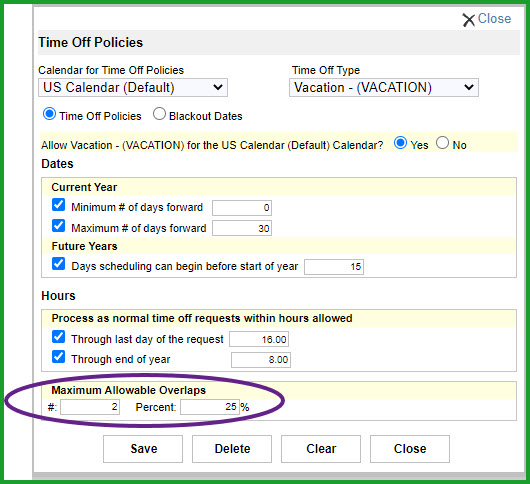
Figure 18 – Maximum Allowable Overlaps
In this example, no more than two or no more than 25% of a direct manager’s Reports To employees in their office and department can be on vacation at the same time. For example, if the manager’s department has 10 employees and two are already scheduled, a third request will require a special approval
Black Out Dates
We also added the ability to require special approvals for time off requests made during user defined ‘black out’ dates. For example, accounting firms are often very busy during tax season, and may want to limit the ability of staff to request and take time off during busy season. In the example below, requests for time off falling during these periods will require a special approval:
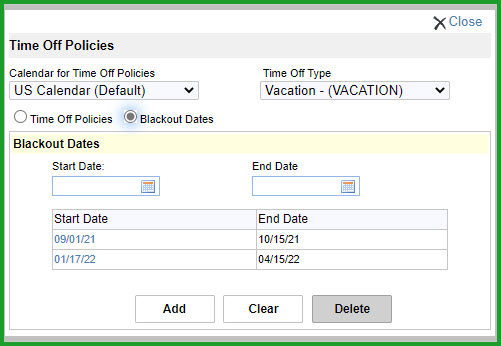
Figure 19 – Black Out Dates
Email Subject List Setup Using Teams
You can now use your Global Teams to define subject lists for system generated emails. Email Setup is available from the Administration \ Company menu. Select an email message type from the drop-down list and click Add New to launch the setup page. In the email setup page, click the Lists combo box to see the list of available Global Teams to select from when configuring the email message:
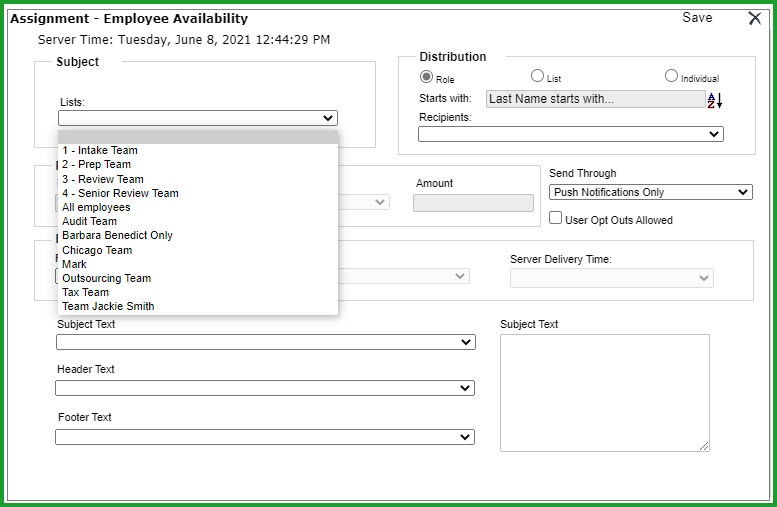
Figure 20 – Email Subject List Teams Setup
Date: September 2020
What’s New in Empire SUITE September 2020?
Enhancements in this Release
In addition to bug fixes and ongoing performance improvements, we’ve added the following new features to the Empire SUITE
• All new Empire RESOURCE Analytics Page
• New Empire RESOURCE Billable/Non-Billable Project permissions
• Excel-based Time Imports by User
• Setup Input Fields
• Timesheet Copy Forward
• Role-based Time Off Approvals
Empire RESOURCE Analytics
Users can now display a grid-based view of scheduled assignments, scheduling metrics and more, including a new feature which allows schedulers to assign multiple resources to a project at one time. Empire RESOURCE Analytics extends the power and flexibility of Empire SUITE Teams into the Resourcing area for a better, faster and more intuitive solution for your firm’s scheduling requirements. From the menu, click the Analytics link to launch the Empire RESOURCE Analytics page:

Figure 1 – Analytics Menu Option
The Analytics page, like the Resource wall chart page, displays scheduling information, but with additional details such as scheduled hours by Team, and an easy visual comparison between scheduled hours and actual hours:
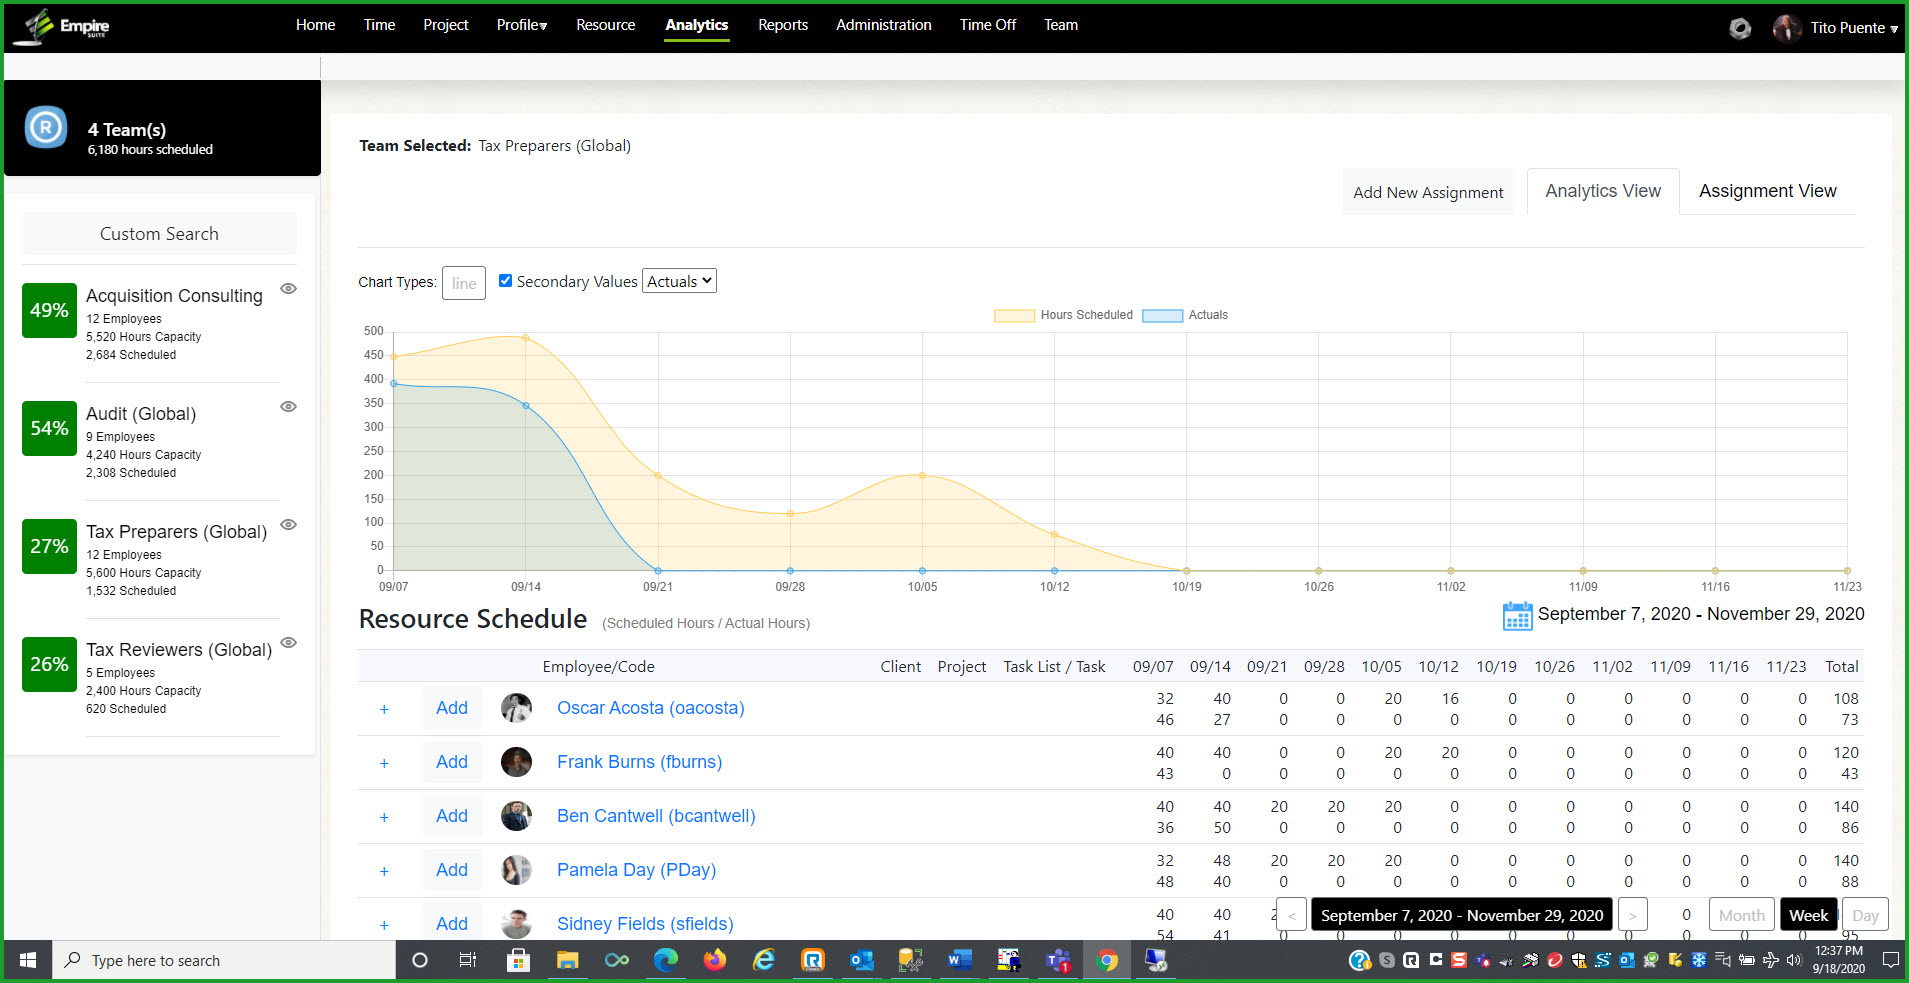
Figure 2 – Analytics Page
Click the Search ‘eye’ icon next to the team name to see the details on the Team staff members:
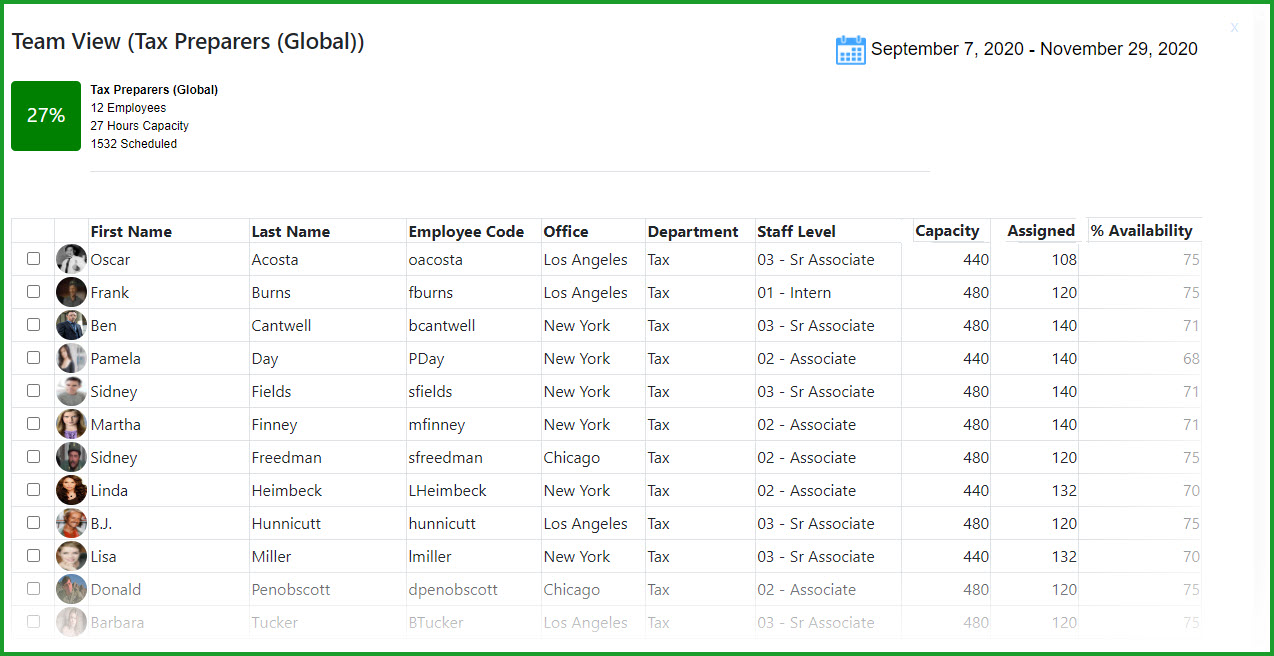
Figure 3 – Analytics Team Details
If you click the checkbox next to the employee name, the Add New Assignment option is enabled and you can add multiple employees to an assignment at the same time:
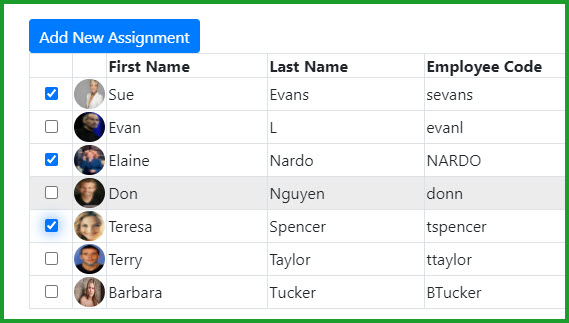
Figure 4 – Add New Assignment
In addition to assigning a single staff member to a project, you can now assign multiple staffers to the same project, as well as make an assignment to a Staff Level. Click the Add link (or a plus sign if the user already has assignments):
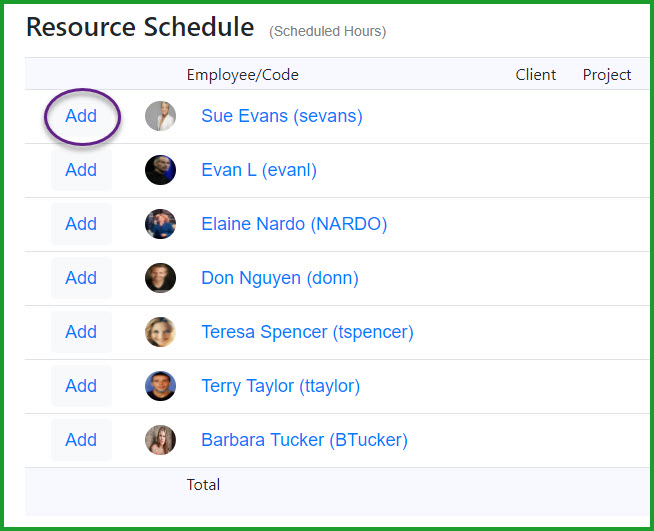
Figure 5 – Adding an Assignment
This will launch the new Analytics Assignment page. Use Type Ahead in the employee name field to select the staff members you’d like to schedule:
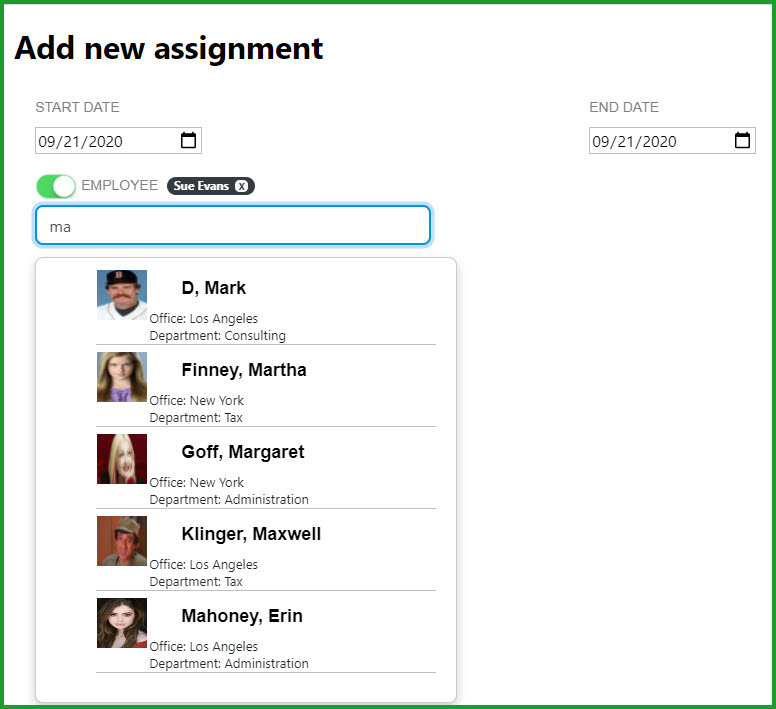
Figure 6 – Adding Multiple Employees
To make a Staff Level assignment, click the Toggle and use the Type Ahead to select the appropriate staff level:
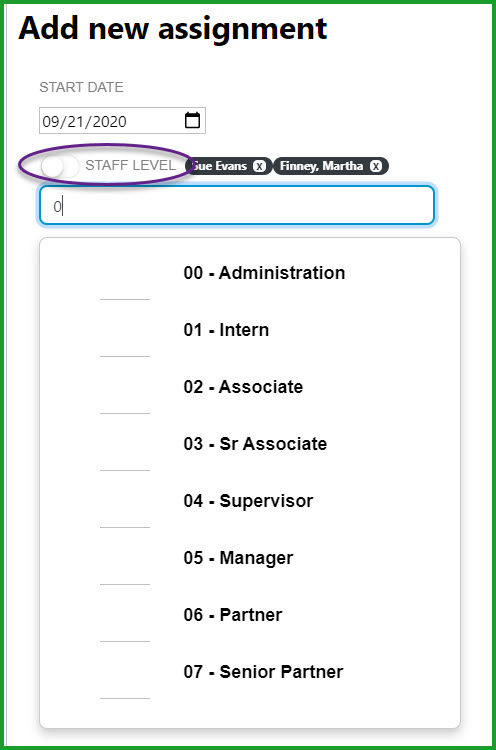
Figure 7 – Adding a Staff Level Assignment
Once you have the desired staff members and staff levels selected, use the Project Type ahead to select the project, set the dates, and the schedule details:
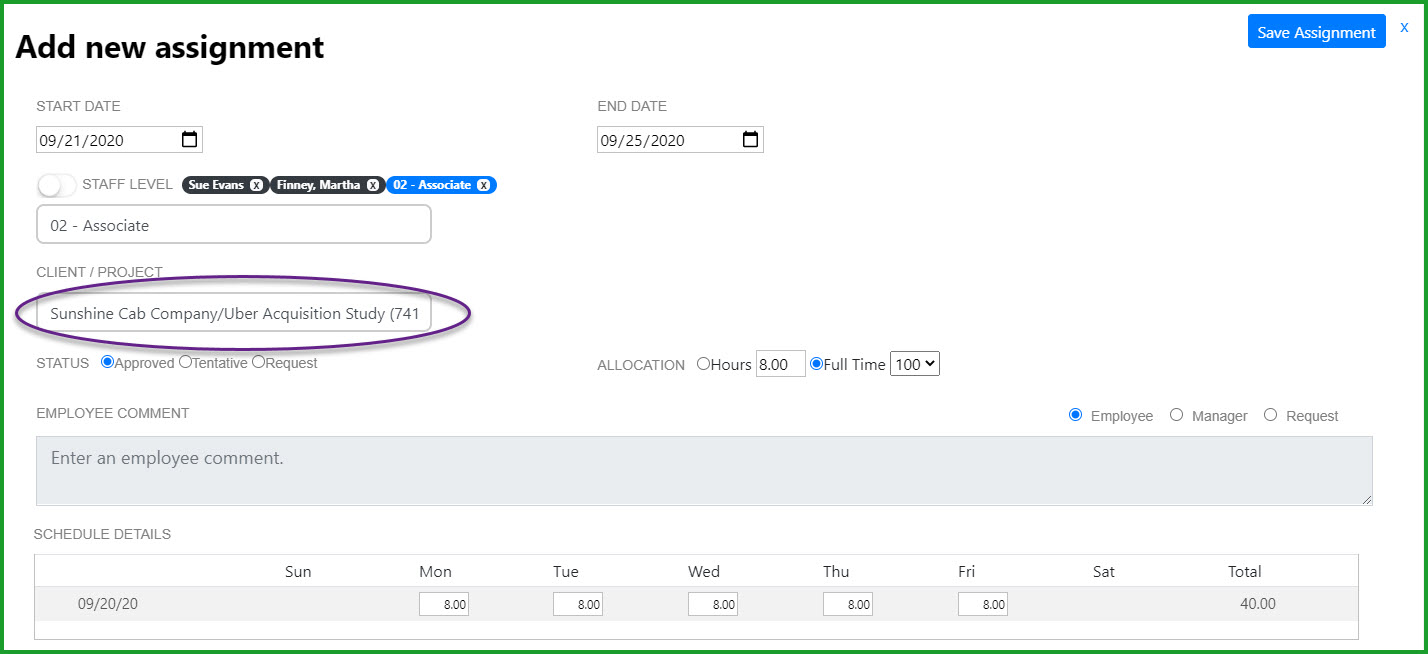
Figure 8 – Completing the Assignment
The Analytics page also includes Team assignment totals as a percentage of capacity over the selected date range:
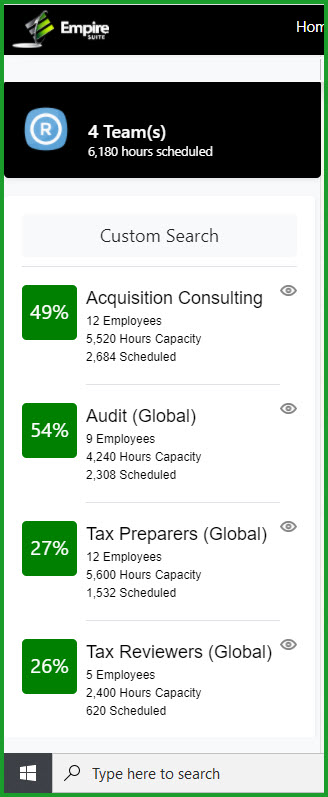
Figure 9 – Analytics Teams
To learn more about Teams and how to create them, click Team in the toolbar to get started:

Figure 10 – Team Link
See the What’s New in Empire SUITE November 2019 for additional information on creating and managing Teams
You can also toggle between different chart types by clicking the Chart Types link in the page:

Figure 11 – Chart Types
New Empire RESOURCE Billable/Non-Billable Project permissions
We’ve added new permissions for users when scheduling themselves on projects. From the Administration menu, go to Company \ Edit Permissions and select the Resource application:
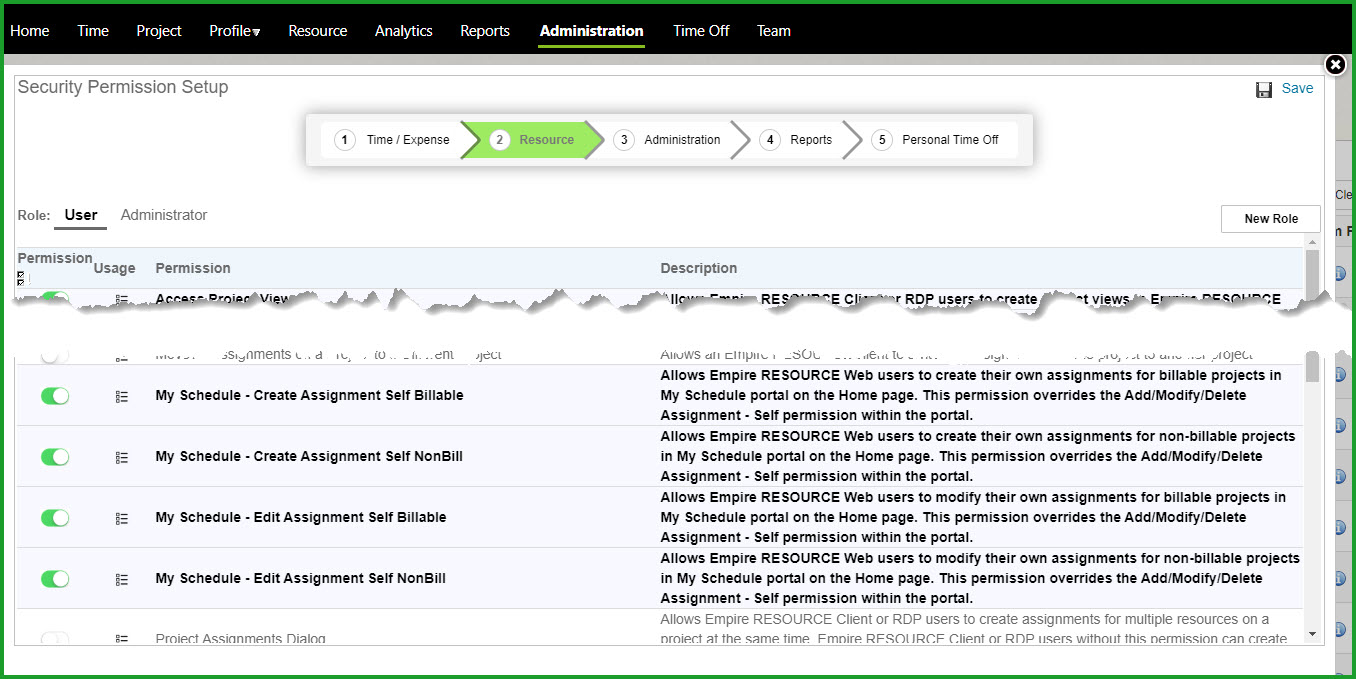
Figure 12 – New Self Schedule Permissions
The new permissions allow administrators finer control over the type of projects user can self-schedule to: either billable or non-billable projects or both; and whether users are allowed to edit assignments they have created for themselves. It’s important to note that these permissions override the existing Add/Modify/Delete Assignment – Self permission. That is, if a user doesn’t have the Add/Modify/Delete Assignment – Self permission, the user will be allowed to self-schedule if the user has either or both of the billable or non-billable My Schedule – Create Assignment Self permissions.
Excel-based Time Import by User
Users can now import their time using Excel spreadsheets. From the timesheet, select Import from the Print/Import option:
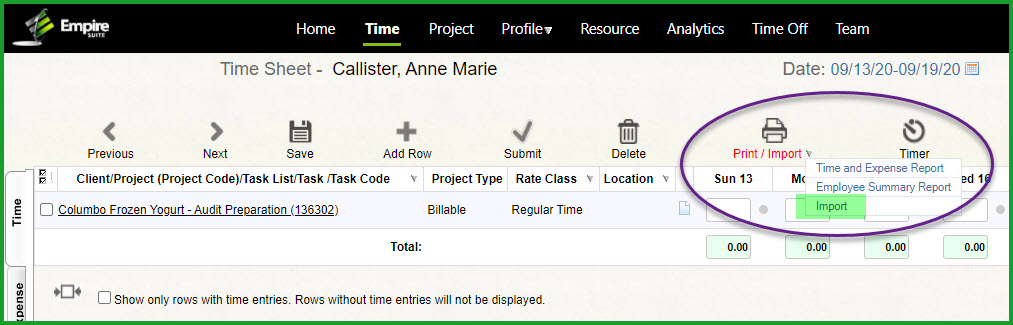
Figure 14 – Time Import Option
This will launch the Import page, which includes a list of required and optional columns to include in the import spreadsheet:
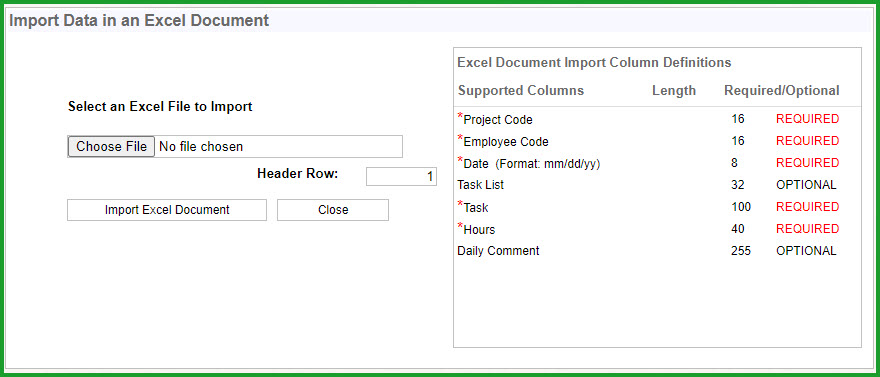
Figure 15 – Time Import Option
The import will use either *.xls or *.xlsx spreadsheets. Use the Choose File button to select the upload file. A few things to note:
• The Employee Code in the spreadsheet must match the employee code of the user. In other words, the import doesn’t work for other users than the logged in user. You cannot import time for other users from your timesheet.
• The Dates in the spreadsheet must be within the approval period dates. For example, if the selected Approval Period is 9/13/2020 through 9/19/2020, then all of the rows in the spreadsheet must have dates within that range
• The timesheet Approval Period must be Active. You cannot import rows against a Submitted or Approved timesheet
In addition to the above, the import will also validate the Project Code, Task List and Task information against what is stored in the system, and will alert you if there are errors in the file preventing the import.
Setup Input Fields
Users with Administration permissions can now define which fields to configure when setting up the Empire SUITE. From the Administration \ Company menu, select Setup Input Fields to determine which attributes will be configured in Resource, Time and Expense. For example, in the screenshot below, Resource Users can add Task List and Task information when creating assignments, but elements such as the Location and Type of Work will be hidden:
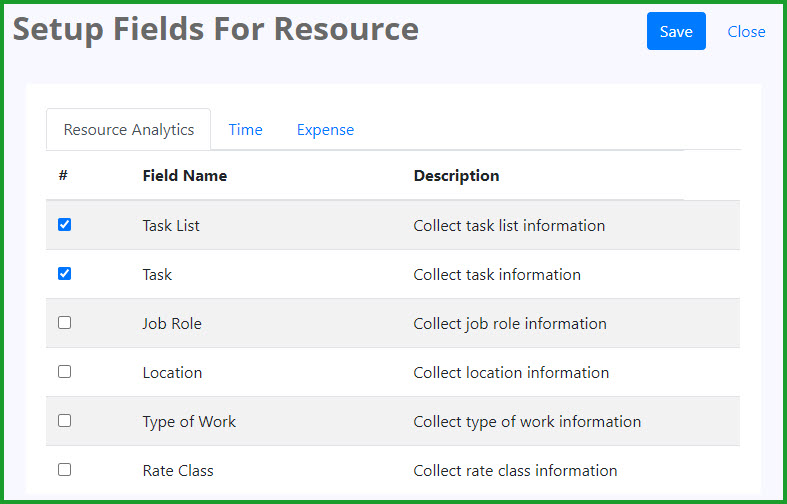
Figure 16 – Resource Setup Options
Similar pages are available for time and expense. In the Time tab, administrators can define which fields will be available for user input in the timesheet:

Figure 17 – Setup Fields for Time Entry
Administrators can also define which fields are available in the Expense sheet:
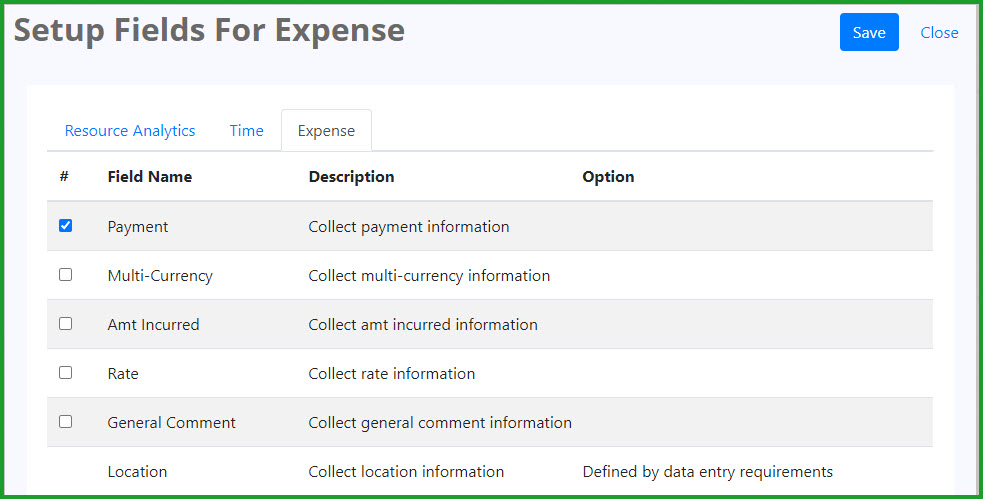
Figure 18 – Setup Fields for Expense Entry
Timesheet Copy Forward
We’ve added user defined options for copying timesheet information from one approval period to the next. While some users may want to copy all timesheet details – client, project, task list, tasks and general comments – from one period to the next, other users may want to limit which details are copied forward. To set the options, click the Copy Forward link in the Timesheet toolbar:

Figure 19 – Copy Forward Menu Option
Set the toggles to copy the desired timesheet details from one period to the next:
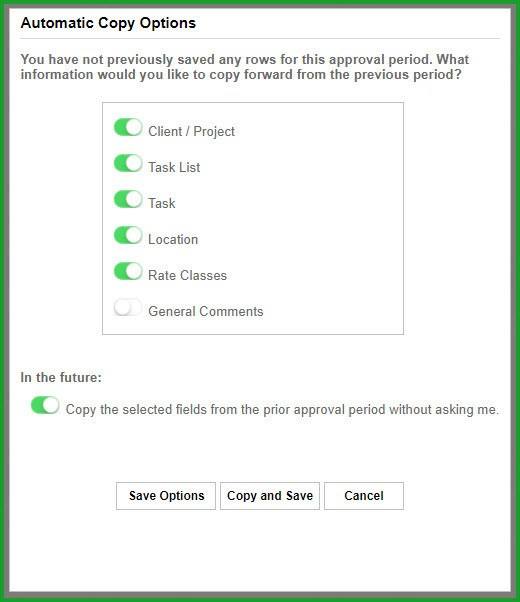
Figure 20 – Setup Fields for Expense Entry
When the In the Future toggle is on, the copy options are selected automatically and the user won’t be prompted to review the options when moving from one timesheet approval period to the next. In the off position, the Automatic Copy Options page will pop up when moving from one period to the next. The user can
• Accept the options as defined by clicking Save Options; or
• Update the options and save them by clicking Copy and Save. The saved selections will be copied to the next timesheet period.
• Click Cancel to return to the timesheet without moving to the next period or copying any of the timesheet details to the next period.
Role-based Time Off Approvals
We’ve expanded the number of approvers for time off events to include project managers and other user definable approver types. For example, you can add an extra set of approvers to cover time off requests that are made outside of a defined date range ‘window’ or for requests that exceed an employee’s available balance.
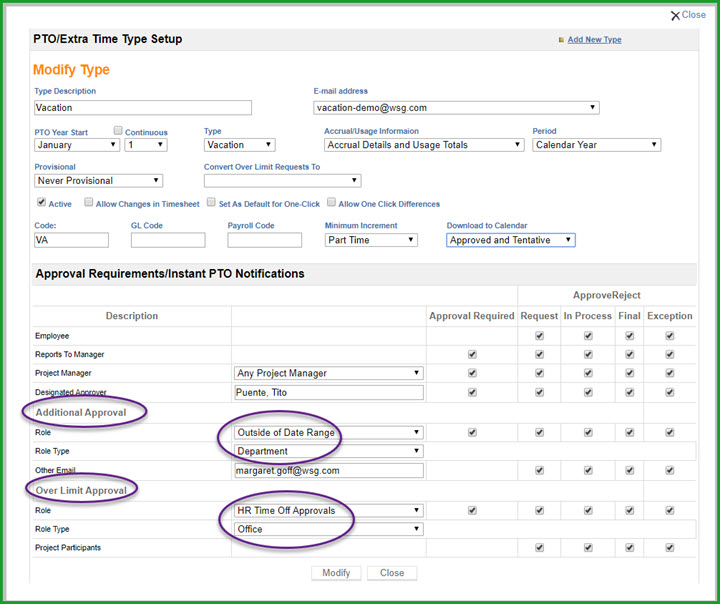
Figure 21 – Time Off Approval Roles
The additional approver roles and role types are defined in the Time Off \ Administration \ Role Setup and Role Assignment pages. You define the Role in the Role Setup page and select which data elements the approval role applies to. For example, the Outside of Date Range role applies to offices and departments:
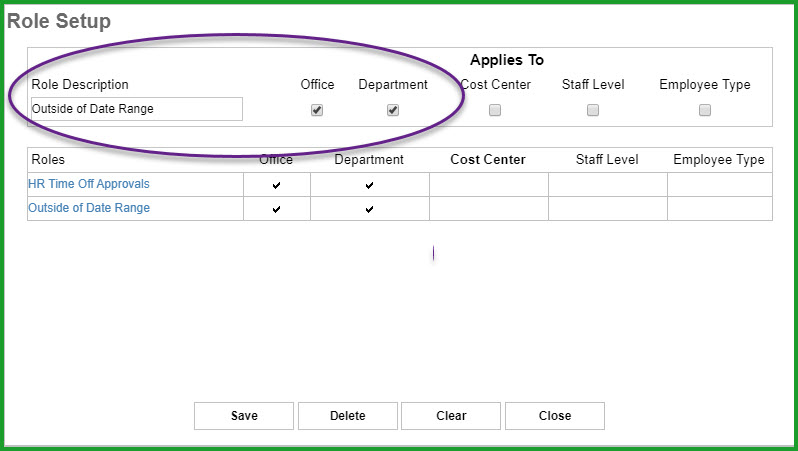
Figure 22 – Time Off Role Setup
Staffers are assigned to the appropriate Approval Role in the Role Assignment page:
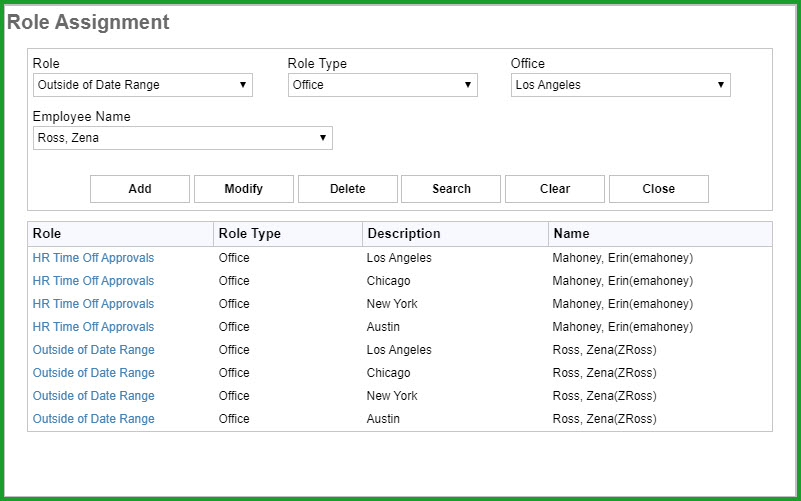
Figure 23 – Time Off Role Assignment
Date: April 2020
What’s New in Empire SUITE April 2020?
Enhancements in this Release
In addition to bug fixes and ongoing performance improvements, we’ve added the following new features to the Empire SUITE
• Split View Resource Display
• Updated Web Resource Display
• Recalculate Resource Rates
• Home Page Time Off Today List
Split View Home Page Resource Portal
Users can now see a split screen view of their assignments in both calendar and list modes.From the Home page My Schedule portal, click Full Screen:
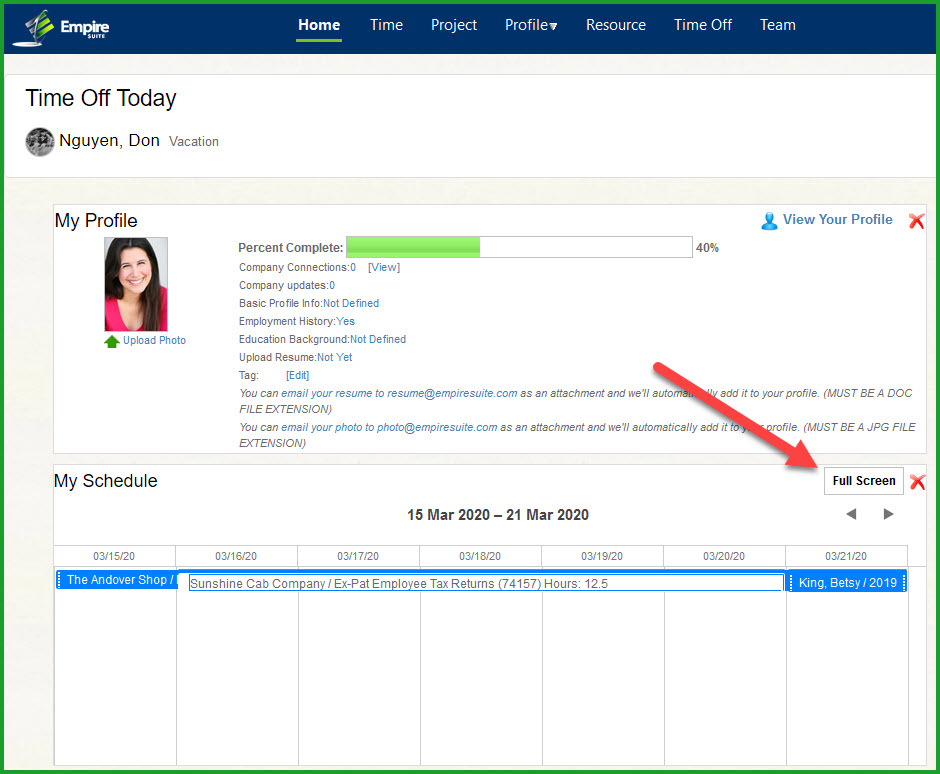
Figure 1 – My Schedule Full Screen
The top of the screen gives you options to control the assignments listed in the left-hand side of the display – use the slider to determine how far back to go, and how far forward:

Figure 2 – My Schedule Split Screen
The bottom of the left-hand side of the display gives users additional options for controlling the display and for content:

Figure 3 – Split Screen Display Options
Use the above controls to:
• Set the width of the split screen
• Set the assignment height (Small, Medium or Large)
• Toggle between Full Screen, which shows assignments in a calendar view, same as the display in the My Schedule portal on the home page, and Split Screen
• Change the display to a different employee
• Use the Exit Full Screen button to return to the Home Page
Updated Web Resource Display
We’ve added a new option to the Web Resource Main Page Filter Bar which allows a user to select the Display size:
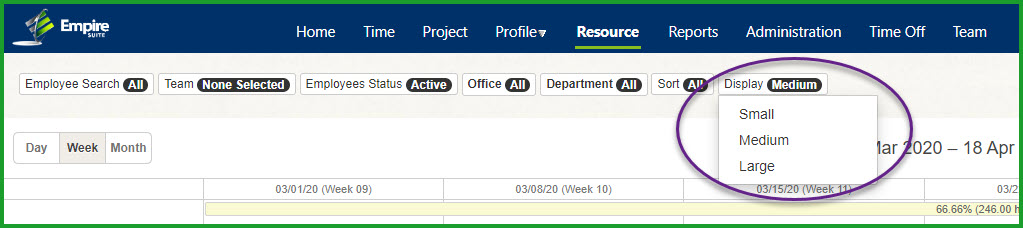
Figure 4 – Resource Display Size Options
This option allows the user to shrink or expand the visible amount of assignment detail in the Resource main page.For example, here’s the display in Medium mode:
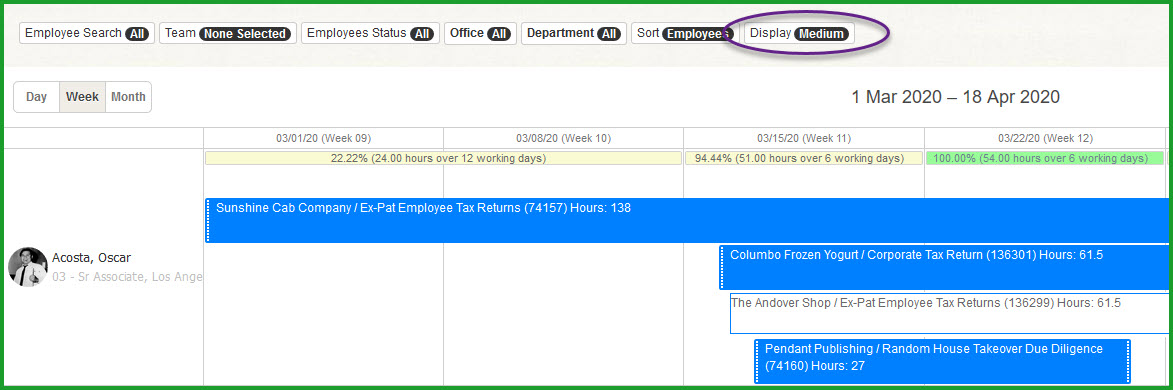
Figure 5 – Medium Mode
Tentative assignments are now displayed with a white background using the same border color as configured in Resource Setup.For example,Billable assignments are displayed with a blue background and white lettering.Tentative Billable assignments are displayed with a white background and a blue border:
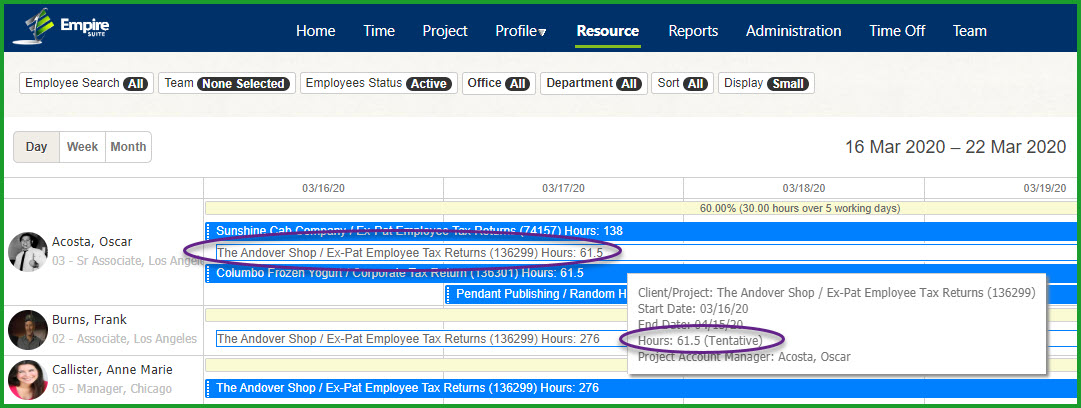
Figure 6 – Tentative Assignments
Recalculate Resource Rates
We have given users an easier way to recalculate the revenue and cost aspects of an assignment when the underlying rates have changed.The resource rate recalculation feature, available from the Administration \ Company menu, allows a user to trigger a recalculation when rates have changed without modifying the existing assignments:
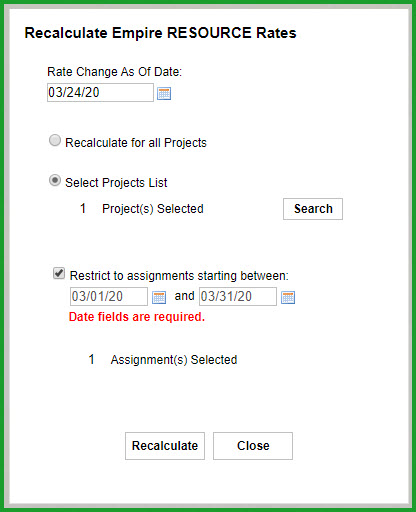
Figure 7 – Recalculate Resource Rates
Rate Change as Of Date – This date is used to define which rate period will be used when recalculating
Recalculate for all Projects or Select Projects List – The rate recalculation can be done for all projects or for a subset by using project search
Restrict to assignments starting between – You can set a specific date range for the recalculation by defining the start and end dates
Home Page Time Off Today
We’ve added a Home Page list of Who’s Out of the Office today. When you log into the Empire SUITE, you’ll see a list of staffers who are out of the office today and why:
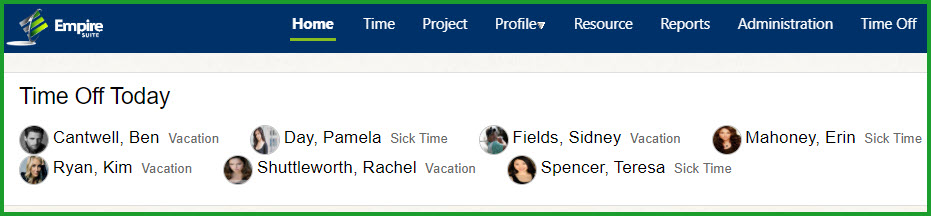
Figure 8 – Time Off Today
Date: November 2019
What’s New in Empire SUITE November 2019?
Enhancements in this Release
In addition to bug fixes and ongoing performance improvements, we’ve added the following new features to the Empire SUITE
• Teams – you can now define Teams for use when staffing projects and workflows
• Text Message Support for PTO Requests, Reviews and Approvals
• The Task List and Tasks feature has been re-engineered and new functionality has been added
• PTO Overlaps – you can now define how PTO ‘Overlap’ are determined. A PTO ‘Overlap’ occurs when two staffers from the same office, department or
• Office and Department Management, including new Office fields
• Resource Copy and Reassign Enhancements
Teams
You can now create Teams of staffers to make resource and workflow assignments easier. Click Team in the toolbar to get started:

Figure 1 – Teams
Define your Team name and click Save:
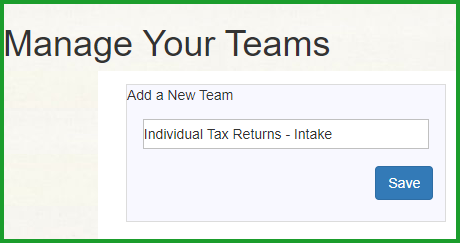
Figure 2 – Creating Teams
Next, add the desired Team members by clicking the checkbox next to the employee photo:
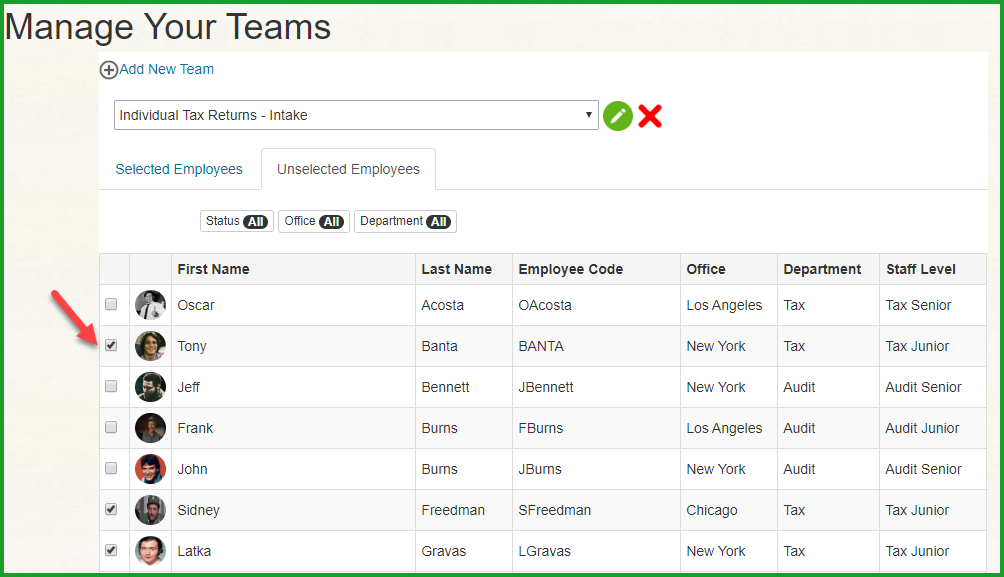
Figure 3 – Adding Staff to a Team
Click the Selected Employees tab to see your team members:
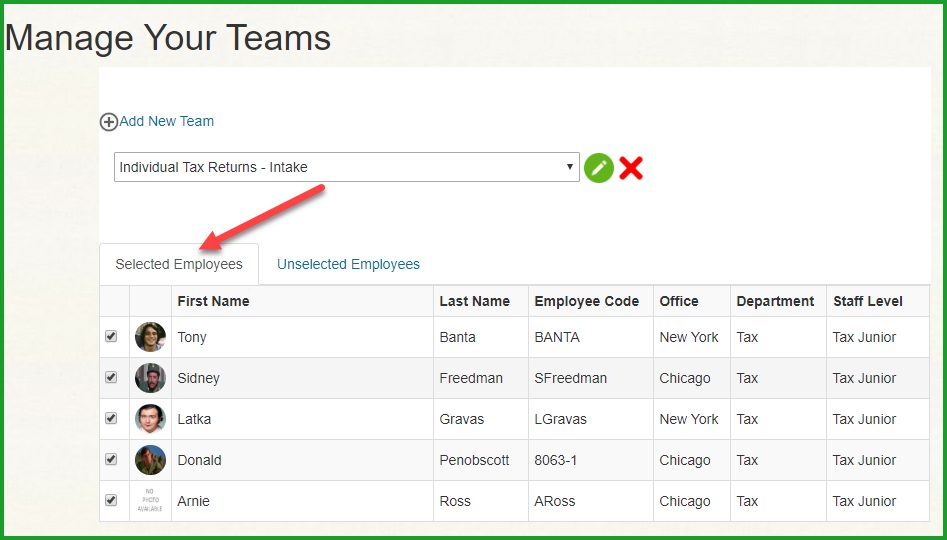
Figure 4 – Selected Team Members
We’ve added a Team option to the Empire RESOURCE Filter Bar:
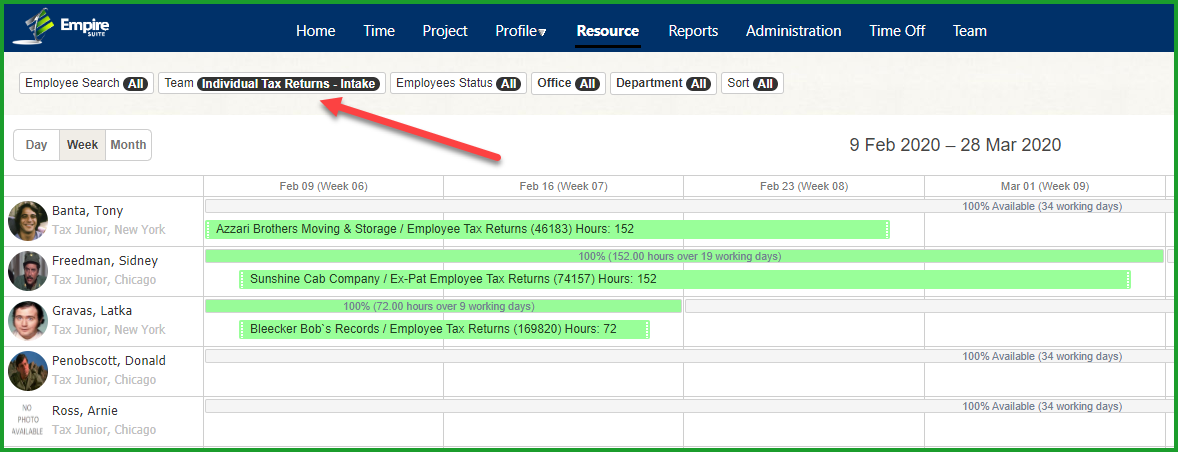
Figure 5 – Empire RESOURCE Team View
One quick note about the Team option in the Filter Bar: if you select a team and then click any of the other filter options, the display will change to the selected Filter option. That is, the Filter selections are not additive. If you’ve selected Individual Tax Returns – Intake as a team and then select the New York office as a filter, the display will change to show all of the staff in the New York office, not just Individual Tax Returns – Intake team members in the New York office
Text Message Support for PTO Requests, Approvals and Rejections
You can send and receive text messages and emails when viewing time off requests, approvals, rejections and final approvals. Text messages are also supported when timesheets are rejected and when reviewing receipts in Approve Others.
To use text messages, employees need to add appropriate phone information and allow their phone to receive text messages:
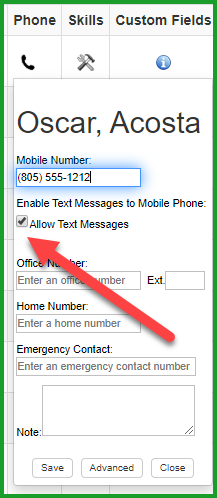
Figure 6 – Telephone Number Set Up
To add telephone information, click the telephone icon in the View Employees page, or you can add telephone information from the View Profile page.
To send a text message, click the List tab in the Time Off page. If the employee has a phone number and text messages enabled, you’ll see the Text Message icon in the upper right corner of the display:
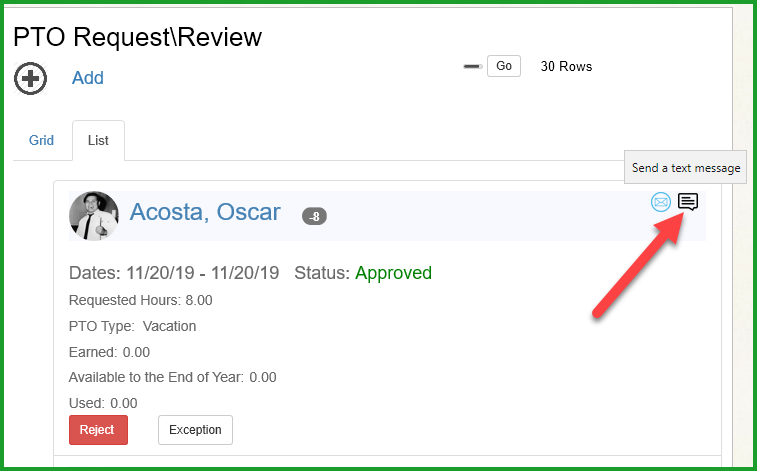
Figure 7 – Sending a Text Message from Time Off
Enter the desired text and click Send Text Message:

Figure 8 – Sending the Text Message
The text message will come from the logged in user sending the message:
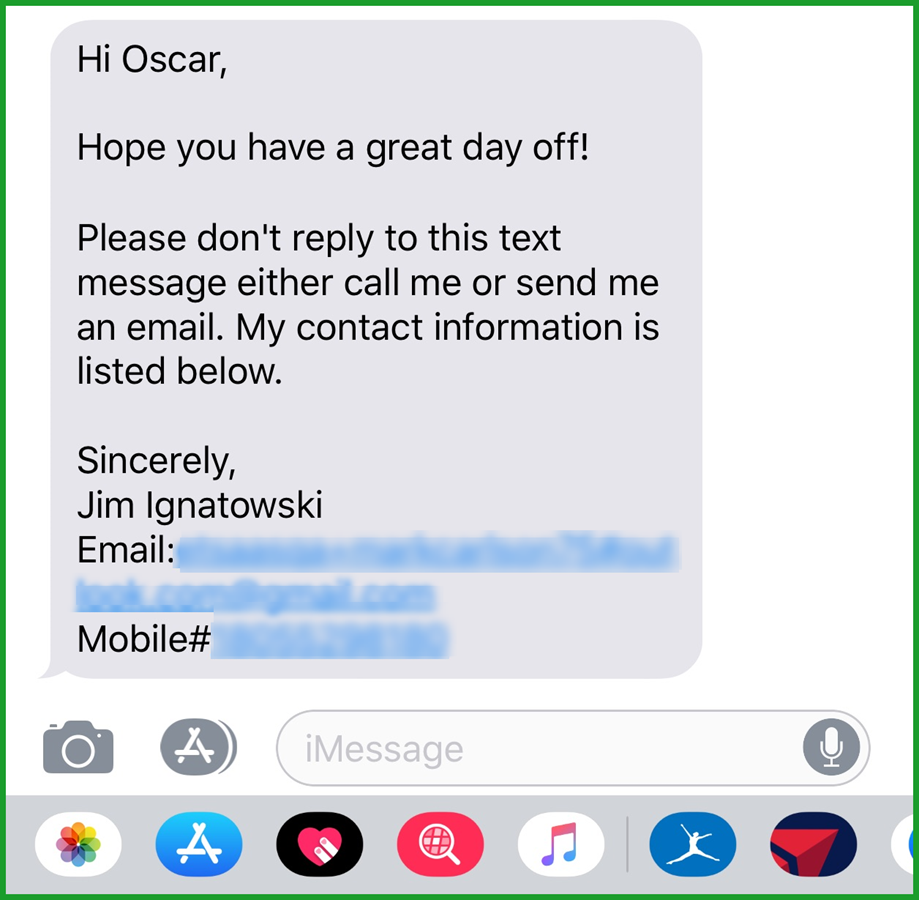
Figure 9 – Text Message
You can send text messages for any time off request, approved time off event, rejected time off event or on a time off event which has final approval
You can also send text messages when there is a question about an attached expense receipt. From the Approve Others tab, open the desired timesheet and click the Comment icon:
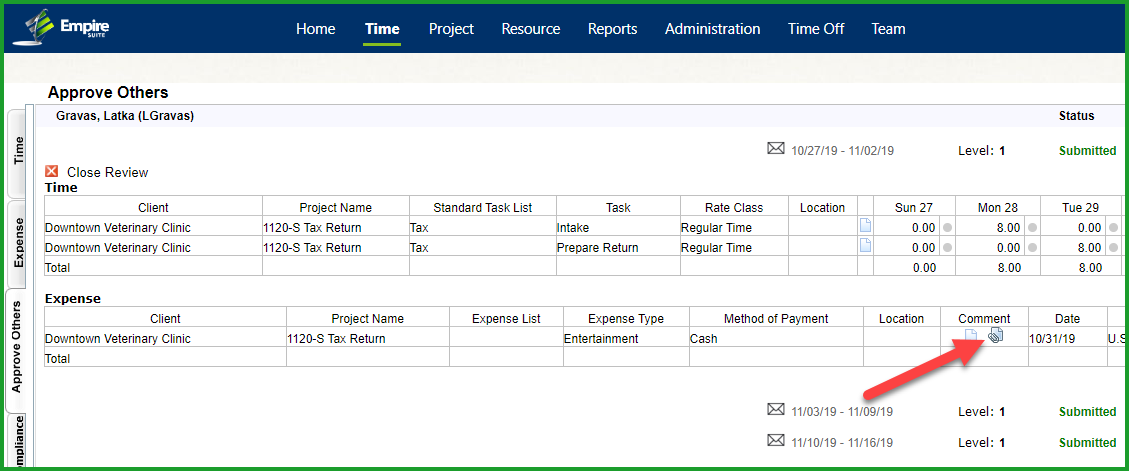
Figure 10 – Approve Others Expense Comment
The text message will come from the logged in user sending the message:

Figure 11 – Approve Others Receipt Text Message
Rejecting a timesheet will also trigger a text message. Click the Reject icon and that will launch the Rejected Comment field. Click Reject to reject the submitted timesheet and send a text message to the staffer:
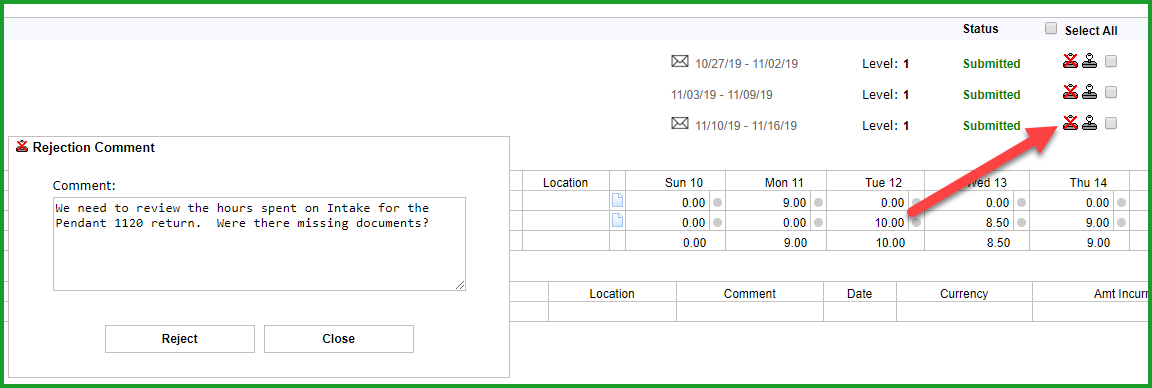
Figure 12 – Rejected Timesheet Text Message
Task List and Task Functionality Has Been Improved and Enhanced
We’ve added new features to make it easier to manage task lists and tasks. You can now copy and paste tasks between projects and filter tasks by status or search for specific tasks by task name.
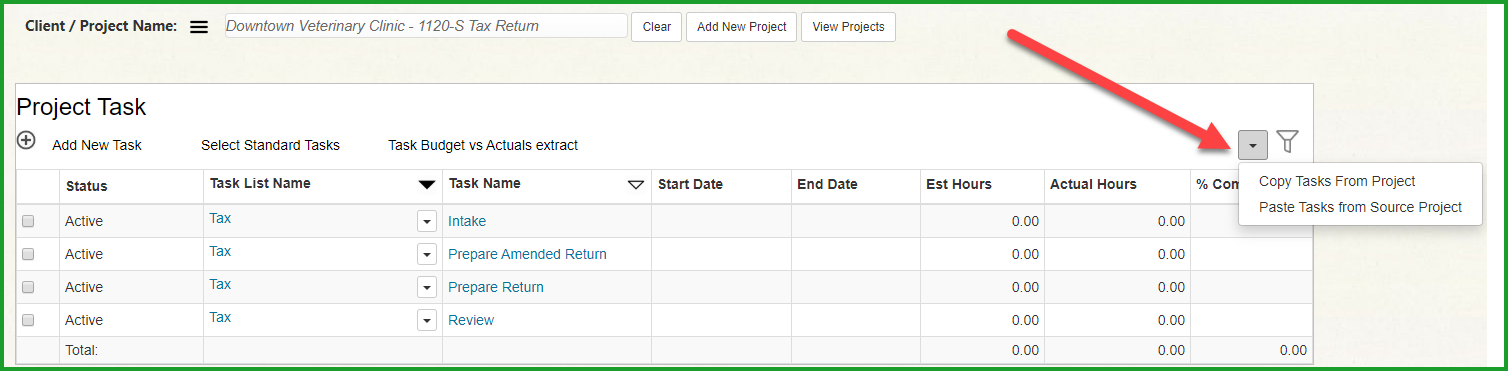
Figure 14 – Task Copy and Paste
To copy tasks from one project to another
1. Select your source project from the Project Dashboard and click Copy Tasks From Project
2. Click Clear in the Dashboard toolbar
3. Select the desired project
4. Click Paste Tasks From Source Project
You can also filter tasks by status or search for tasks by Task Name. Click the Filter icon to launch the search options:
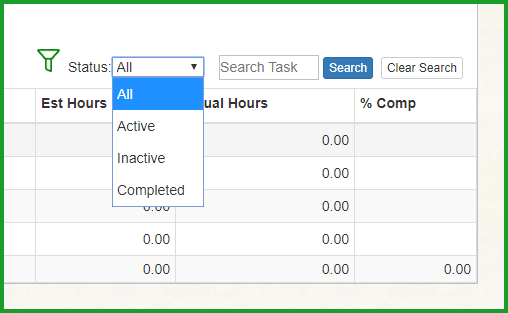
Figure 15 – Task Search by Status
Click Clear Search to clear the search fields.
We’ve made it easier to select and manage project tasks by adding additional options. Click the triangle next to the task name to:
• Select all tasks in the list as project tasks
• Manage tasks and task lists
• Copy Tasks
• Paste Tasks
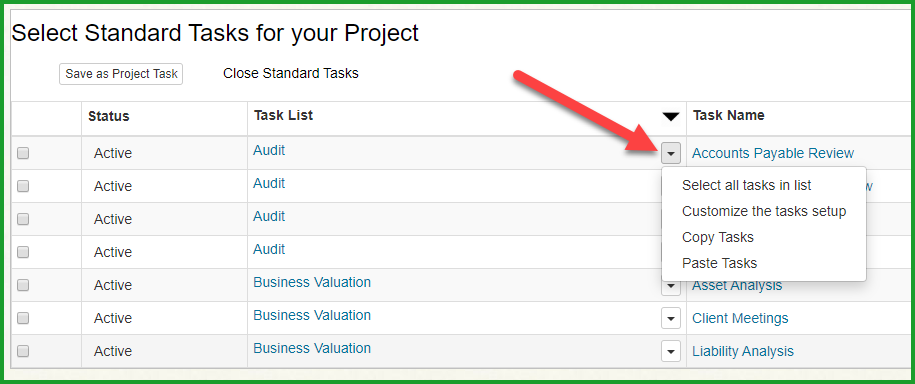
Figure 16 – Managing Tasks and Task Lists
Time Off Overlaps
A Time Off Overlap is when two staffers have time off scheduled at the same time, or when there is an overlap between time off periods. For example, if staffer A has vacation scheduled from Monday, the 18th through Friday the 22nd, and staffer B has a long weekend planned and will be out on Friday, the 15th and Monday, the 18th.
We’ve added the ability for users with the appropriate permissions to define the conditions that trigger an overlap:
• The staffer’s manager or manager(s)
• Cost Center
• Office and/or Department
From the Time off menu, select Administration, then click Overlap Definition:
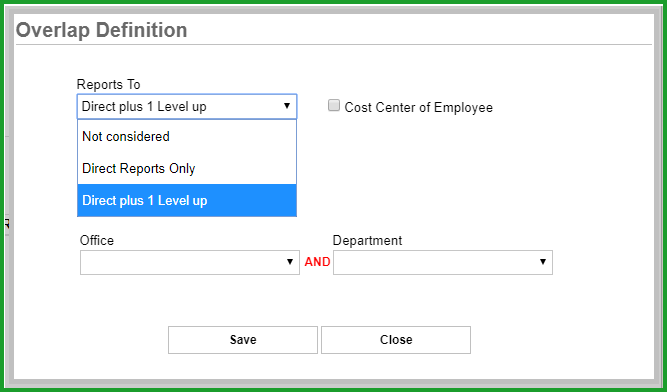
Figure 17 – Time Off Overlaps
Managing Offices and Departments
We’ve added specific menu options for managing offices and departments. From the Administration menu, select Company, then click Manage Offices:
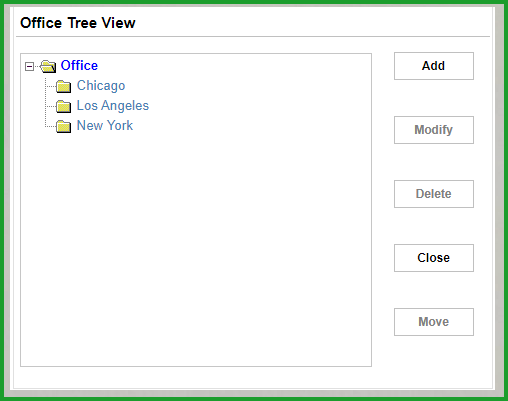
Figure 18 – Managing Offices
We’ve also added new fields to the Office configuration. These can be found when using the Edit User page. Click the pencil icon to modify an existing office or the plus icon to add a new office:
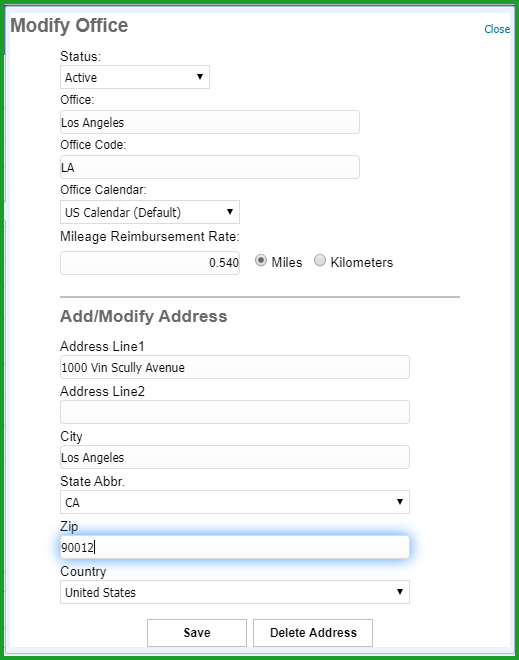
Figure 19 – New Office Fields
Resource Copy and Reassign Enhancements
We’ve made it easier to create new assignments by adding a Copy Assignment option. Click any assignment and then select Copy Assignment from the menu:
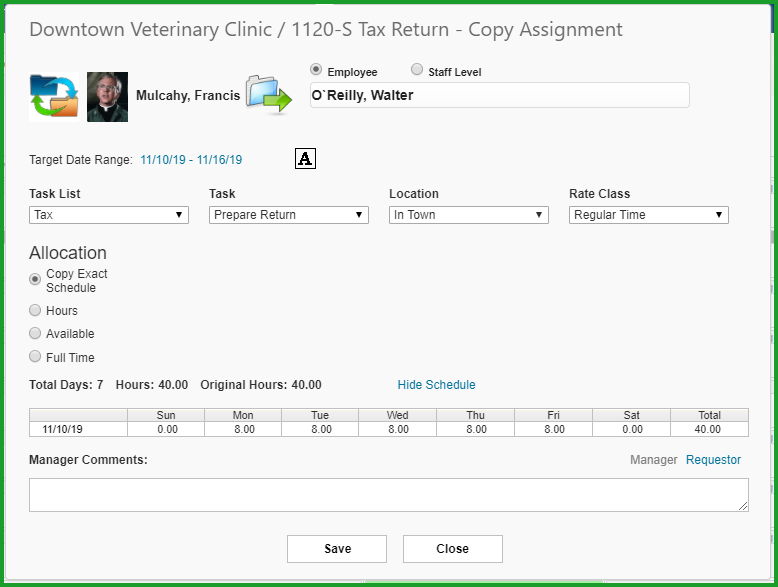
Figure 20 – Copy Assignment
You can copy the exact schedule or you can modify the assignment as required using the Hours, Available and Full-Time options.
Reassigning an assignment is also simpler. Click the assignment then select Reassign:
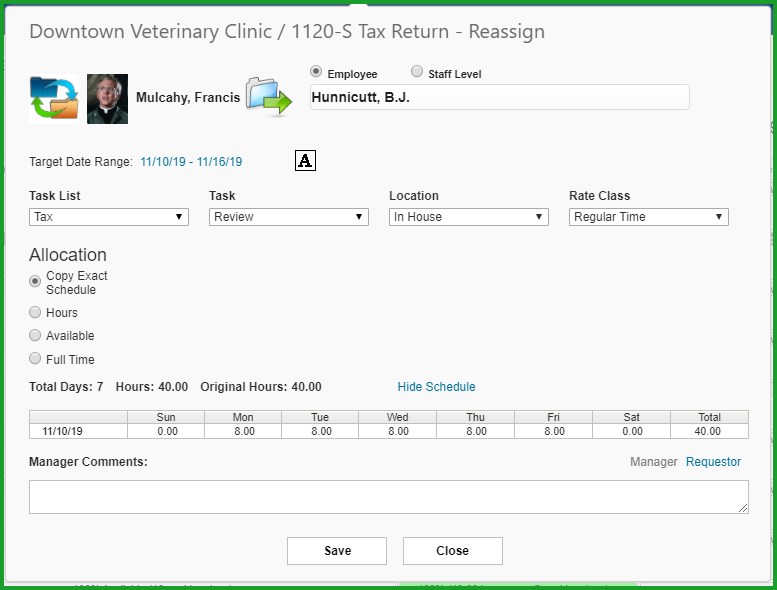
Figure 21 – Assignment Reassign
Both Copy and Reassign support either named resources or Staff Level assignments.
Date: August 2019
Important Changes You Should Know About
We have redesigned several pages to make the UI more responsive and easier to use. Specifically:
• We've added Slider Menus to improve performance and enhance the user experience when using mobile devices
• We've added Filter Bars to the Administration, Project and Resource pages to give users single-click options to manage the page content display
• We've redesigned the Project Main Details page, using a more responsive white space design and more visible icons, including a new edit project button located on right side of the new project view
Summary:
Other Enhancements in this Release:
• Home Page
Self-scheduling support from the resource portal on the home page
Ability to edit your assignment from the home page when security permissions allow
Support for the assignment team view in a split screen presentation from the home page
• Administration
We've added a Slider Menu so you can manage your employees on the go with your tablet devices
We've added a Filter Bar to the Manage Users page
The Employee Grid View has been updated and expanded to include more information
You can add phone information to the employee record
Administrators can now add employee profile photos for all employees
• Project
• Resource
We've added a Filter bar to give users one-click management of the Resource page display contents
You can now sort the Resource Calendar page by Office, Employee Last Name or Staff Level
Added two new ways to create resource assignments
We've added new menu options for editing, deleting and viewing existing assignments
We've added new options and modified the Resource Assignment page to make it easier to use
One-click Tentative assignment approvals
Home Page
Self Scheduling
Users with the appropriate security permissions can now make changes to their assignments using the Home page My Schedule portal. Click the assignment to launch the resource scheduling menu...
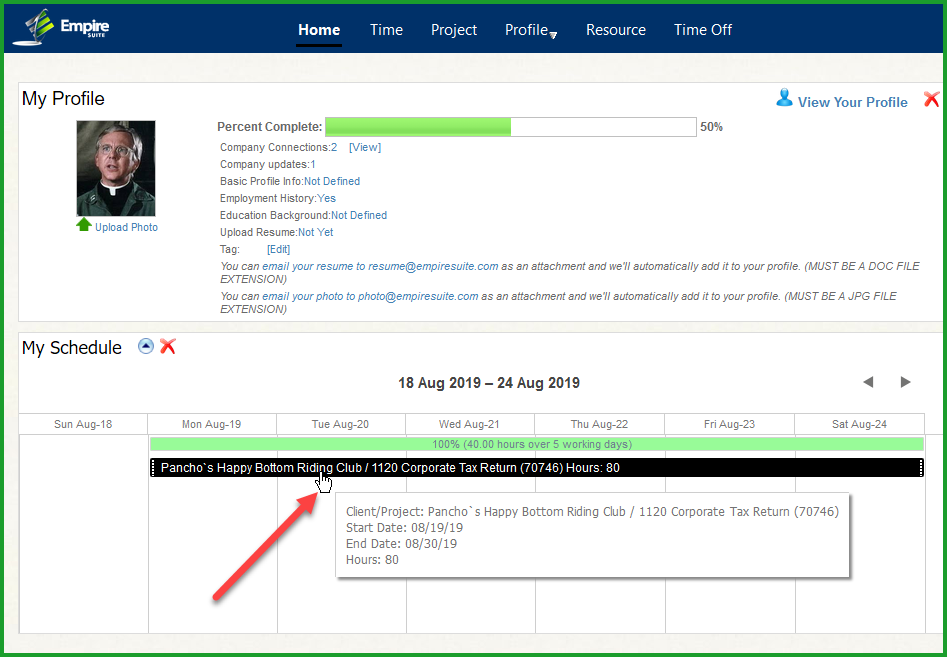
Figure 1 – Self Scheduling from the Home Page My Schedule Portal
... and click Edit Assignment to launch the Edit Assignment page:
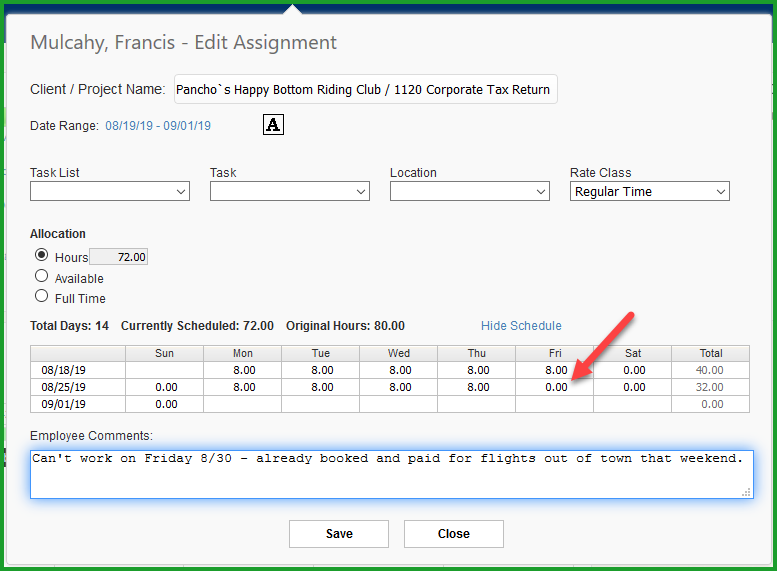
Figure 2 – Self Schedule Edit Assignment
A couple of other things to note:
1. In order to self schedule, users need the following permissions in their Resource application role:
- a. Add/Modify/Delete Assignment – Self
- b. Enable Web Scheduling
- c. Execute Empire RESOURCE
- d. View My Schedule Portal
2. There are database settings that enable Self-Scheduling and determine what Self Schedulers can do with an assignment. We do not have a UI for this feature at the present, but will be adding one in a subsequent release. Please contact WSG and we will work with you to configure the correct database settings:
- a. Allow/Do Not Allow Self-Scheduling
- b. Set the number of days forward self-schedulers are allowed to use. That is, how far in advance of today will you allow users to modify their own schedule. The default is 30 days, but this is easily changed.
- c. Allow/Do Not Allow self-schedulers to reduce the hours assigned
Team View
We've also added support for a Team View from the My Schedule portal. Click the assignment link, then click Team to see other team members assigned to the same project:

Figure 3 – Team View
It's important to note we've added granularity links to the Team View. In the upper left corner of the frame you'll see links to change the display presentation:
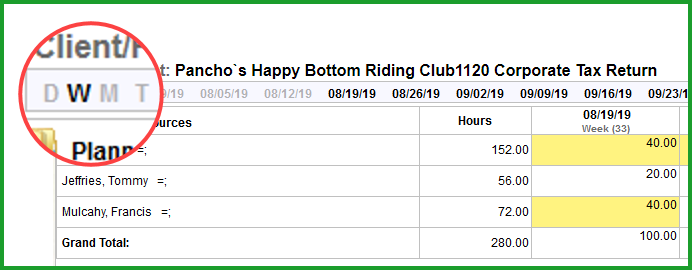
Figure 4 – Team View Granularity Links
• D will change the presentation to Daily
• W will change the presentation to Weekly
• M will change the presentation to Monthly
• T will snap the display to the current day
Administration
Added a Filter Bar to the Manage Users Page
We've expanded our use of Filter Bars and added one to the Administration page. The Advanced Search is still available for more detailed searches using multiple search criteria, but the Filter Bar makes it easy to find employees by status, office or department. For example, if you want to see Active, Los Angeles-based Tax department employees, click the All link to set the desired options:

Figure 5 – Manage Users Page Filter Bar
The Employee Search has been upgraded also, giving you single click options to find employees based on the logged in user:
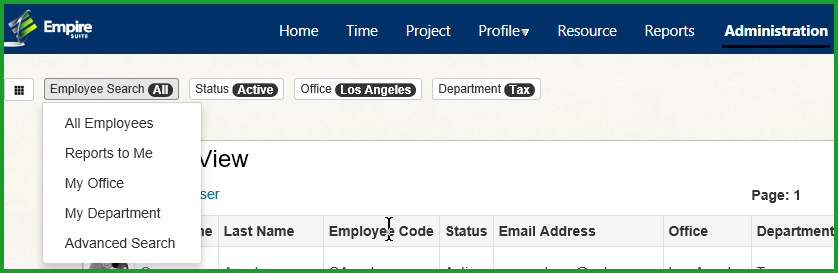
Figure 6 – MManage Users Filter Bar Employee Search
Slider Menu
In addition to the Filter Bar, we've changed the entire menu structure in the different modules by adding a Slider Menu structure. The Slider Menu makes it easier to navigate the application using mobile devices. Click the Slider Menu icon in the upper left corner shown in both Figure 5 and Figure 6 above to slide the Administration Menu into the display:
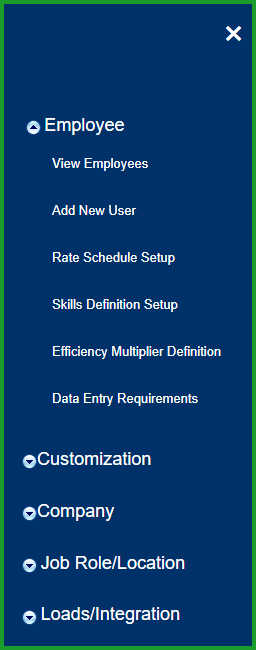
Figure 7 – Administration Page Slider Menu
Click the X in the upper right corner to slide the menu out of the display
Improved and Expanded Employee View Page
We've improved and expanded the Employee View page to include more information, including phone numbers. We've removed the Card view display option and also re-engineered the UI to make it faster and more responsive:
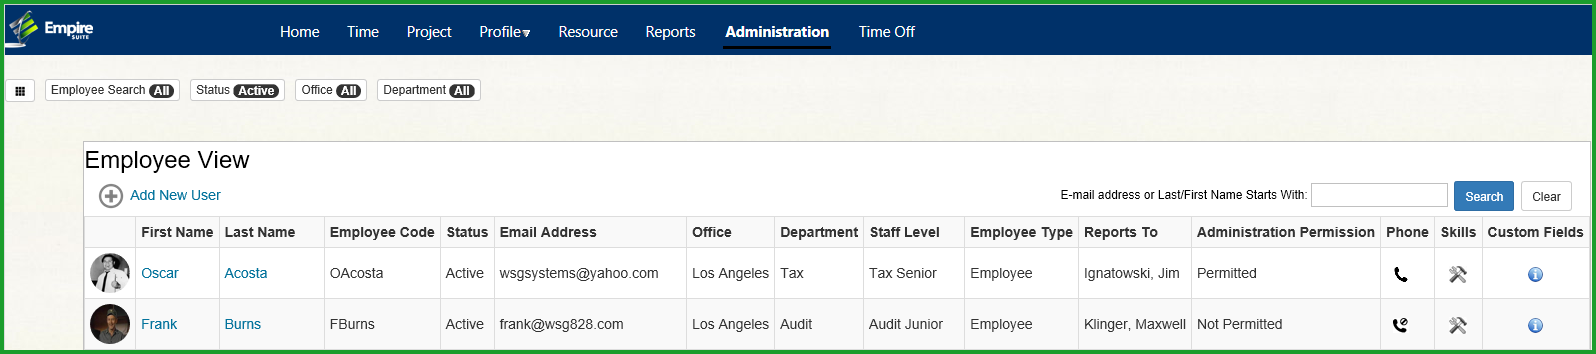
Figure 8 – Expanded Employee View
To add user phone numbers and emergency contact information, click the handset icon in the Phone column:
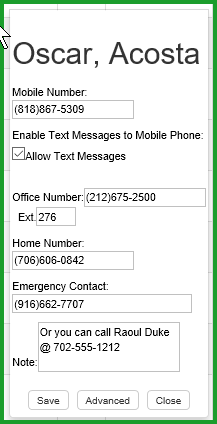
Figure 9 – Phone Information
We've also added an Advanced option to the phone information page to allow you to add additional contact numbers, as well as flag those contact numbers for Text Messages:
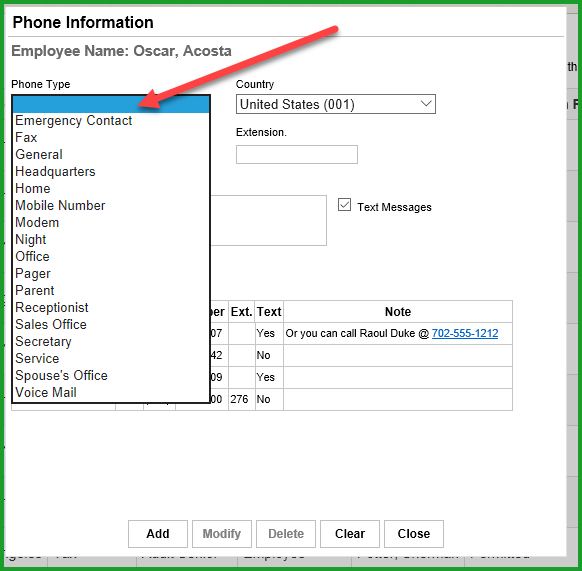
Figure 10 – Phone Information Advanced Page
You can also add phone information from the Profile page:
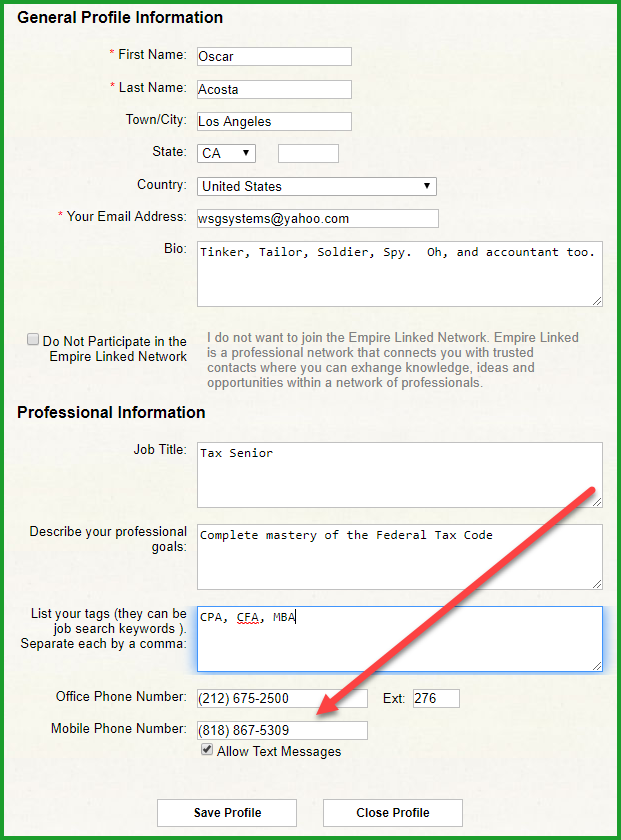
Figure 11 – Profile Page Phone Information
Employee Profile Photos
Administrative users with the Upload Employee Profile Photo permission can upload employee photos from the View Employees page. Add the permission to the appropriate role from the Administration \ Company \ Edit Permissions menu. Be sure to save your changes:
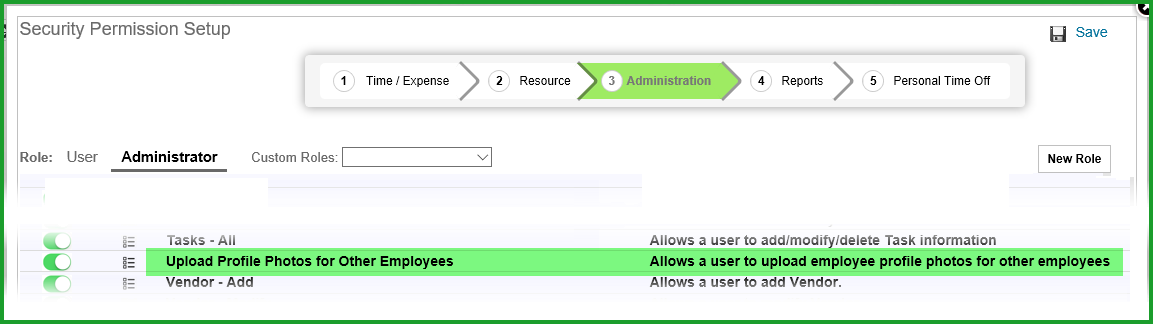
Figure 12 – Upload Employee Photo Profile Permission
You'll need to log out and log back in for the permission to be applied to the user role. Then go to Employee \ View Employees and click the Photo icon for the employee:
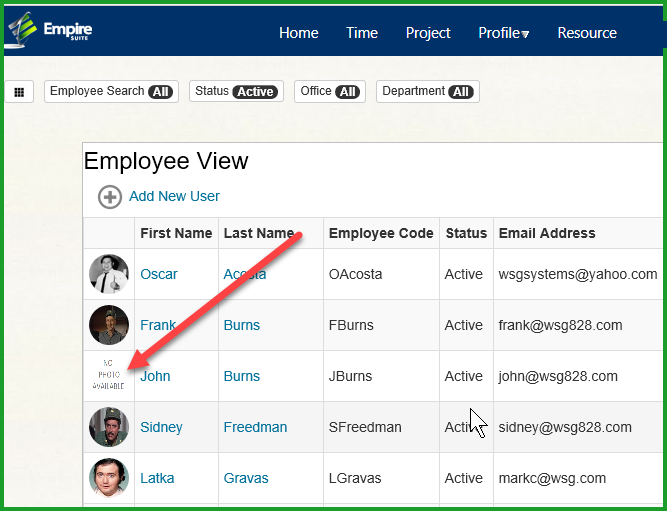
Figure 14 – Employee Photo Link
We'll add the photo to the Employee View.
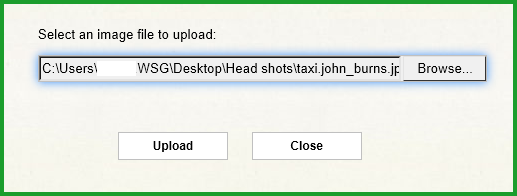
Figure 15 – Photo Upload
Project
Added a Filter Bar to the Project Page
The Project page Filter Bar gives users single-click options for displaying and filtering the project page contents by common attributes without requiring the user to open the Advanced Search page. For example, if you want your Project Dashboard to include only the projects you manage, click the 'Projects I Manage' option:
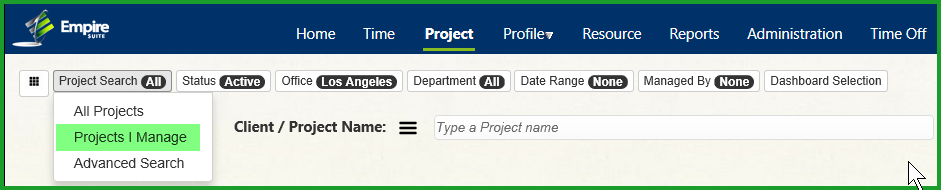
Figure 16 – Manage Users Page Filter Bar
The Filter Bar remembers your last settings and restricts projects based on the filter settings when you leave and return to the Project Dashboard.
Dashboard Selection Option
By adding a Dashboard Selection option, which allows uses to include or exclude the available graphs and charts, we've made it easier for tablet users to manage their clients and projects on the go.
Slider Menu
In addition to the Filter Bar, we've changed the entire menu structure in the project module by adding a Slider Menu structure. The Slider Menu makes it easier to navigate the application using mobile devices. Click the Slider Menu icon in the upper left corner shown in Figure 16 above to slide the Project Menu into the display:
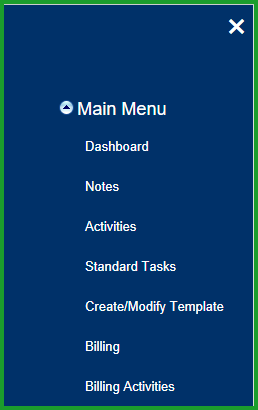
Figure 17 – Project Page Slider Menu
Click the X in the upper right corner to close the Slider Menu.
Updated Project Pages
We've updated and rewritten the project pages with a 'white space' design to support a cleaner, more responsive UI and to add support for mobile devices. Here's the new Project Dashboard:
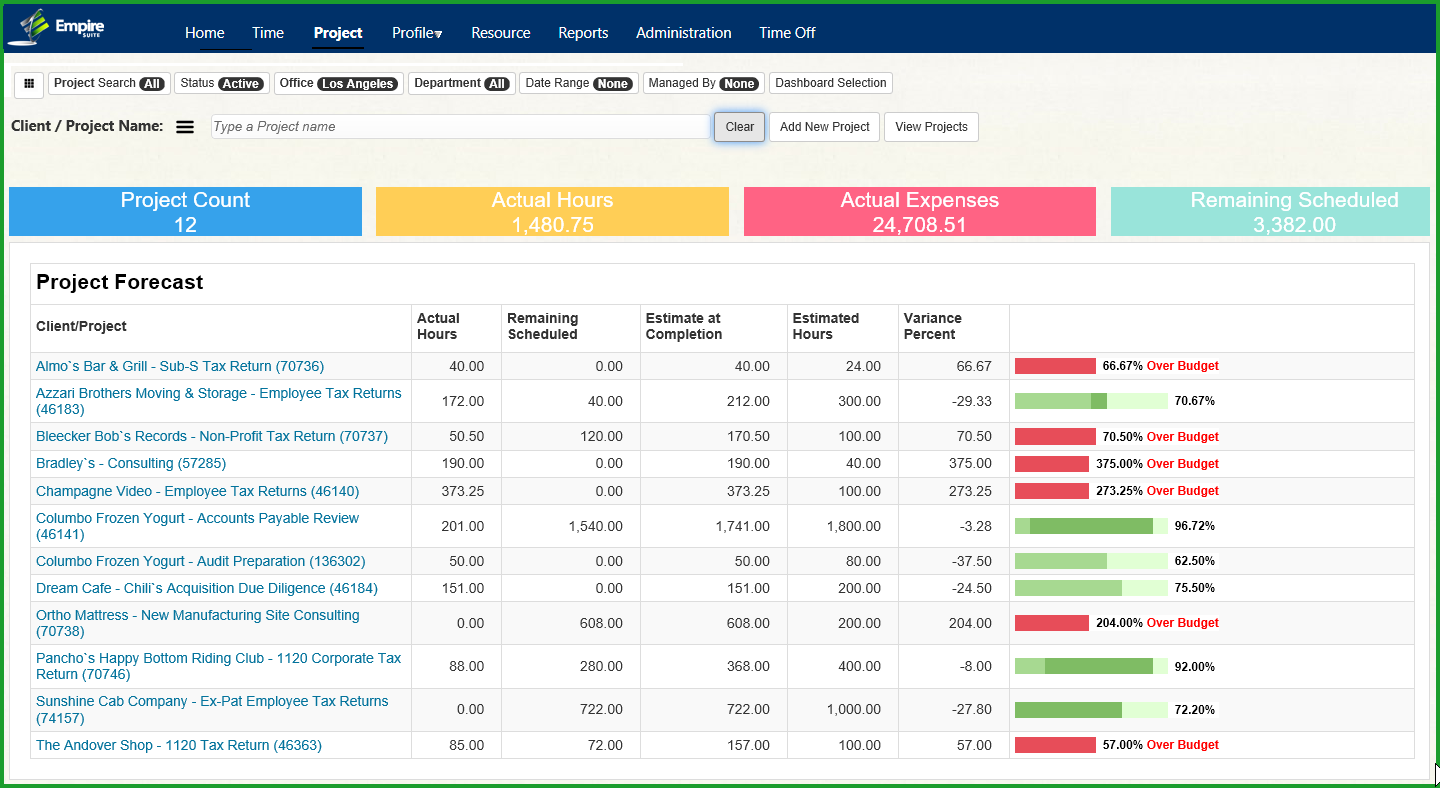
Figure 18 – Project Dashboard
Here's the new project main details page. Note the Edit Project icon is enlarged and easier to see:
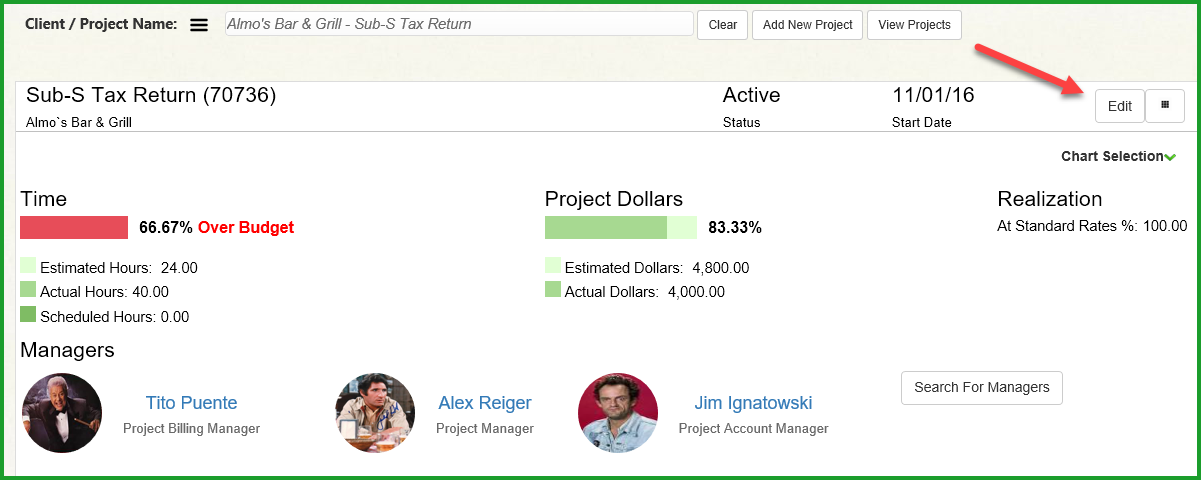
Figure 19 – Project Main Details
Click the Dropdown menu icon next to the Edit button to add an activity to a project, attach a document and more:
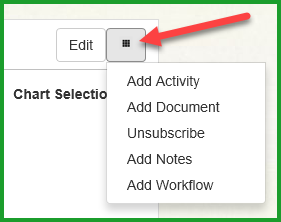
Figure 20 – Dropdown Menu Icon
Add or Change Project Managers from the Project Main Details Page
You can now add or change a project manager in the Project Main Details page without having to go to a separate page. Simply click the link next to the picture to add a new manager or change the existing manager:

Figure 21 – Project Managers
You can also search for a manager by clicking the Search For Managers button.
Resource
Added a Filter Bar to the Resource Calendar Page
The Resource page Filter Bar options are different from the Project page version, but the functionality is much the same: instead of launching the Advanced Search feature to find employees by Status, Office, Department or Reports To, the Filter Bar makes it easy to display your desired content:

Figure 22 – Resource Filter Bar
The Resource page Filter Bar remembers your last settings and will display Resource Calendar page content based on your last settings.
New Resource Calendar Page Sorting Options
We've added Sorting capability to the Resource Calendar page. Click the Sort button to display the Resource Calendar page content in order by:
• Employee Last Name
• Office
• Staff Level
Two New Options for Creating Assignments
You can still click and drag across the calendar to add an assignment, but now you can also launch the Create Assignment page with a single click in the calendar grid...
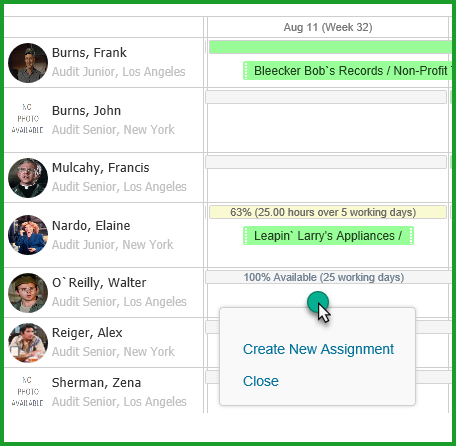
Figure 23 – Single Click New Assignment
...or by mousing anywhere over the employee information on the left-hand side of the Resource Calendar Page and clicking the plus sign:
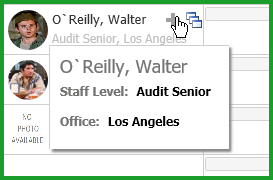
Figure 24 – Employee Information Assignment Create Option
New Menu Options for Editing, Viewing and Deleting Existing Assignments
Clicking an existing assignment will launch a menu with options for editing, viewing and deleting an assignment:
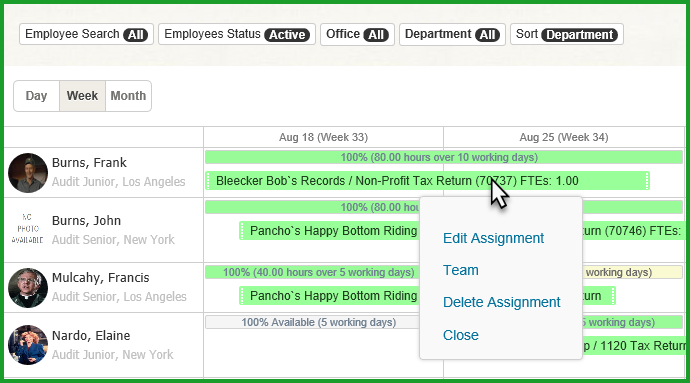
Figure 25 – Resource Assignment Menu
• Edit Assignment launches the Resource Assignment page
• Team will display the other resources assigned to the same project
• Delete Assignment will delete the assignment
• Close will close the menu and return you to the Resource Calendar page
Improved Resource Assignment Page
We've modified the Resource Assignment page to make it more intuitive and added new features:
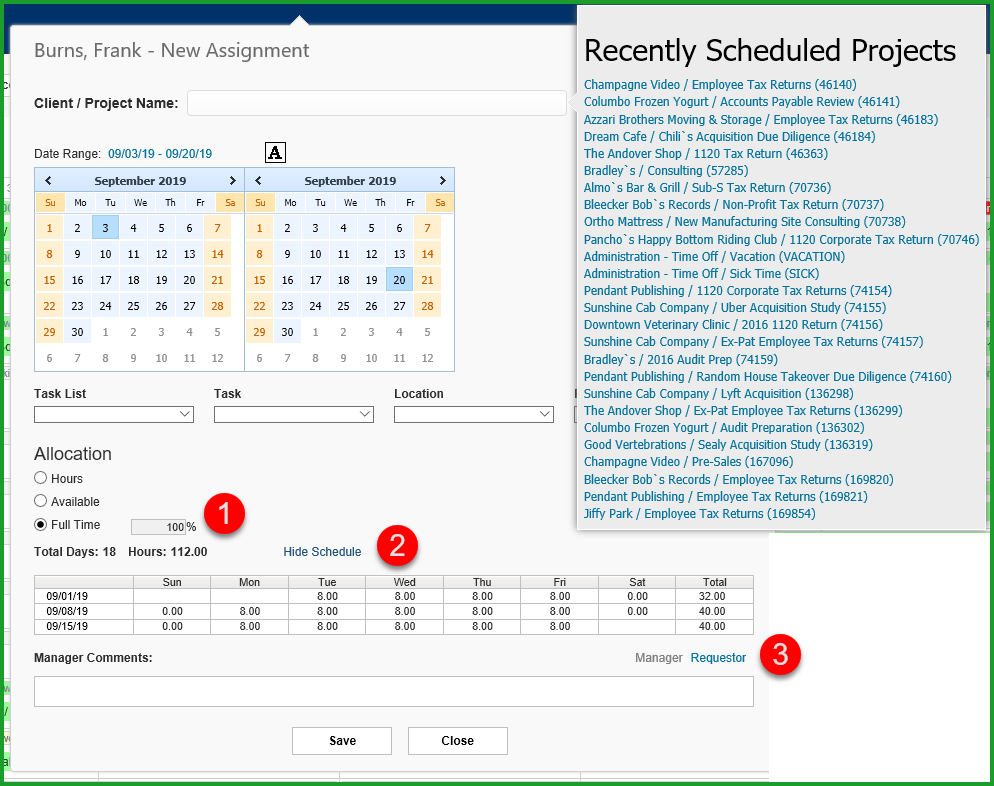
Figure 26 – Resource Assignment Page
1. The default term for the assignment is now full time
2. You can toggle between displaying and hiding the schedule
3. You can add Employee, Manager or Requestor comments to the Assignment
One Click Tentative to Approved Assignment
Users with the Approve assignment permission can now change an assignment's status to Approved from Tentative without having to open the assignment:
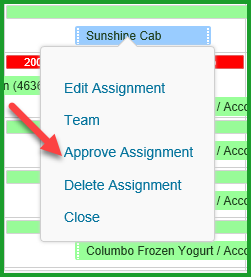
Figure 27 – Approve Assignment
Resource Team View
We've added the ability to see the other members of a resource team without leaving the Resource Calendar Page. Click any existing assignment and click Team to see other staffers assigned to the same project:
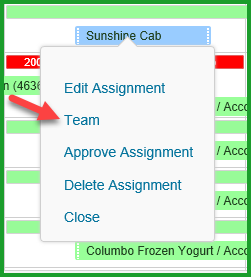
Figure 28 – Existing Assignment Team Option
We'll show the other members on the team in a split screen at the bottom of the display:

Figure 29 – Team View
Resource Project View
You can now see the other projects a staffer has been assigned to from the Resource Calendar Page. Mouse over the Employee details at the left side of the screen. Click the File icon to launch the split screen showing you all the projects the staffer is assigned to:
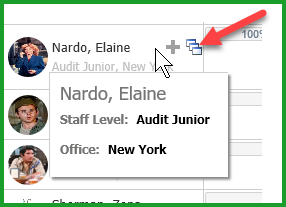
Figure 30 – Resource Project View Launch
As with the Team View, we show you the staffer's project assignments in a split screen at the bottom of the display:

Figure 31 – Resource Project View
Copy Resource Schedules Between Projects
We've added the ability to copy either the actuals or existing resource schedule from one project to another. The Copy Resource option is available from the Project Main Details page. Pick your source project, then click the Slider Menu icon to launch the Project menu, and select Copy Resource:
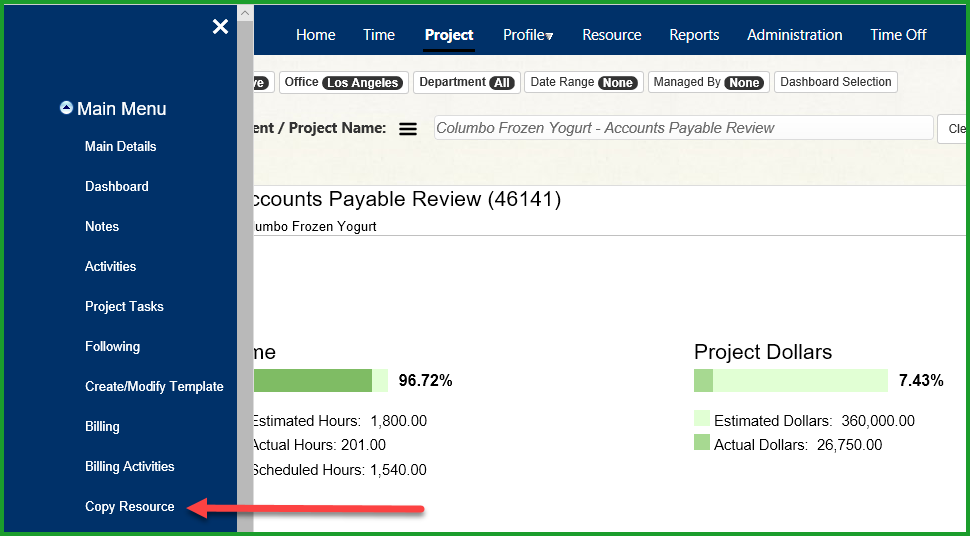
Figure 32 – Copy Resource Menu Option
The Copy Resource Information page:
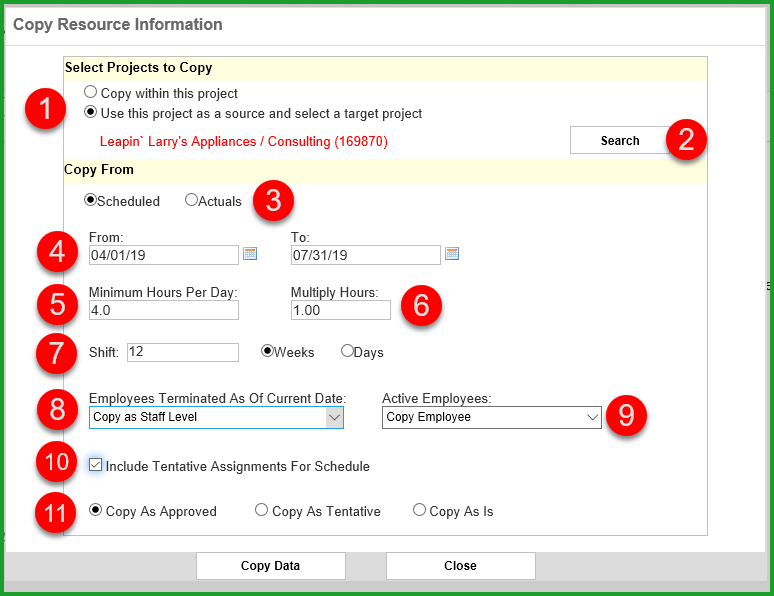
Figure 33 – Copy Resource Information
1. Click the 'Use this project as a source project and select a target project' radio button
2. Use the Project Search link to locate your target project
3. Select either Scheduled or Actuals as the basis for copying from your source project to the target project
4. Pick the appropriate date range for either Scheduled or Actuals
5. Set the minimum scheduled or actuals hours per day to include in the copy process
6. Set a multiplier as appropriate to use when copying either scheduled or actual time
7. Shift the copy process by the desired number of days or weeks. The default value is 364 days
8. Determine how you want to handle Terminated employees in the copy process. You can select one of the following options:
a. Do Not Copy
b. Copy the Employee
c. Copy as Staff Level
9. Determine how you want to handle Active Employees. You can select either:
a. Copy Employee
b. Copy as Staff Level
10. Use the checkbox to either include or exclude Tentative assignments if your copy process is using Scheduled
11. Determine how you want to handle the assignment status. Select one of the following options:
a. Copy as Approved
b. Copy as Tentative
c. Copy As Is
When you've got your settings as desired, click Copy Data to copy the Scheduled or Actuals from the Source project to the Target project
Date: Feb 2019
Summary:
- Here’s a list of new features in this release:
-
New Empire SUITE Sign Up page and Improved Sign Up Process
Completely Revamped Empire TIME OFF Interface and Enhanced Functionality
Empire RESOURCE Enhancements
New Project User Interface
New Client User Interface
Resume Upload Support
New Empire SUITE Sign Up page and Improved Sign Up Process
We’ve completely reworked the Empire SUITE sign up page and we now allow you to configure your environment as Empire EXPENSE or Empire TIME OFF only. We’ve also added an option to include sample data to help you learn how to use the applications.
Add your information and click the Start Free Trial Now button:
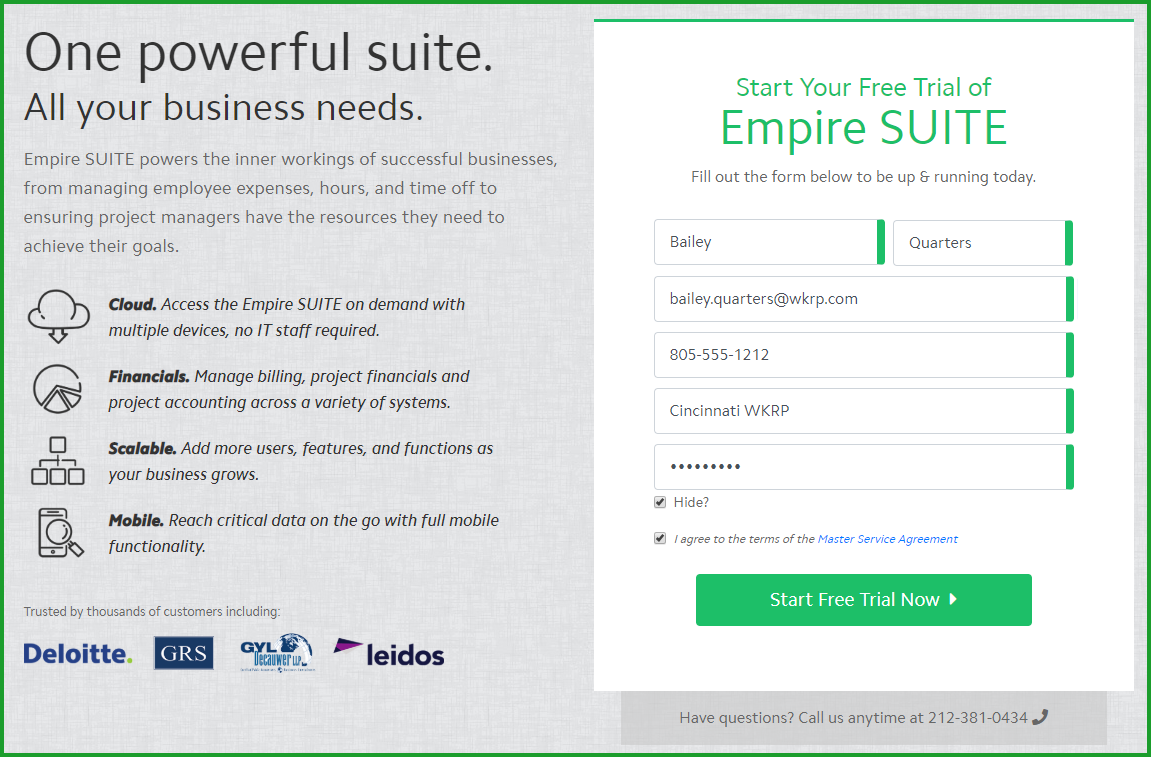
Figure 1 – Sign Up Page
The Start Free Trial Now button will take you to a new page where you can pick which Empire SUITE application you’d like to use:
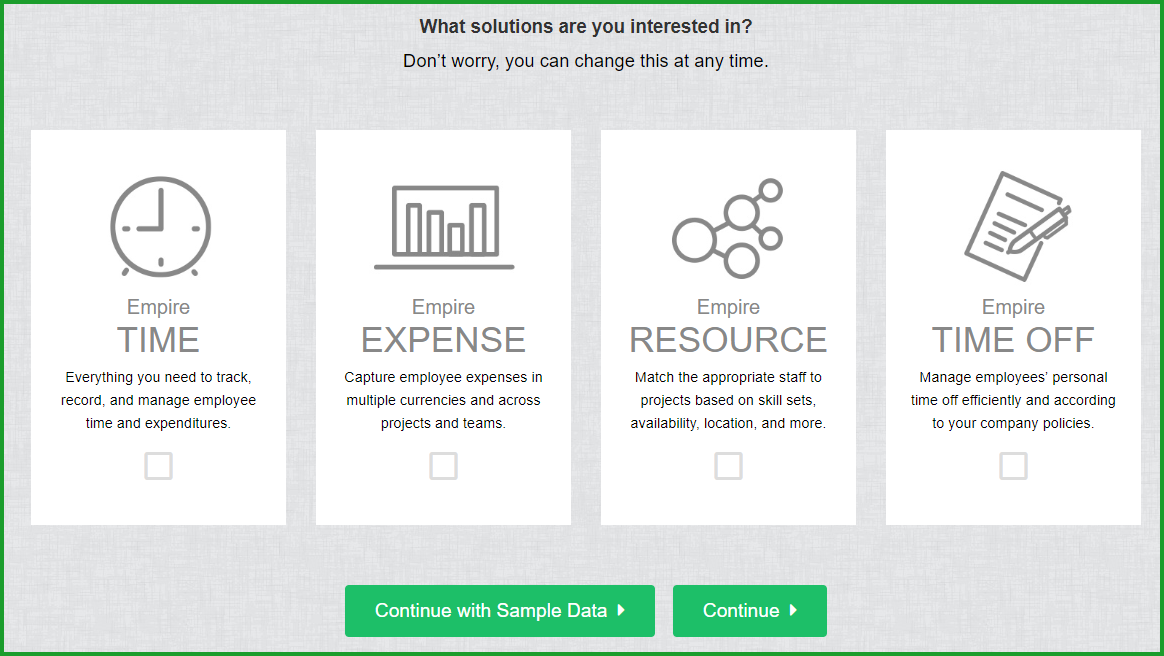
Figure 2 – Empire SUITE Application Sign-Up
You can select from any of the available applications and of course you can add more later as your business grows or your needs change. You also have the option of using Sample Data to help get you started with your trial.
Completely Revamped Empire TIME OFF
The user interface has been redone and new functionality, such as multiple approvals, instant notifications and conflicts/overlaps information, has been added. It’s important to note Empire TIME OFF has been rebuilt with a responsive design allowing you to run the application across mobile, tablet, laptop and desktop computers with the same user experience.
PTO Request\Review Page
The PTO Request\Review page has been completely updated
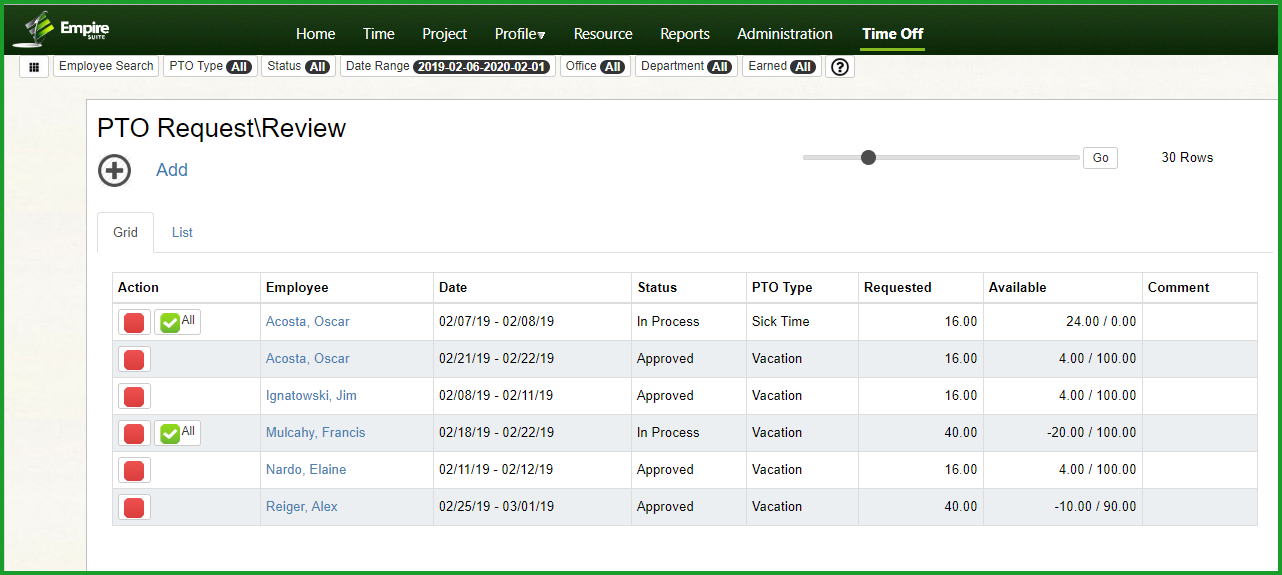
Figure 3 – PTO Request\Review
We’ve also added two tabs to let users control how the details are displayed. Figure 3 above is Grid mode, which is the default view when seeing this page on a desktop computer, laptop computer or a tablet. List Mode, shown below, is the same information but in a list format:
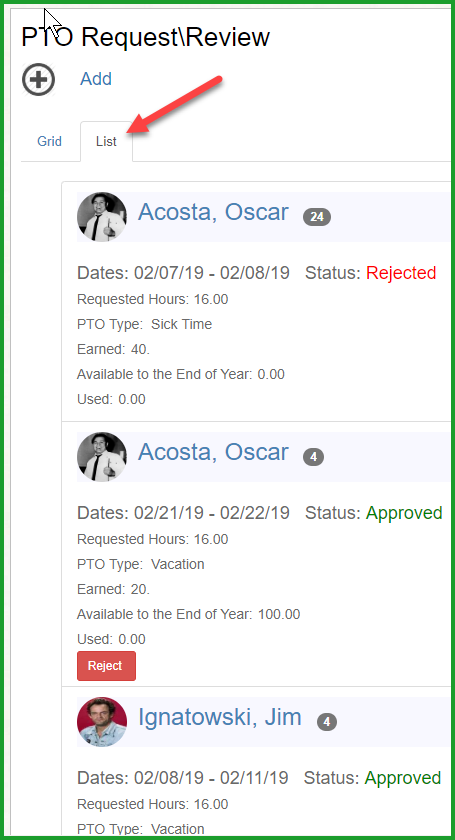
Figure 4 – PTO Review List Mode
List mode is the default display when viewing the page on a mobile device or smaller tablet, or if the browser window is reduced in size to where Grid mode will not display properly.
Time Off Administration
We’ve moved all of the Time Off Administrative options under a single icon, located at the left side of the Time Off toolbar:

Figure 5 – PTO Administration
Click the grid icon to see the different Personal Time Off Administration controls:
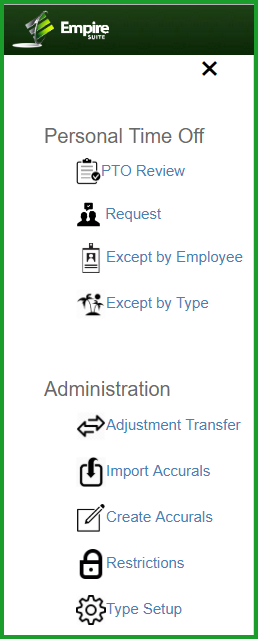
Figure 6 – PTO Administration Menu Options
Time Off Type Setup
We’ve completely updated the Time Off Type Setup feature to include support for multiple approvals and notifications for all interested and affected parties. Click Type Setup, then select the desired PTO Type. (Note: Vacation and Sick Time are included for your convenience. Other types can be added as required by your company). Below is a screenshot of the updated Vacation type setup page:
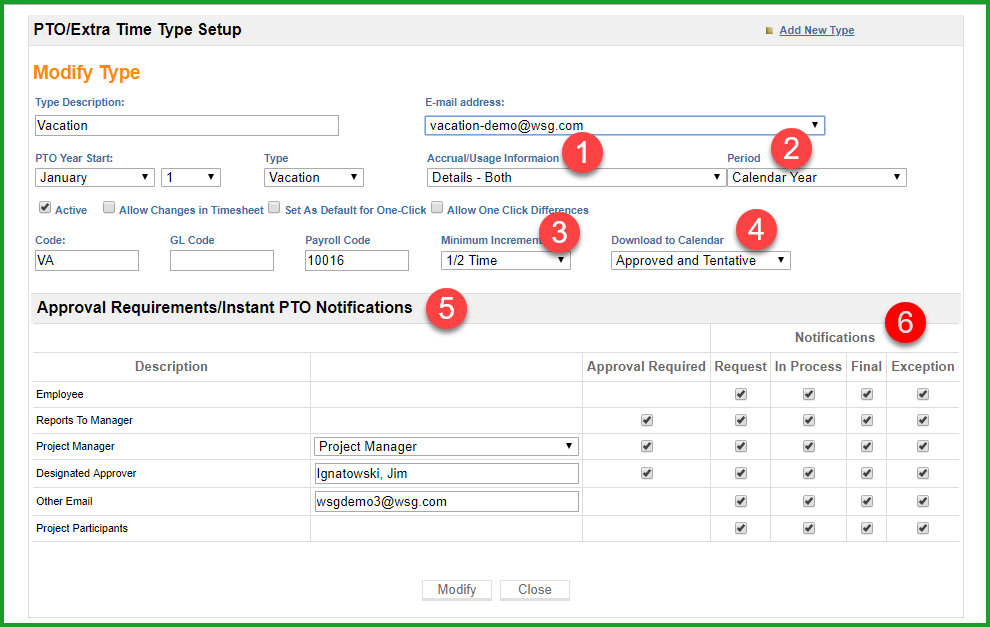
Figure 7 – PTO Type Setup Page
1. Accruals\Usage Information – administrators can decide which details are included in system generated PTO Emails:
- a. Accrual Details and Usage Totals
- b. Accrual Totals and Usage Details
- c. Details – Accruals Only
- d. Accrual Details and Usage Totals
- e. Accrual Totals and Usage Details
- f. Details – Accruals Only
- g. Totals – Accruals Only
- h. Totals – Usage Details Only
- i. Totals – Both
2. Period – Administrators can determine the period associated with the PTO Type:
- a. Calendar Year
- b. Current Date +/- 12 Months
- c. Request Date +/- 12 Months
3. Minimum Increment – Administrators can determine the minimum amount of time allowed for requests by PTO Type:
- a. Half Time
- b. Full Time
- c. Part Time
4. Download to Calendar – Administrators can determine by status whether or not a request is downloaded to an Employee Calendar:
- a. Approved and Tentative
- b. Approved Only
- c. None
5. Approval Requirements/Instant PTO Notifications – Administrators can configure different approval rules for different PTO Types. For example, you can configure Sick Time as immediate approved while a Vacation request may require multiple approvals. Approval emails and instant notifications can be configured for:
- a. Employee ‘Reports To’ Manager
- b. Project Manager for any projects the employee is assigned to
- c. A designated approver
- d. Another designated user by email
- e. Other employees assigned to the same projects as the requesting employee
6. Notifications – These settings determine which users receive instant notifications during the request and approval process:
- a. Request – An email with the request details
- b. In Process – As the request is routed for approvals, the In Process email includes information about the request’s approval status and whether or
not the required approvers have approved the request or whether the request is still pending
- c. Final – The Final notification is sent when the last approval is in place or if an approver has rejected the request
- d. Exception – The Exception email is triggered if there is a change to an approved time off request
Time Off Request\Review Page Filters
We’ve updated the Time Off Request view filters with new one-click controls:

Figure 8 – PTO Request Type Filters
Users can search for PTO Requests by:
- • Employee
- • PTO Type
- • Status
- • Date Range
- • Office
- • Department
- • Earned
And the filters have one-click All capability as well as user defined searches to refine the desired criteria
Time Off Request
We’ve completely reworked the Time Off Request page. From the PTO Request\Review page, click Add:
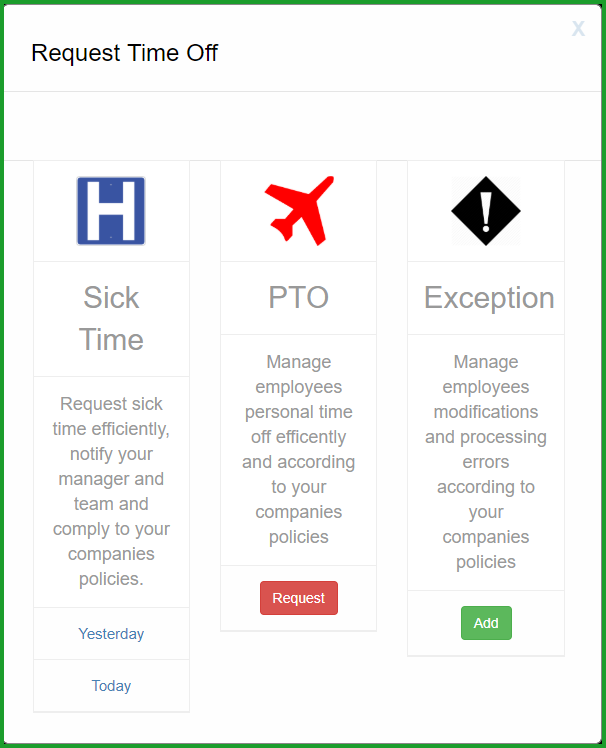
Figure 9 – Request Time Off
Sick time offers one-click requests for Yesterday and Today. We’ve also completely updated the PTO Request page. Click Request to add a request for any type of configured time off and select the appropriate date range
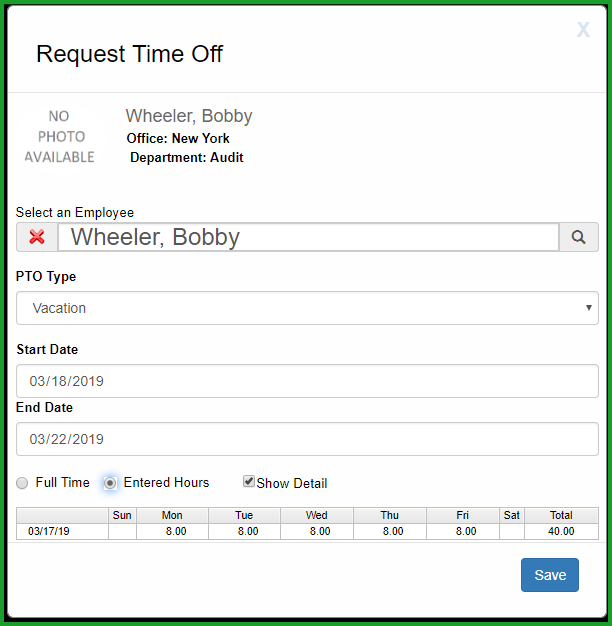
Figure 10 – Request Time Off Detail
Lastly, we’ve updated the Exception Time page. Click Add from the Request Time Off page to launch the Exception Time page. (Note: Exception time events are for recording unscheduled PTO events, such as historical sick time or updates to scheduled and approved vacation time already in a timesheet)
Click the tab to select either Exception Time by Employee. . .
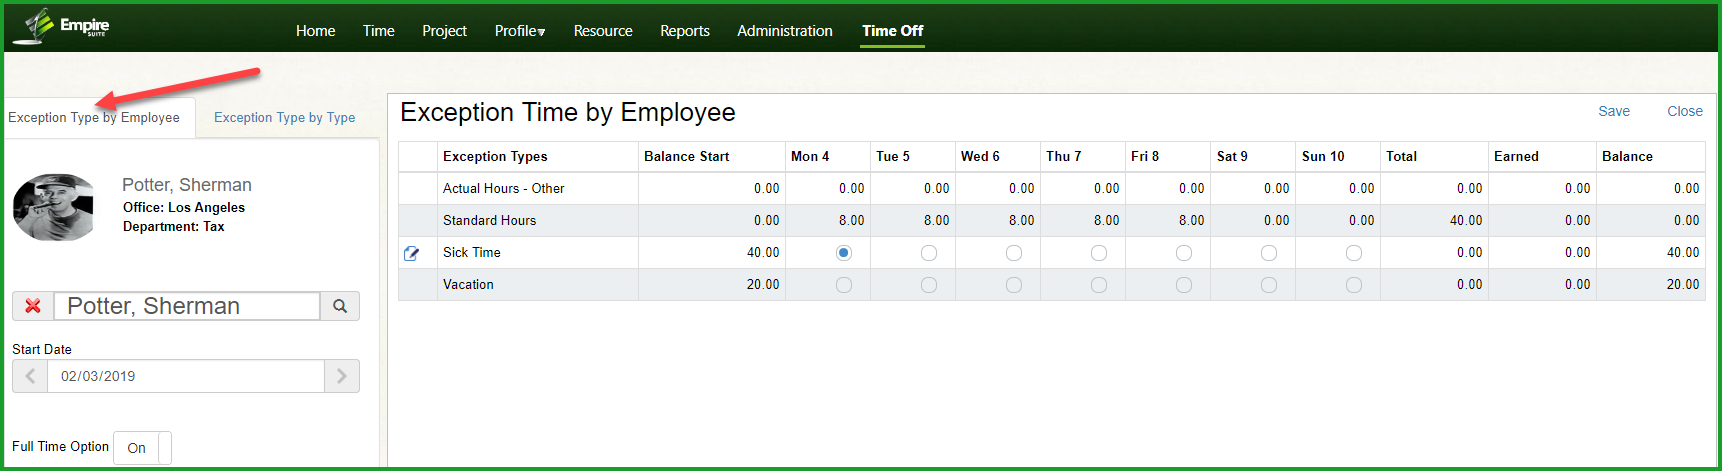
Figure 11 – Exception Time by Employee
. . . or Exception Time by Type
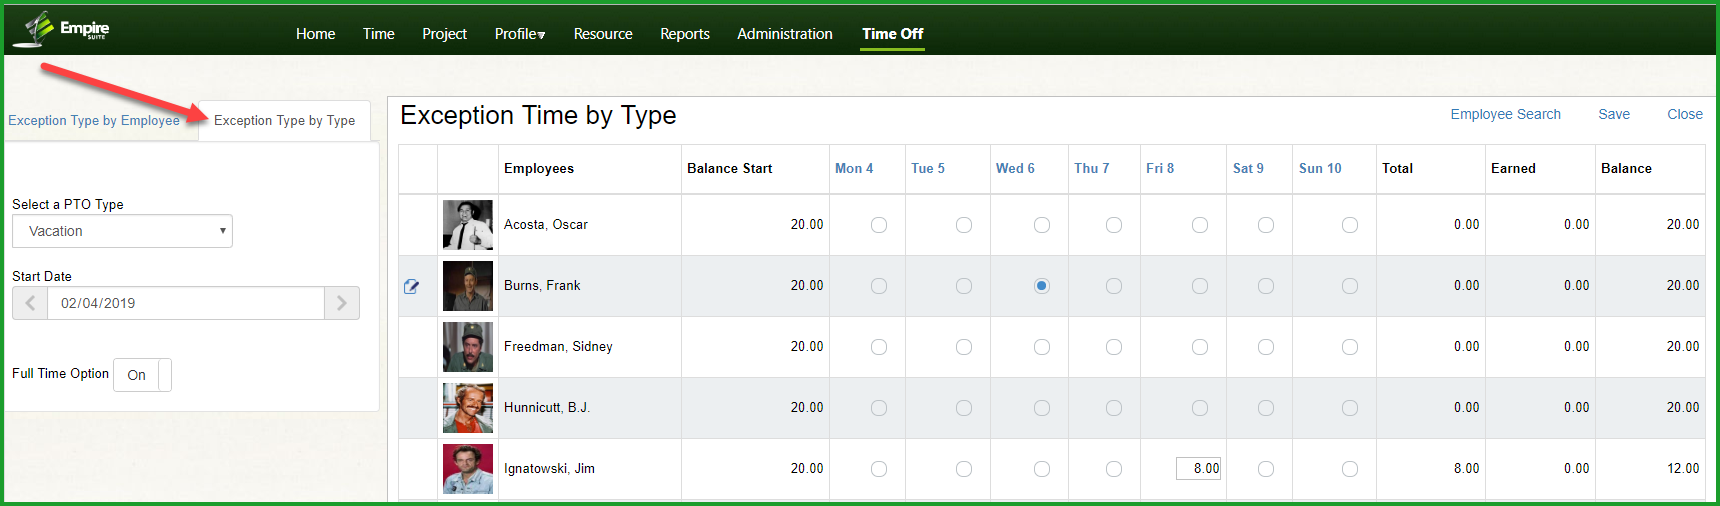
Figure 12 – Exception Time by Type
Both Exception Time by Employee and Exception Time by Type have a Full-Time toggle on/off option. When Full-Time is selected, simply click the appropriate radio button for the day, employee and type to add the entry. When Full-Time is Off, you can enter the appropriate hours for the desired day, employee and type.
You can use Exception Time by Type to add a time off event to a group of employees without typing or clicking in a cell for each individual employee. For example, if your company gave everyone a Snow Day, simply click the day in the column header to add the entry for all employees:
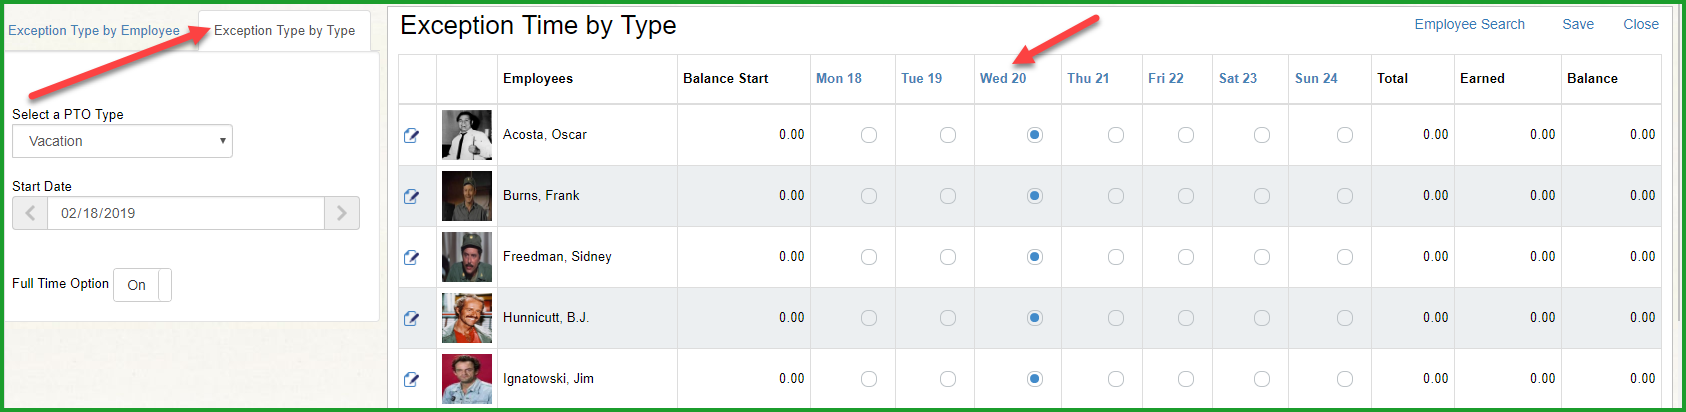
Figure 14 – Exception Time by Type for All Employees
PTO History, Conflicts and Overlaps
Another new feature in Empire TIME OFF are tabs with detailed information for time off request history, conflicts between the employee’s time off request and any project assignments during the same period, and overlapping time off requests or approved events from other employees with the same Reports To manager. To see the complete history of a time off request, click the Employee Name in the PTO Review grid and click the History tab:
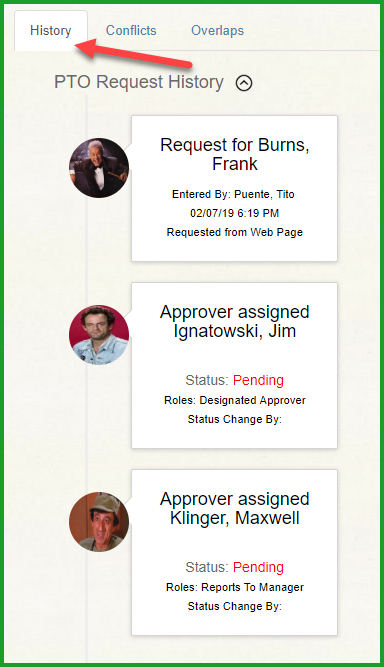
Figure 15 – Time Off Request History
To see if the request has any conflicts with the employee’s project assignments, click the Conflicts tab:

Figure 16 – Time Off Request Conflicts
Finally, to see if the request is overlapping with other time off activity for employees with the same 'Reports To' manager during the requested time off, click the Overlaps tab:
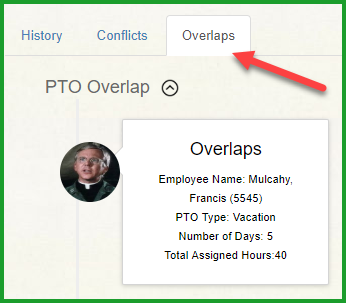
Figure 17 – Time Off Request Overlaps
Time Off Setup
We’ve added a Time Off Setup option. Click the Gear icon in the upper right corner of the page:

Figure 18 – Time Off Setup
The Time Off setup page allows you to
- • Display/hide employee profile photos
- • Set your date format
- • Set your currency format
- • Display/hide project codes
Empire RESOURCE Enhancements
We’ve added several new enhancements to Empire RESOURCE which can be configured through the Empire RESOURCE setup page. Click the gear icon in the upper right corner of the page to open the Setup Options:

Figure 19 – Empire RESOURCE Setup Page Icon
Assignments by Staff Level
You can now make assignments for unnamed resources using Staff Level scheduling. Click the Show Staff Levels checkbox to include Staff Levels in the display:
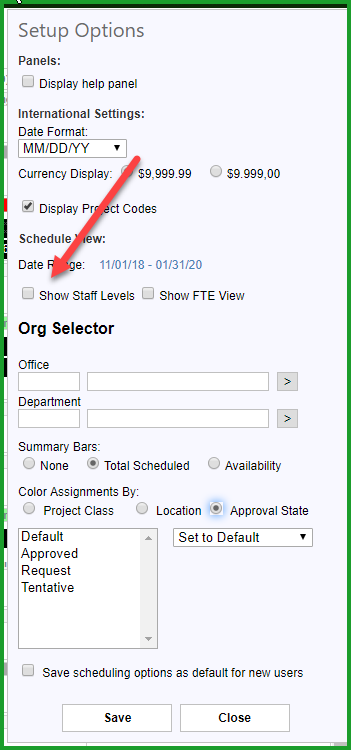
Figure 20 – Adding Staff Levels
When Staff Levels are included in the display, you can make assignments just as you would with named resources:
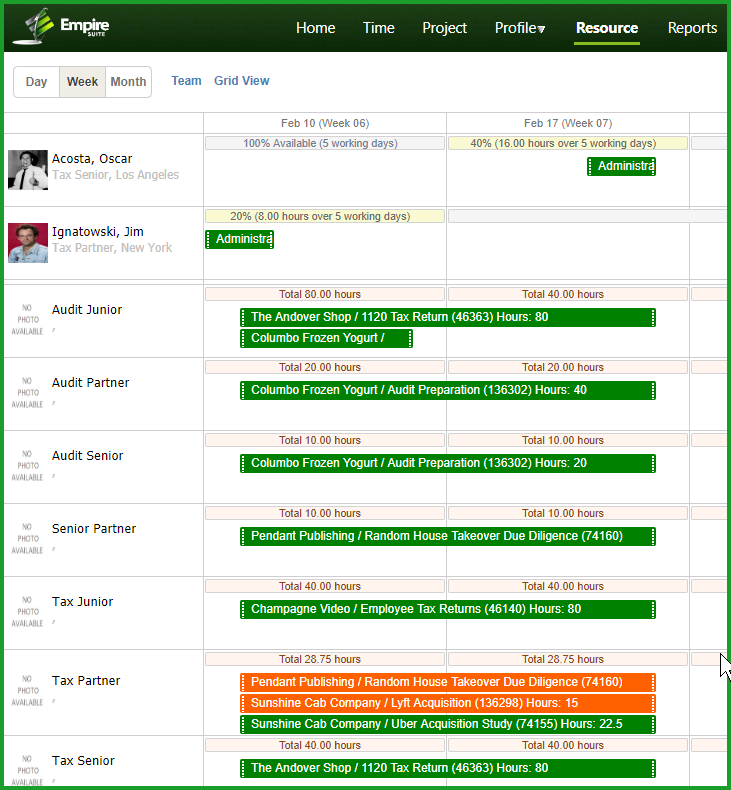
Figure 21 – Staff Level Assignments
You can also reassign a Staff Level assignment to a named resource by dragging and dropping the assignment from the Staff Level onto the appropriate employees, just as you would do a reassignment from one employee to another.
FTE View
For those firms that schedule using a Full Time Equivalent (FTE) model, Empire RESOURCE now supports that method. For example, if your standard calendar is 8 hours a day, 5 days a week, then scheduling a resource for 40 hours in a week would be one (1.0) FTE, 20 hours scheduled in a 40-hour week would be 0.5 FTE and so on. Click the Show FTE View checkbox to include FTE information in the view:
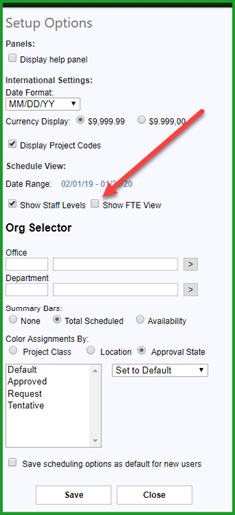
Figure 22 – Show FTE View
This setting changes the displayed assignment information so the assignment’s FTE value is displayed:
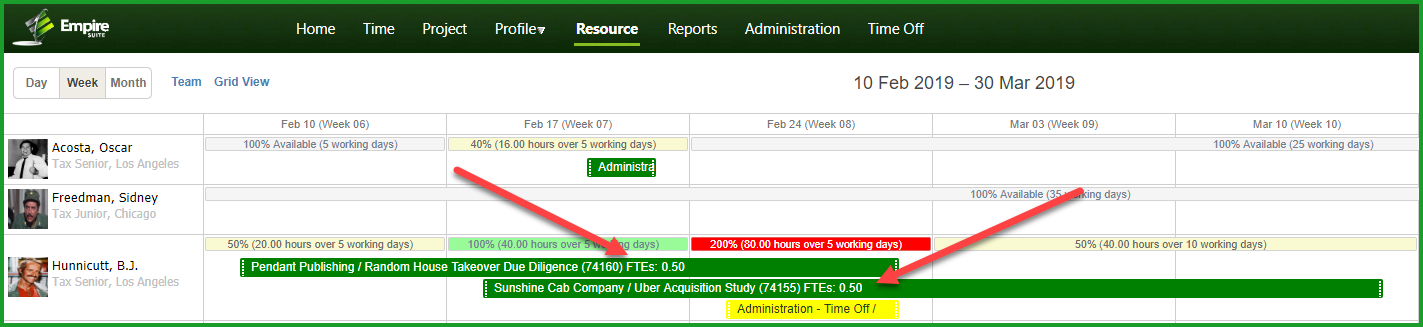
Figure 23 – FTE View
Organization Selection
The Org Selector fields allow you to filter the display for Staff Level Assignments by office and/or department. For example, below is a screenshot of all Staff Level Assignments for the weeks of February 10th and February 17th:
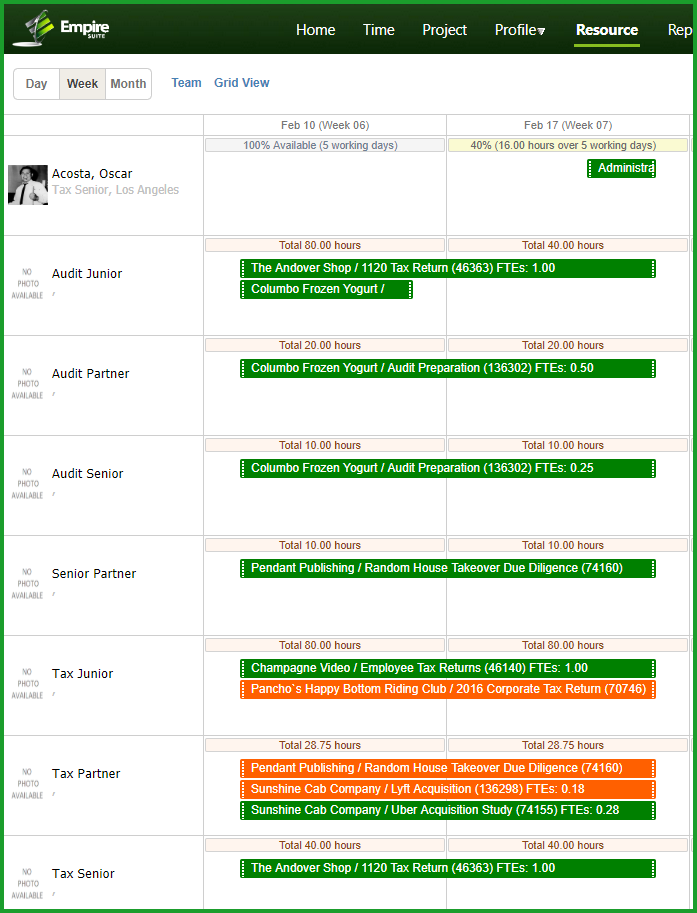
Figure 24 – All Staff Level Assignments
If we set the Org Selector value to the New York office as below:
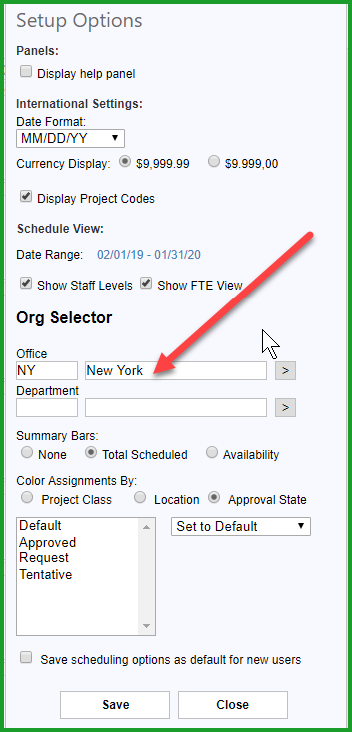
Figure 25 – Org Selector
The display will now change to show only those New York based projects with Staff Level Assignments:
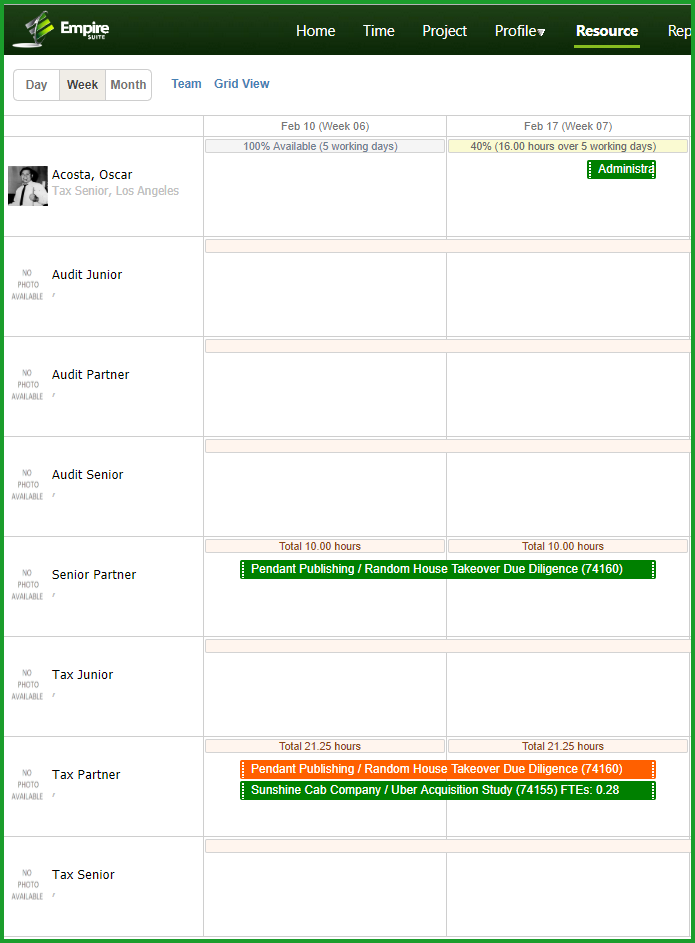
Figure 26 – Wall View with Organization Selected
New Empire RESOURCE Assignment Status Options
Empire RESOURCE users now have the option to make Tentative resource assignments in addition to Approved assignments. Additionally, users have the option to Request a resource or a staff level instead of making an assignment. Click the ‘A’ in the New or Edit Assignment page and select the desired status:
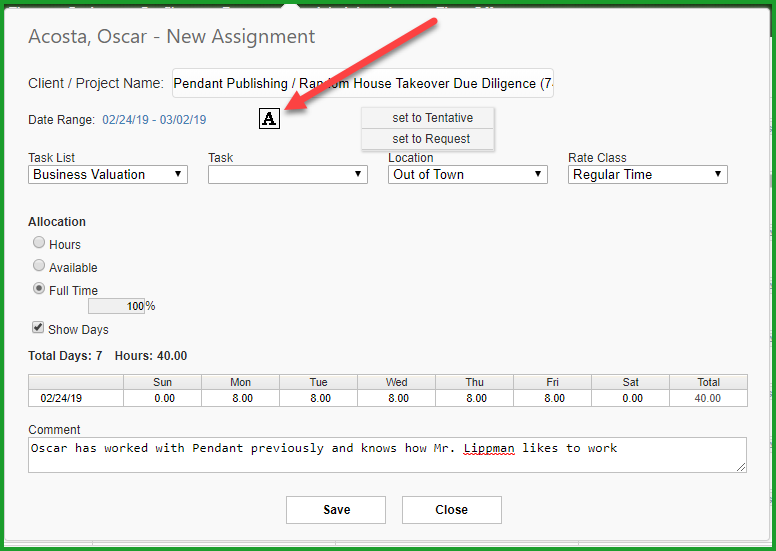
Figure 27 – Approved, Tentative and Requests
Color Code Assignments by Approval Status
You can also color code assignments by approval state (Approved, Request or Tentative). From the Resource page click the Gear icon to launch the Setup page. In the Color Assignments by section, click the Approval State radio button. Please note you can select one, multiple or all approval state options at once.
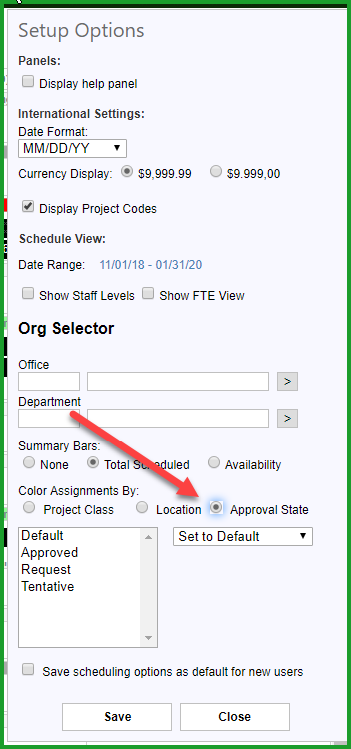
Figure 28 – Resource Setup Approval State
Click the dropdown to choose designated colors for each approval state. You may select the same color for more than one option. Click Save to capture your changes.
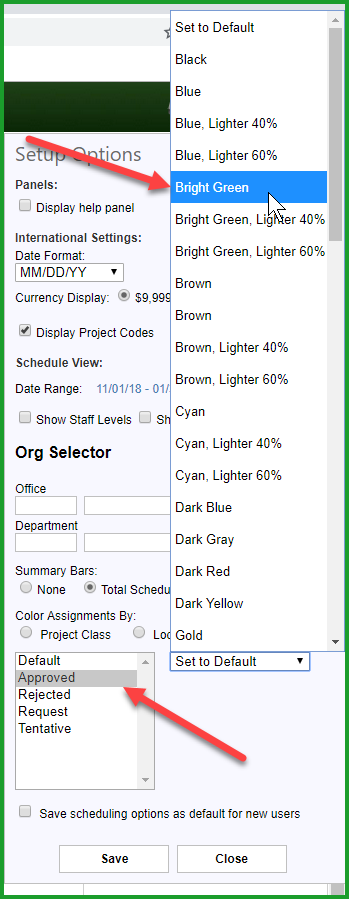
Figure 29 – Color by Approval State
You’ll note in Figures 24 and 26 above, some of the assignments are green and others are orange. Approved assignments have been color-coded green, while requests have been set to orange.
Client User Interface Improvements
We’ve added new features to the client user interface. From the Client Main Details page, click Edit Client:
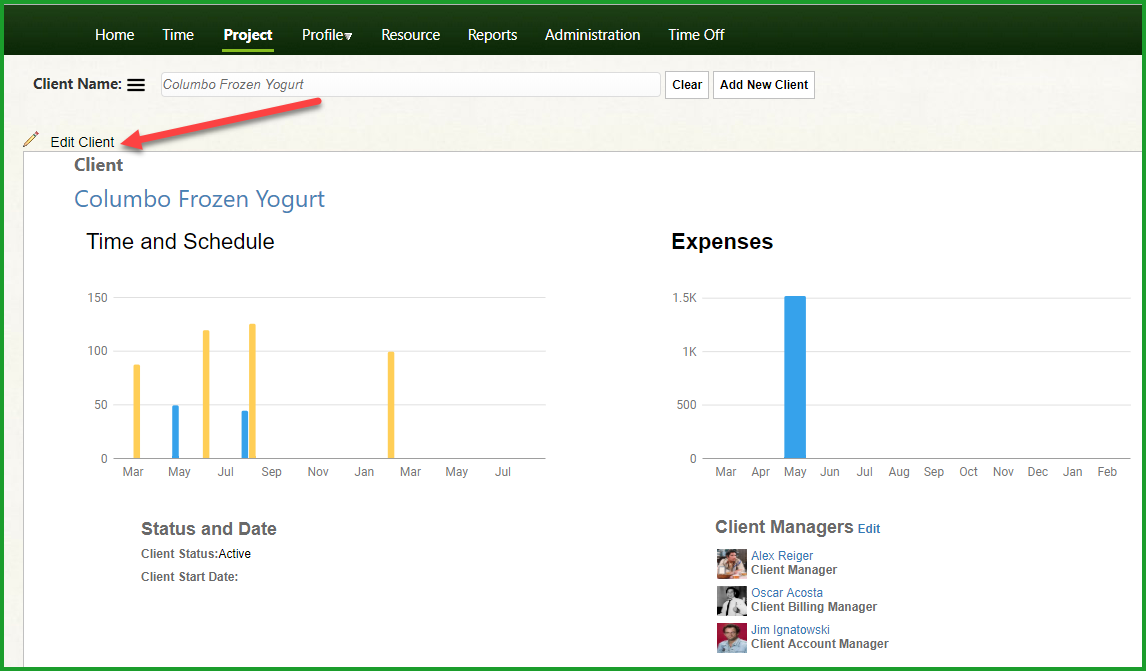
Figure 30 – Client Main Details
In addition to updating the existing display, we’ve added the Client History, along with hours and expense totals for all projects for the client:

Figure 31 – Edit Client Page
Additionally, we now allow you to delete a client as long as there are no approved timesheets or invoices associated with projects for that client.
Client Info (1)
The Client Info frame displays the total hours, hours budgeted and total expenses for all projects for the client.
Client History (2)
The Client History frame displays information regarding when the client was created, who created the client and when the client status was modified
Upgraded Project User Interface
We’ve improved the Edit Project user interface and added new features. From the Project Main Details page, click Edit Project:
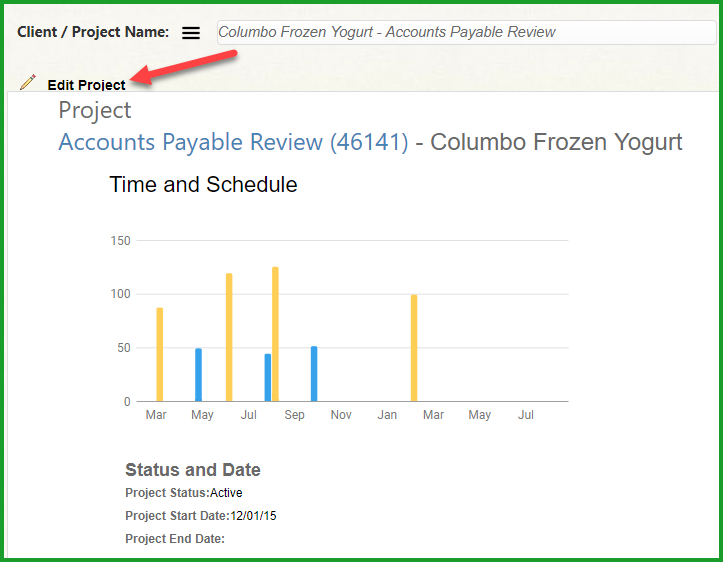
Figure 32 – Project Main Details
In addition to updating the existing display, we’ve added Project Info and Project History frames
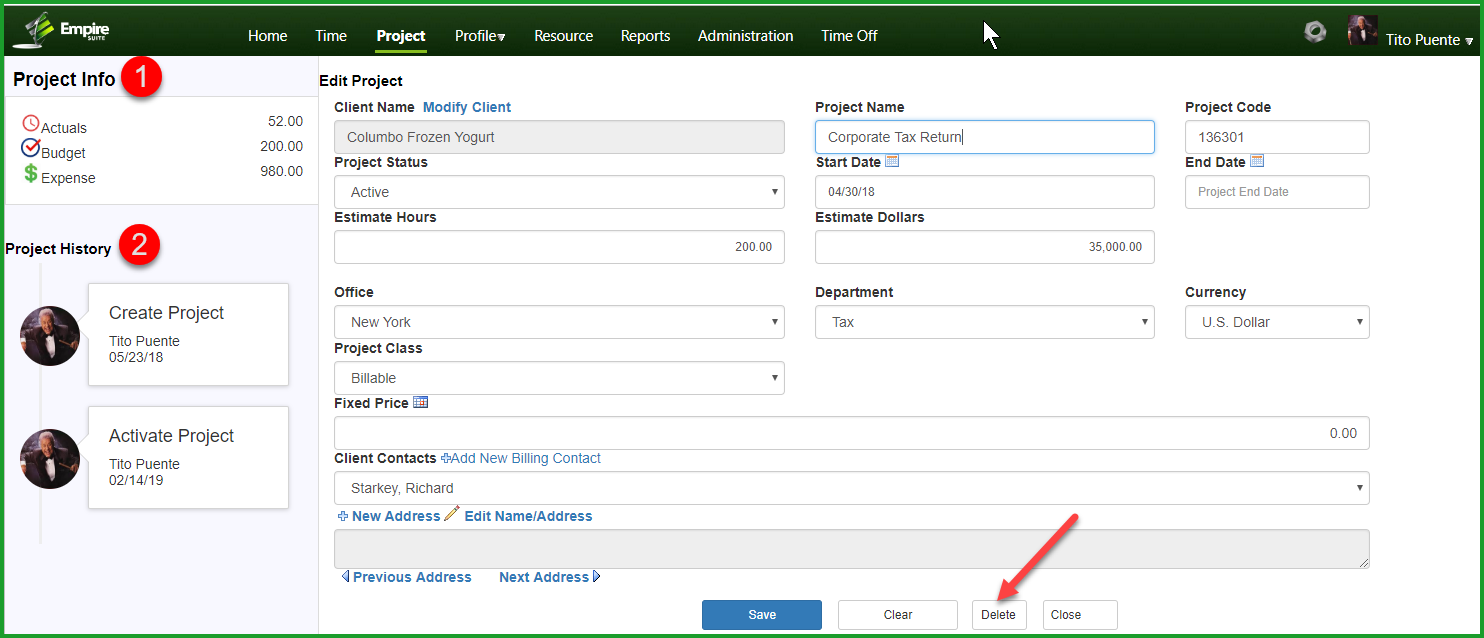
Figure 33 – Edit Project
We also now allow you to delete a project as long as there are no approved timesheets or invoices against the project.
Project Info (1)
The Project Info frame shows the total hours to date, the project’s budgeted hours and the total expenses to date.
Project History (2)
The Project History frame shows the chronology of the project – when the project was created, when it was activated, when it was closed – and identifies the users who modified the project along the way.
Project Menu Options and Security Permissions
We’ve also linked the available project related permissions to the user’s project permissions. Here’s a screenshot of an Administrative user with all the available project permissions:
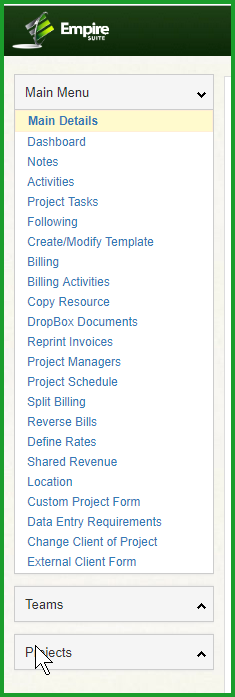
Figure 34 – Administrator Permissions
And here’s a screenshot from a Project Manager with a more limited set of permissions:
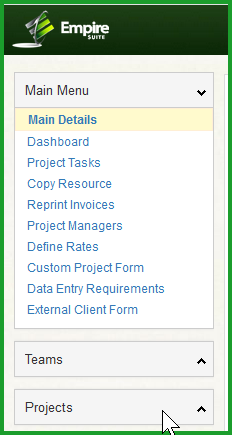
Figure 35 – Project Manager Permissions
Permissions and roles are defined in the Administration \ Company \ Edit Permissions pages.
Resume Upload Support
We’ve removed the Edit Profile option from the Profile menu, and added a Show Resume link in the View Employee page if an employee or consultant has uploaded a resume. To upload a resume, click Upload Resume from the Profile menu:

Figure 36 – Upload Your Resume
Employees or consultants with uploaded resumes will have a link in the View Employee page:
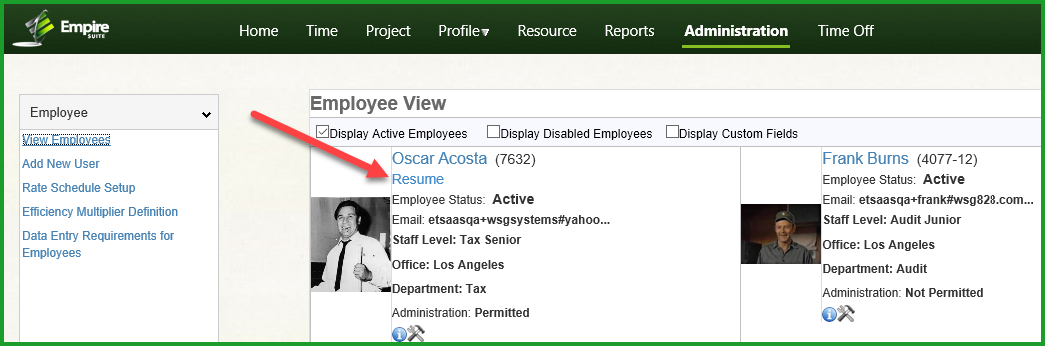
Figure 37 – View Employee Resume Link
Date: May 2018
Summary:
- We’ve added the following new features in this release:
-
Effective Dated Employee information
Vendor Name and Code for Contractors
Expense Locations
Staff Levels Management UI
Staff Level Group support
Employee Import Improvements
Empire MOBILE now supports ProSystem fx mileage entries
User Defined Web Resource View Date Range
Effective Dated Employee Information
Empire SUITE users can now keep track of changes in employee information and see a timeline with historical details. To enable Employee Effective Dates for your employee transactions, go to Administration \ Employee \ Data Entry Requirements for Employees and select Yes for Enable Employee Effective Dates. Be sure to click Save to save the setting:
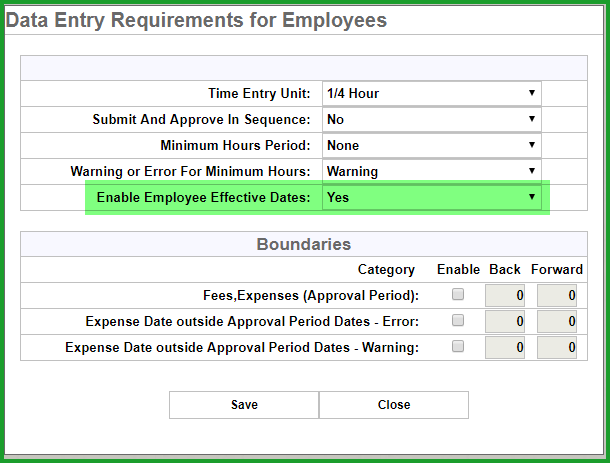
Figure 1 – Data Entry Requirements for Employees
Next, click View Employees and select the appropriate employee from the list or the Card View. Click the Add New Effective Date link:
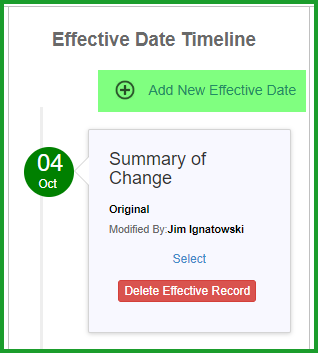
Figure 2 – Data Entry Requirements for Employees
Use the pop-up Calendar to select the Effective Date. Please note any change related to rate schedules must be applied on the first day of timesheet approval period. For example, if you are changing an employee’s office from Los Angeles to New York, the effective date must be the first day of an approval period. You can change an employee’s status on any day. In the example below, we’re going to change the employee’s office from Los Angeles to New York as of Sunday, April 29th because the timesheet approval periods are configured to use a Sunday to Saturday date range:
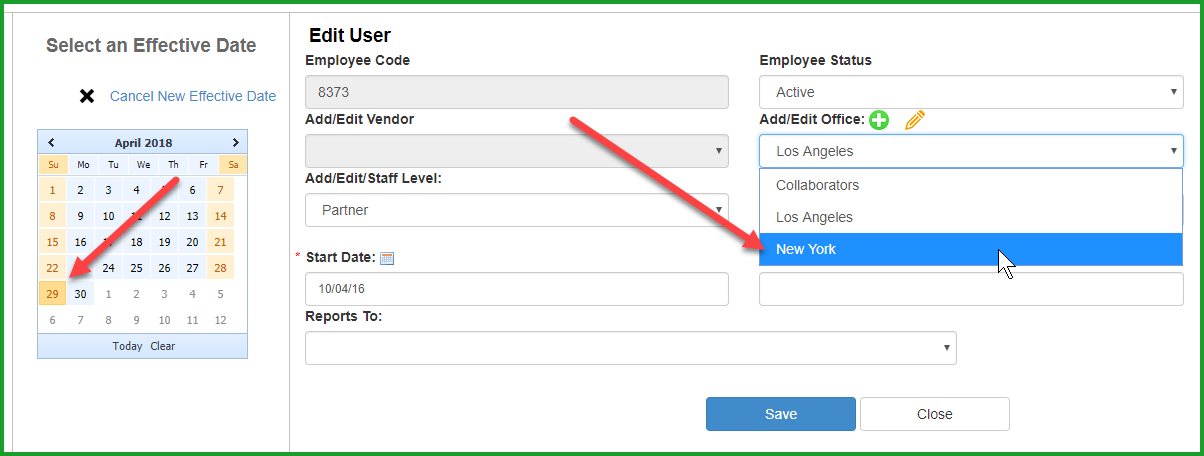
Figure 3 – Adding Effective Dated Employee Information
Be sure to click Save when you’re finished with your changes to return to the Edit User page. Note we’ve now added a Summary of Change frame to indicate an Effective Dated transaction has been added:
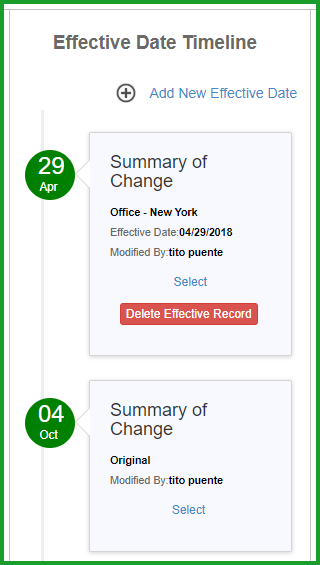
Figure 4 – Summary of Change Details
Click Select to see the transaction details.
Also, we’ve updated the Employee Extract to include the Effective Dated transactions when the feature is enabled. Each effective date will be displayed as a separate row in the extract.
Contractor Vendor Name and Code
For Empire SUITE customers who use contractors and want to associate a contractor with a contracting company, we’ve added a Vendor field to the Edit User page. To capture Vendor information, edit an Employee Type to require vendor information. In the Edit User page, click the Employee Type field Pencil icon to open the Employee Type Setup page:

Figure 5 – Editing Employee Types
To require a Vendor for an employee type, click Vendor Required checkbox:
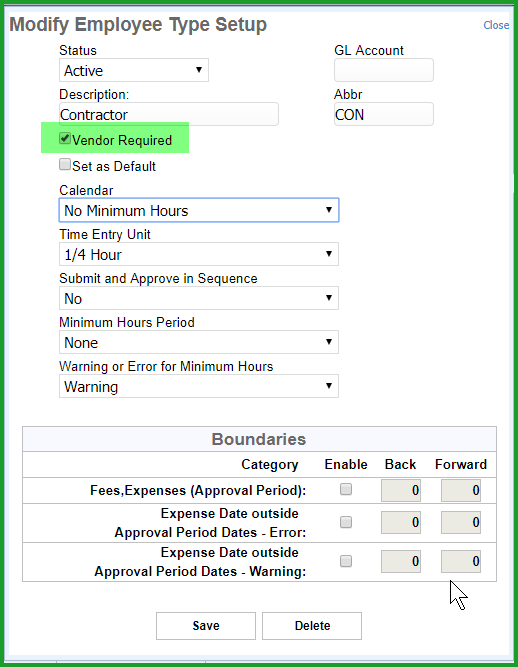
Figure 6 – Modify Employee Type Setup
Click Save to capture your changes. The Add/Edit Vendor field will be enabled in the Edit User page and you can click the Green Plus icon to add a Vendor and Code, or click the Pencil Icon to edit an existing Vendor and Code:

Figure 7 – Adding a Vendor
Add your vendor name and code and a discount percentage if applicable:
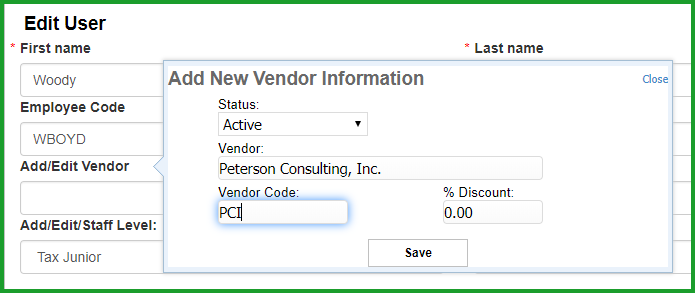
Figure 8 – Vendor Details
Expense Locations
Users can now be required to add a location when entering expense information. To set up Expense Locations, go to Administration \ Job Role/Location and select Location. Use the checkboxes in the Expense column to designate valid expense locations:
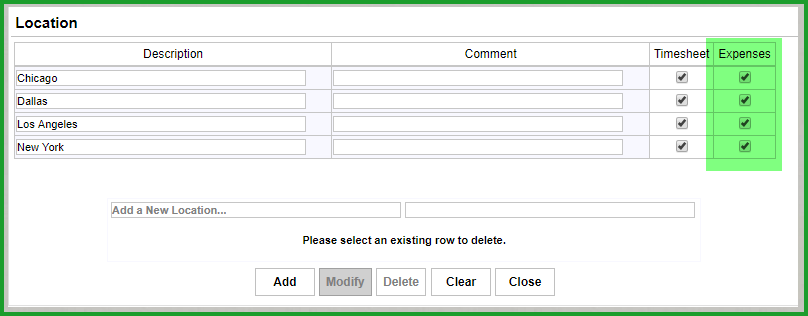
Figure 9 – Configuring Locations
Next, use either Company Data Entry Requirements or Project Data Entry Requirements to require a location when entering expenses. Below is a screenshot of Project Data Entry Requirements configured with a standard location entry required:
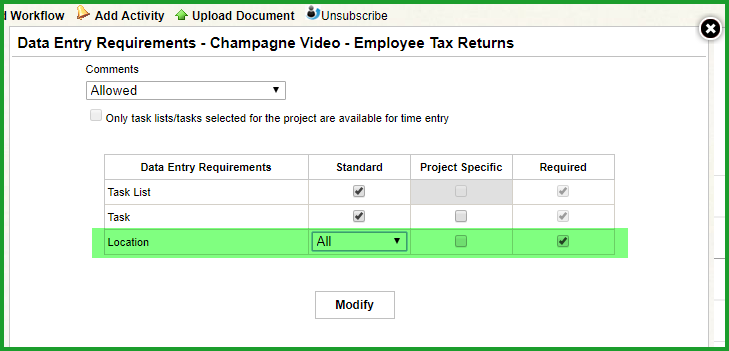
Figure 10 – Locations Required
When expense locations are required, users will not be able to submit or approve an expense sheet without the required detail.
Staff Levels Management UI
Staff Levels are roughly equivalent to Job Titles and are useful for classifying employees and assigning revenue and cost rates across employees assigned to a staff level. From the Edit User page in Administration \ Employee, click the green plus sign to add a new staff level, or click the pencil icon to edit an existing staff level:

Figure 11 – Adding a Staff Level
Either will launch the Modify Staff Level page. Enter a description, code and expected hours value (code and expected hours value are optional) and click Save:
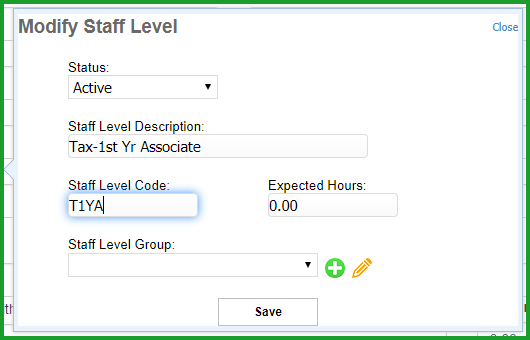
Figure 12 – Modify Staff Levels
Staff Level Group support
Staff Level Groups can be used to aggregate different staff levels into one group for reporting purposes. For example, accounting firms often have 1st Year, 2nd Year and 3rd Year Tax or Audit Associate Staff Levels and may find it useful to group all of the Tax Associates into a Tax Associates Staff Level Group. From the Edit User page in Administration \ Employee, click the green plus icon or the pencil icon to launch the Modify Staff Level page as shown in Figure n above. In the Modify Staff Level page, click either the green plus icon or the pencil icon to add or edit a staff level group:
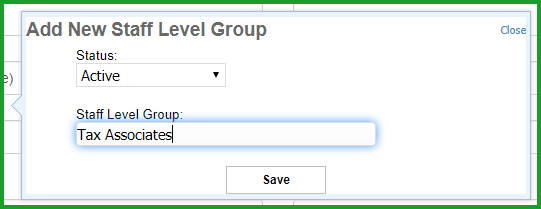
Figure 14 – Adding a Staff Level Group
Here is a screenshot of a Staff Level associated with a Staff Level Group:
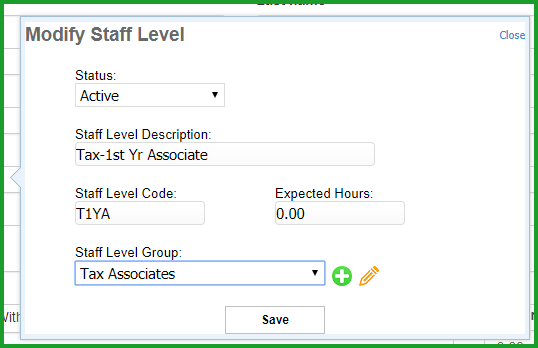
Figure 15 – Staff Level and Staff Level Group
Employee Import Changes
We’ve added several new features to the employee import to make it more flexible and useful.
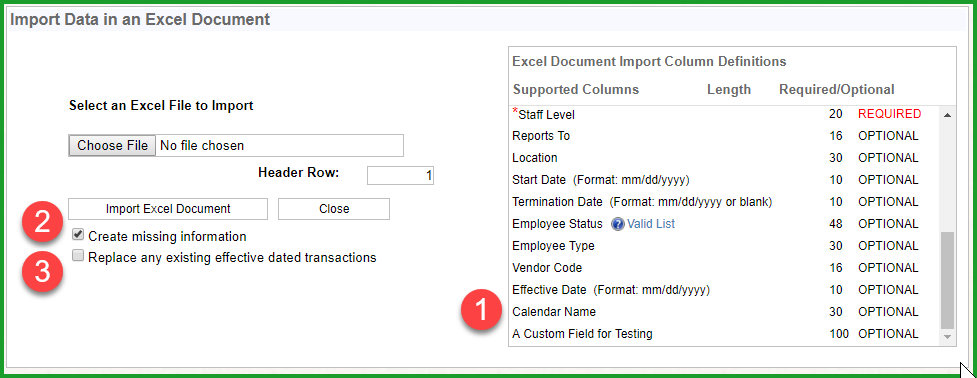
Figure 16 – Employee Import Changes
Employee Calendars
Our clients who configure different calendars for different employee types or offices can now include the Calendar name when using the Employee Import to add new employees or update information for existing employees. The Calendar must already be configured, and the name should match or the imported employee record will not include calendar information.
Create Missing Information
The Employee Import will now add Office, Department, Staff Level and Employee Type information if the load file detects new entries not already in the database. For example, if you want to add employees or move employees to your Detroit office, you don’t need to set up the Detroit office before you do the import – the import will add the office for you.
A quick note about the Create Missing Information checkbox: If your tenant has more than one level for offices or departments, the checkbox is disabled.
Replace any existing effective dated transactions
If you’ve enabled effective dated employee transactions, this option will delete any existing transactions and replace them with the transaction in the load file. For example, assume you have an employee configured as a Tax Associate 2nd Year as of May 1st. If the ‘Replace’ option is checked and your load file includes a row for the same employee to be loaded as a Tax Associate 3rd year as of April 17th, the process will delete the existing May 1st row and replace the entry with the April 17th information.
Empire MOBILE now supports ProSystem fx mileage entries
Empire MOBILE users with CCH ProSystem fx integration enabled were not able to use Empire MOBILE’s native Mileage feature when entering reimbursable mileage transactions. We’ve enhanced our CCH ProSystem fx integration to support using Empire MOBILE’s mileage feature which means users can now take advantage of MOBILE’s automatic distance calculation between locations as well as our one tap ‘Round Trip’ feature.
User Defined Web Resource View Date Range
Empire RESOURCE Web users can now define a date range when scheduling or viewing resource schedules. From the Resource page, click the gear icon in the upper right corner of the page:

Figure 17 – Resource Setup
Click the Schedule View: Date Range links to set the desired date range:
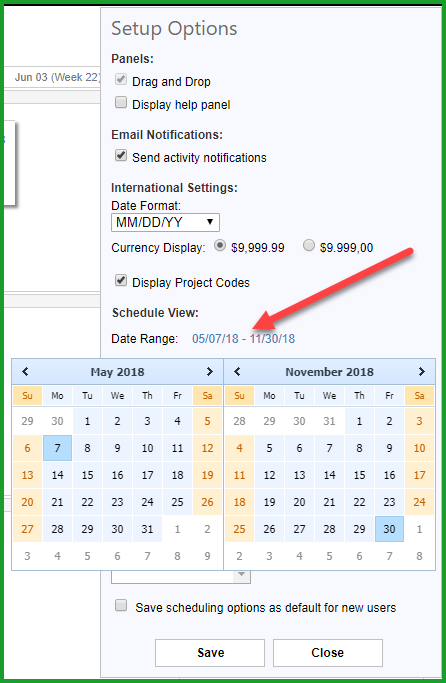
Figure 18 – Resource Date Range
Date: February 2018
Summary:
- We’ve added the following new features in this release:
-
Empire RESOURCE to Microsoft Outlook Calendar Automation
Copy Resource
New Reporting Permissions and BI Reporting Functionality
Empire RESOURCE to Microsoft Outlook Calendar Automation
Empire RESOURCE customers now have the option to download assignments automatically into user Microsoft Outlook calendars. The automation is available for Exchange 2010 and later, as well as Office 365 environments. Please contact WSG if you are interested in adding this capability to your toolkit.
Copy Resource
We’ve added the ability to copy a project’s resource schedule from one period to another. Select Copy Resource from the Project Dashboard page:
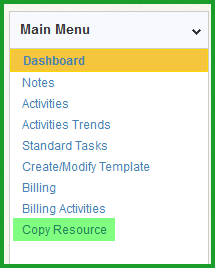
Figure 1 – Copy Resource Project Dashboard
You can also select Copy Resource from the Project Main Details page:
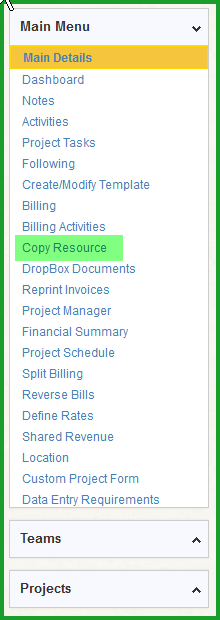
Figure 2 – Copy Resource Project Main Details
Use the Copy Resource Information page to select the project or projects and to define how the assignments should be copied:
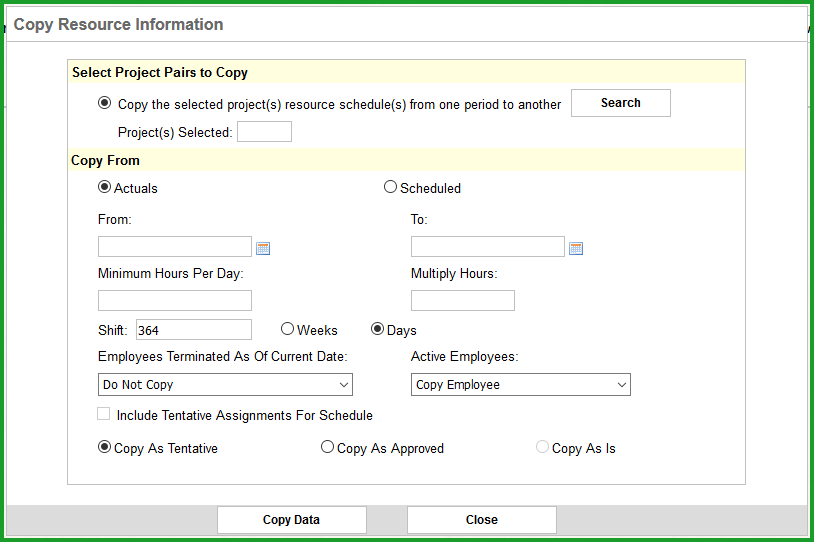
Figure 3 – Copy Resource Information
• Search – Use the Search option to select the desired projects using your standard project search attributes such as status, name, office, department and Additional Information (Custom) fields:
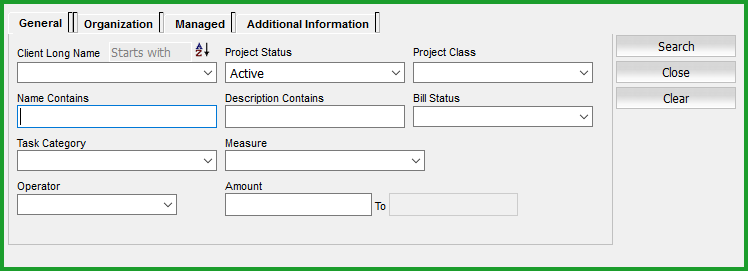
Figure 4 – Project Search
• Copy From – Use these settings to define what and how you want to use the Copy feature
- ♦ You can copy the resource plan using either scheduled hours or actual time by selecting either Actuals or Scheduled
- ♦ Use the FromFrom and to calendar controls to set the desired copy range. Your copy range can be as small as a single day or can be multiple years if desired.
- ♦ Use the Minimum Hours Per Day field to ignore either actual or scheduled amounts below your desired threshold. This can be useful if you’re using Actuals and
don’t want to copy small amounts of time from random resources you would prefer not to include in the proposed schedule.
- ♦ The Multiply Hours control can be used to modify the amount of either actual or scheduled hours copied.
- ♦ The Shift control determines how far in advance the selected range is copied in either Weeks or Days. Please note the Shift can be a negative number.
- ♦ The Employees Terminated As Of Current Date combo box let you decide how to treat actuals or scheduled hours for terminated employees.
You can select any of the following options:
- Do Not Copy
- Copy Employee
- Copy as Staff Level
- ♦ The Active Employees combo box lets you decide how to treat actuals or scheduled hours for your active employees.
You can select either of the following options:
- Do Employee
- Copy as Staff Level
- ♦ If you are copying Scheduled hours, use the Include Tentative Assignments for Schedule checkbox to include or exclude any tentative assignments
occurring during your selected From and To date range
- ♦ Finally, use the Copy radio buttons to determine the created assignment status:
- Tentative
- Approved
- As Is, meaning Tentative assignments will be created as Tentative and Approved assignments will be created as Approved
When the desired settings are configured, click Copy Data to copy the resource schedule. Click Close when finished to return to either the Project Dashboard or Project Main Details page.
New Reporting Permissions and BI Reporting Functionality
We’ve made some changes to how Empire REPORTS are accessed and we’ve added some additional reporting functionality.
Security Permissions by Report
Along with adding a new Reports permission group to the Edit Permissions page, we’ve added a separate security permission for each report. Go to Administration \ Company \ Edit Permissions:
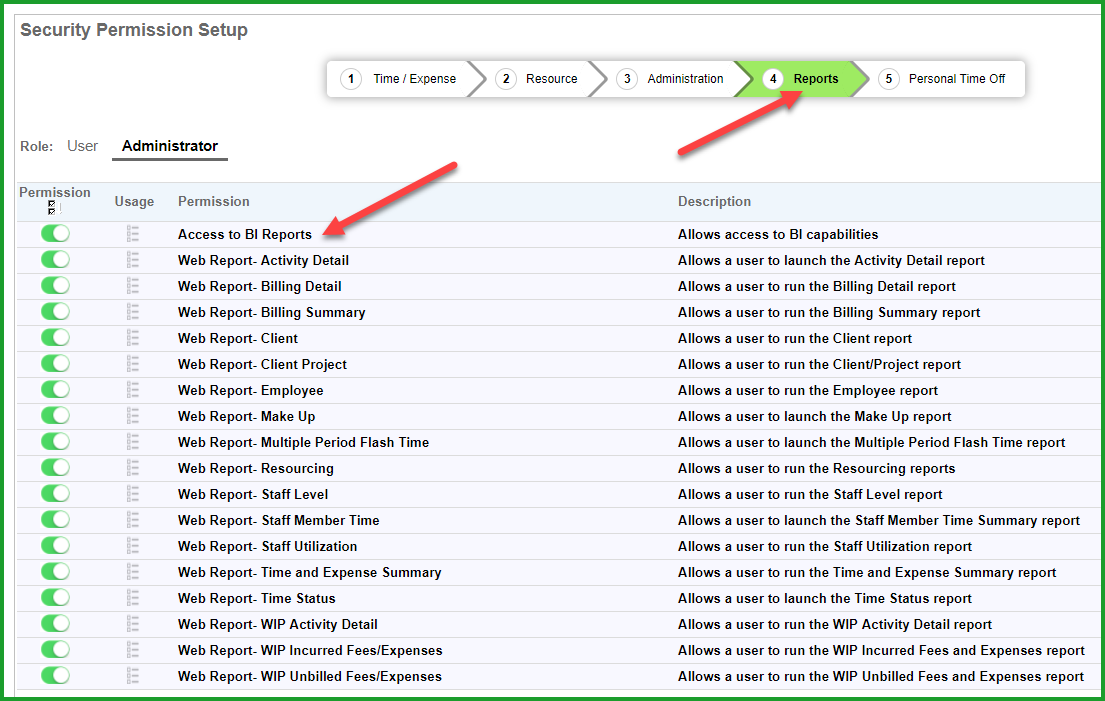
Figure 5 – Reports Permissions
When you click the Reports link in the tool bar, you’ll launch the standard Empire REPORTS page, with links to all of the standard reports enabled for your user based on the permissions defined for your role:
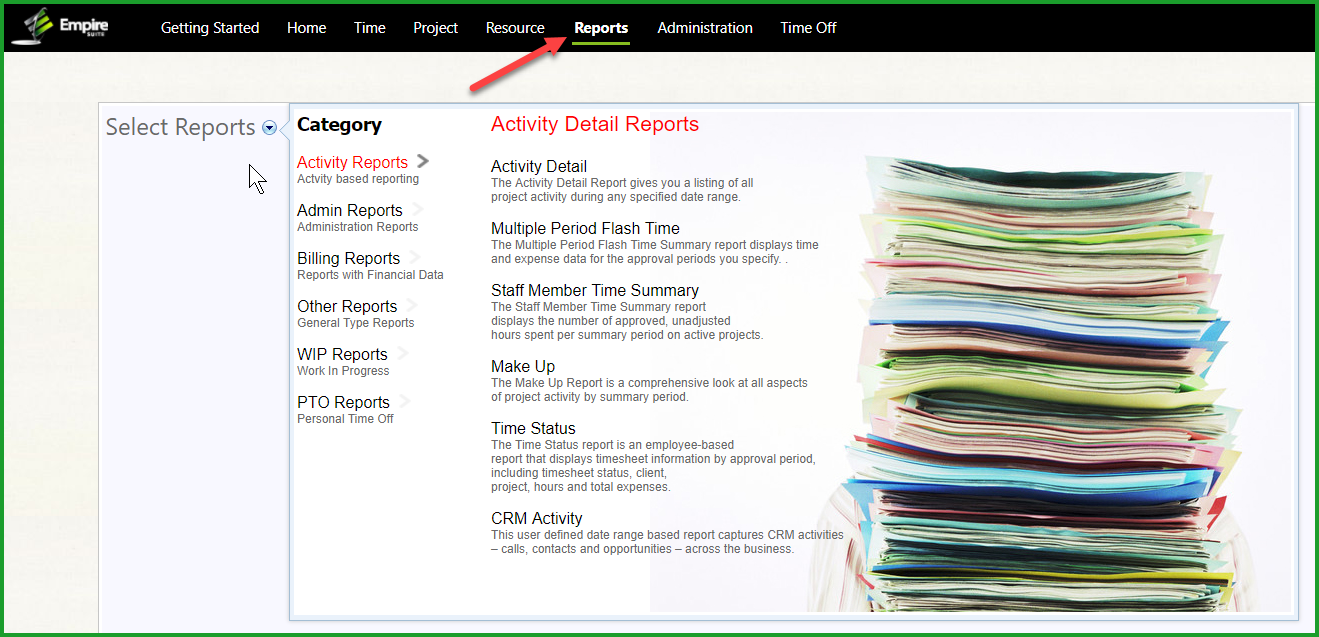
Figure 6 – Standard Empire Reports
Access to BI Reports
If your tenant has been configured to allow access to our new Business Intelligence based reporting capability, you’ll have an Access to BI Reports permission included in the Reports permission group. If you’d like to enable this feature, please contact WSG so we can make the necessary database updates for your tenant.
If you don’t have the BI Reports database setting enabled for your tenant, you won’t see the Access to BI Reports permission in the Reports permission group.
Changes in Reports Behavior with BI Reporting Enabled
When BI Reporting is enabled for your tenant, users with the Access to BI Reports permission will see a different page when they launch Empire REPORTS:

Figure 7 – BI Reports Enabled
Click the Standard Reports link to view the standard Empire REPORTS.
BI Reporting
WSG has incorporated business intelligence (BI) reporting tools into our reporting solution. The tools are seamlessly integrated and embedded in our cloud version and allows WSG to produce custom ad hoc reports and dashboards, as well as data analytics using drag and drop.
Use Report Search to find a report using a keyword such as Time or Expense. For example, if you click Report Search and use Time as a search variable, note the list of reports and the report count changes to only those reports with Time in the report title:

Figure 8 – Report Search
The Recently Used link will display a list of the last 10 BI Reports you’ve run:
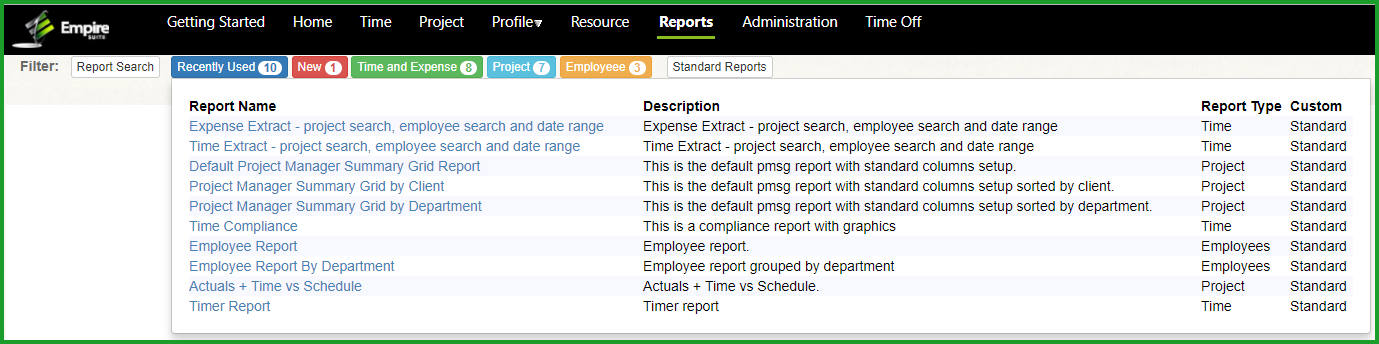
Figure 9 – Recently Used
The New link displays a list of recently added reports and views:

Figure 10 – New Reports
The Time and Expense link displays a list of time and expense reports ranging from lists of users entering reports to compliance reports, including graphics:
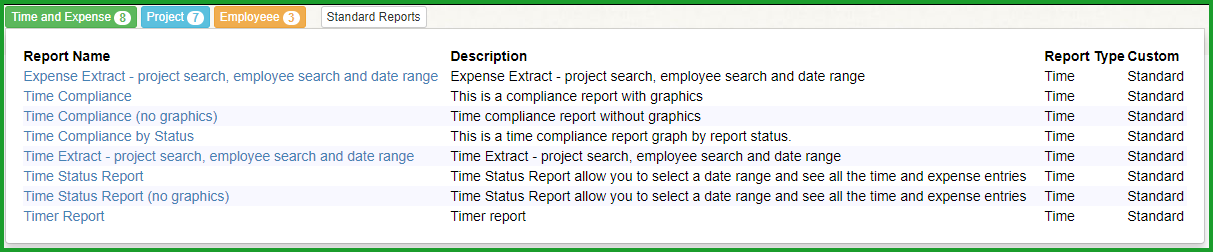
Figure 11 – Time and Expense Reports
The Project link displays a list project-based reports:
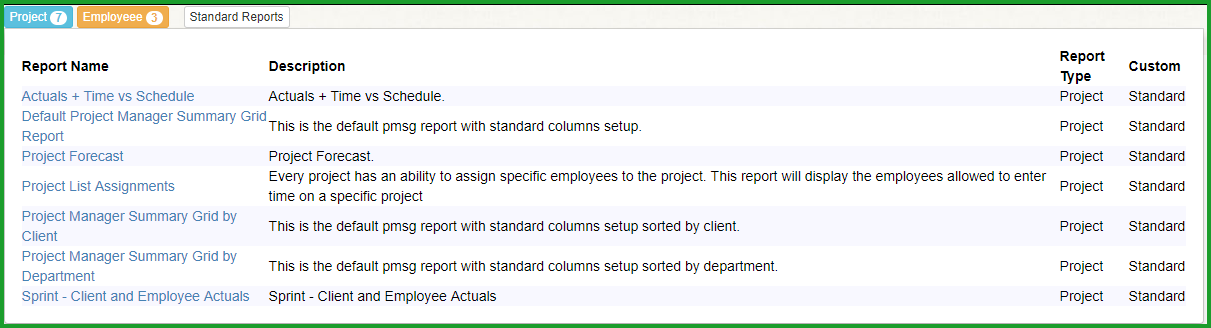
Figure 12 – Project Reports
The Employee link displays a list of employee-based reports:

Figure 14 – Employee Reports
How the BI Reports Work
Depending on the type of report, each BI report will use up to three (3) different reporting elements to determine the report content. For example, if you select the Time Extract – project search, employee search and date range report from the Time and Expense group, you’ll see the following links to customize the report content by project, employee and date range:

Figure 15 – Report Content Selection
The report will display based on your client/project, employee and date range selections:
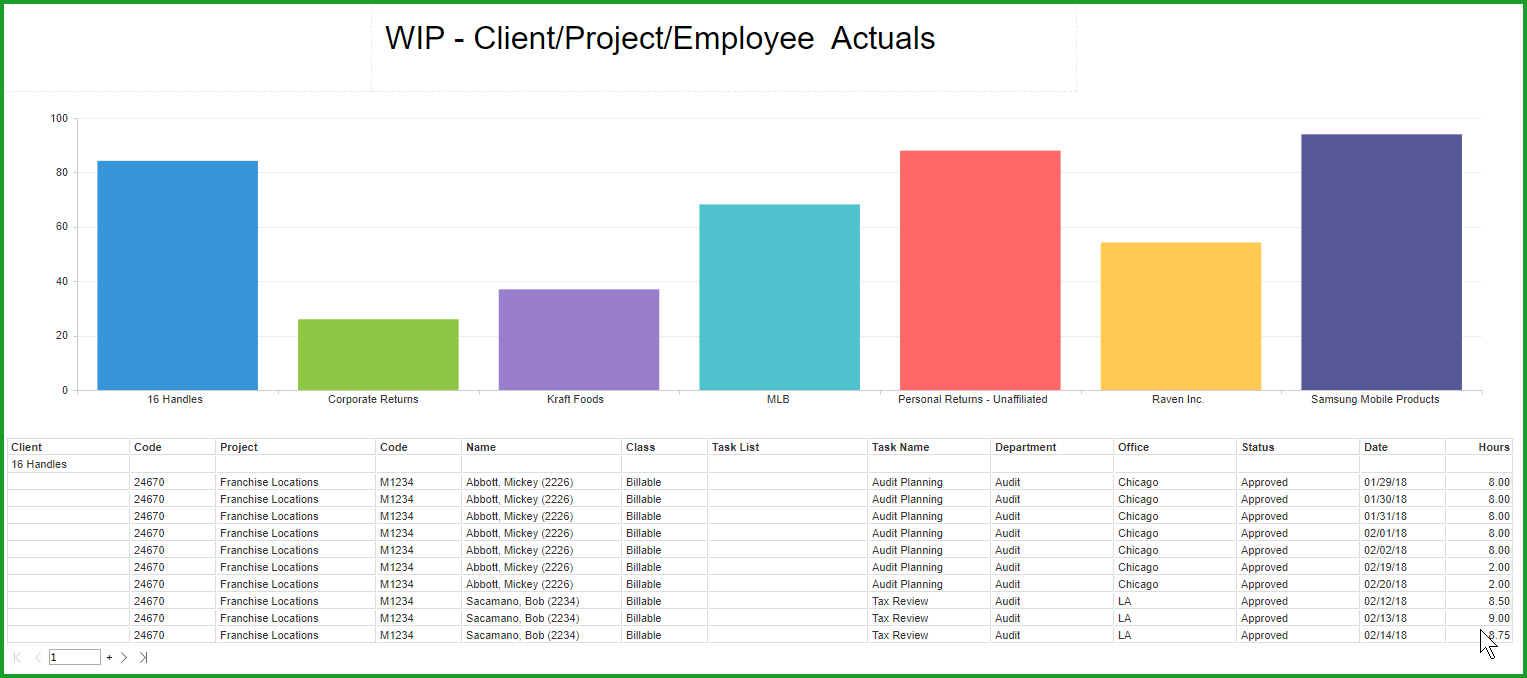
Figure 16 – Sample Report Results
Once the report results are returned, you’ll see fields with additional filtering options to further refine and customize the report results.
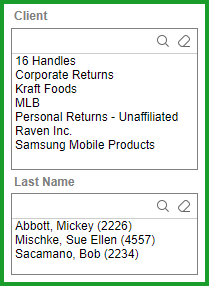
Figure 17 – Report Results Unfiltered
Note here you can add or remove clients, projects and employees from the results by clicking individual entries, or using shift-click to select multiple items:
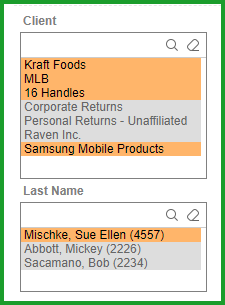
Figure 18 – Report Filters
And here are the updated report results based on the selected filtering items:
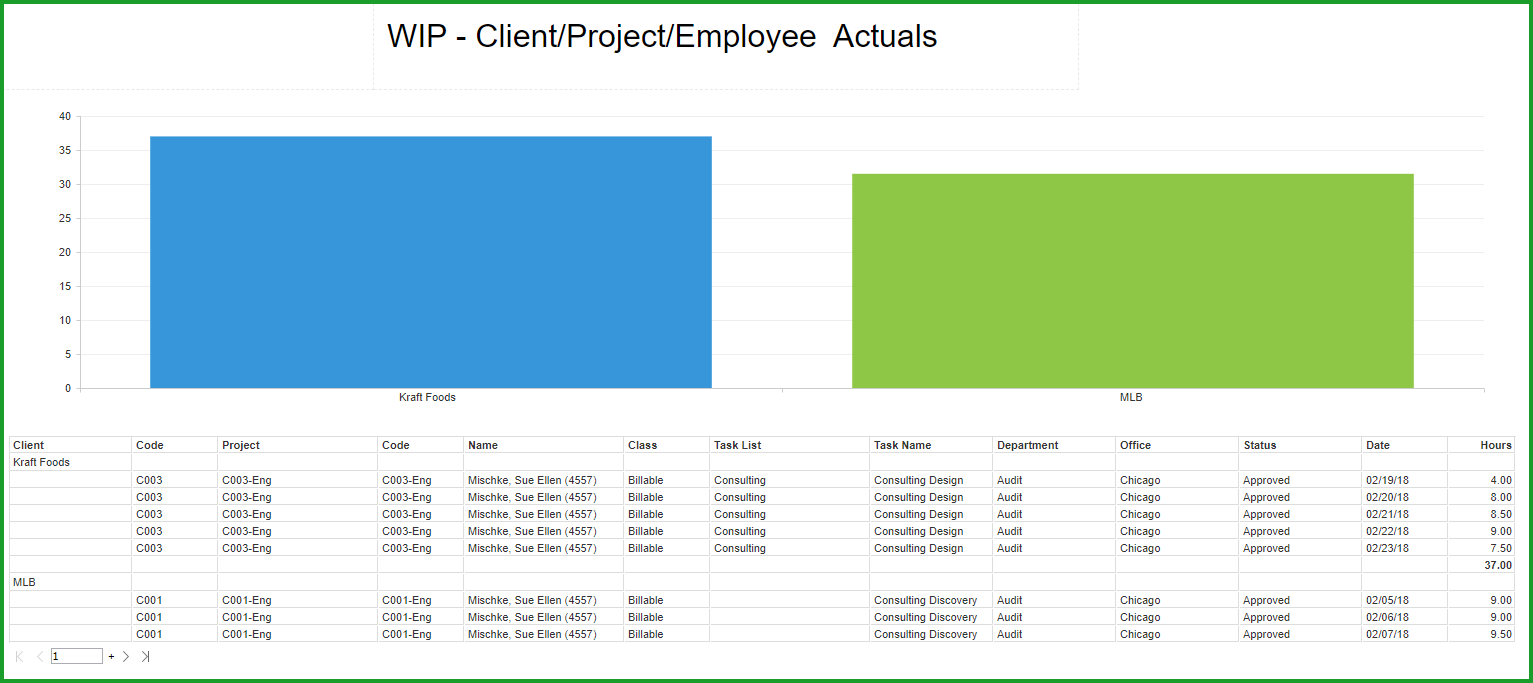
Figure 19 – Report Results Filtered
Please contact WSG for more information about our BI Reporting capabilities and how they can be implemented for your tenant.
Date: September 2017
Summary:
-
Employee Types
Office/Department Hierarchies
View Employees
Holiday Lists Management
Timers
Activity based Web scheduling
Instant Personal Time Off notifications
Employee Types
We’ve added the ability to create and manage different employee types – Full-time, Part-time, Contractors, Exempt, etc. – and also define different data entry requirements by employee type. For example, your Exempt employees may be required to report 40 hours per week and report their time in sequence, but Contractors or Part-time employees may have different reporting requirements – they can record less than 40 hours in a period, or they can skip timesheets during periods when the contractor or part-time employee is not working. From the Administration page, select View Employees, then select an employee to launch the Edit User page:
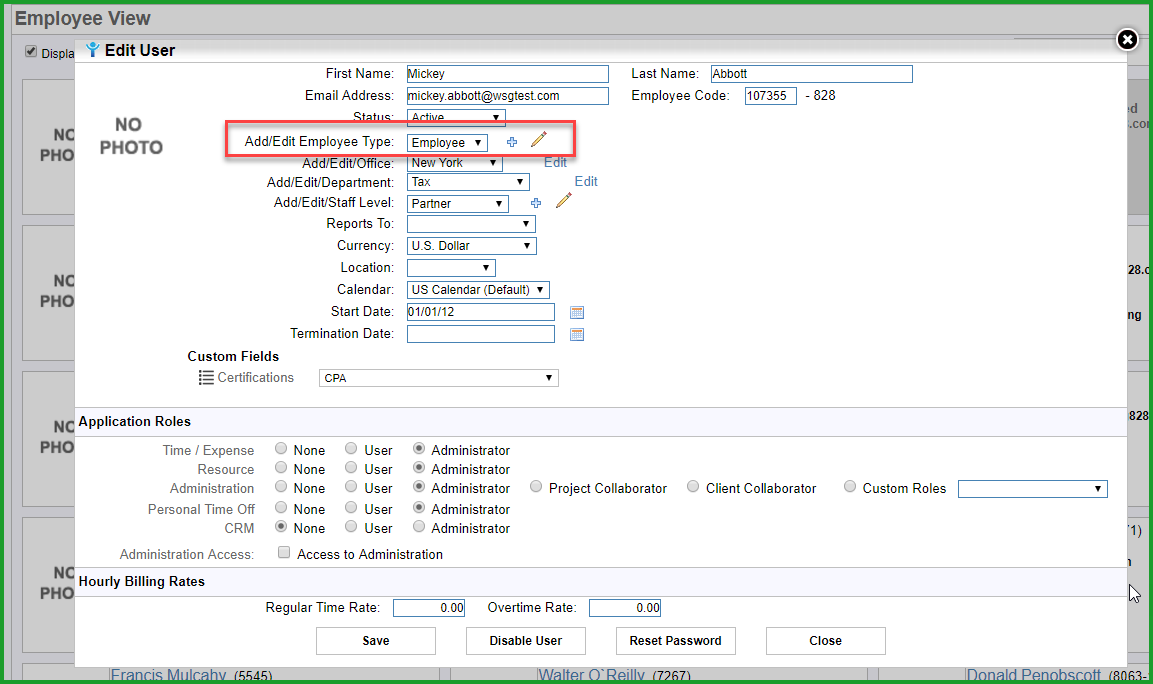
Figure 1 – Employee Types
To add a new employee type, click the ‘plus’ icon. To edit an existing employee type, click the pencil icon:
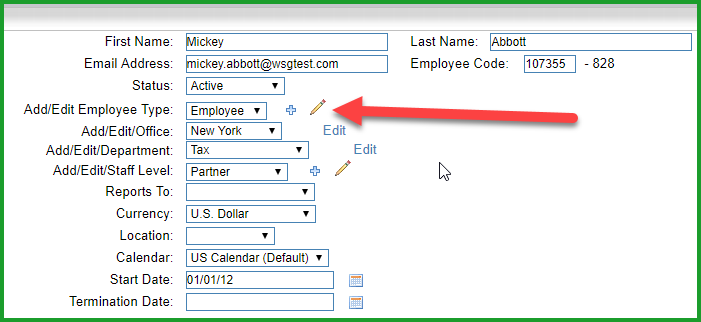
Figure 2 – Editing an Employee Type
For example, you may want to add a Contractor employee type with a different combination of Data Entry Requirements than your employees. Click the plus icon to launch the Add New Employee Type Setup page:

Figure 3 – Creating an Employee Type
You can designate an employee type as the default when adding new employees by clicking the Set as Default checkbox. All new employees added will be assigned the default employee type.
Office/Department Hierarchies
We’ve added the ability to create multi-level office and department hierarchies so your configuration can align with your business structure. If you’d like to set up hierarchies for offices or departments, let us know and we’ll configure your tenant with the required levels. Once that’s done, you can manage the different nodes from the Administration \ View Employees \ Edit User page. Click Edit to open the office or department page:
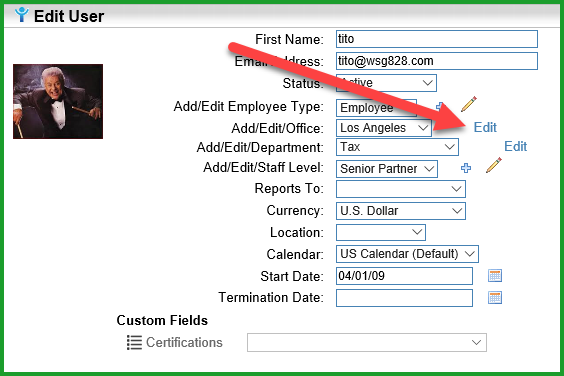
Figure 4 – Office Hierarchy Main
Click the plus or minus icons to expand or collapse the hierarchy:
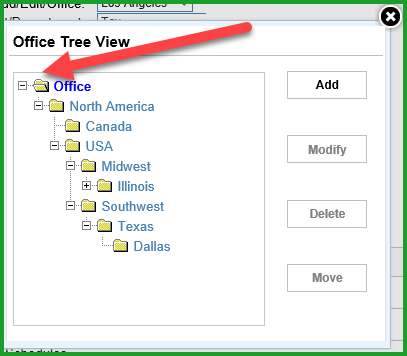
Figure 5 – Hierarchy Details
To add a node, click the level above where you want to add a node, then click Add. For example, if you want to add a new East territory in the USA, click USA then Add:
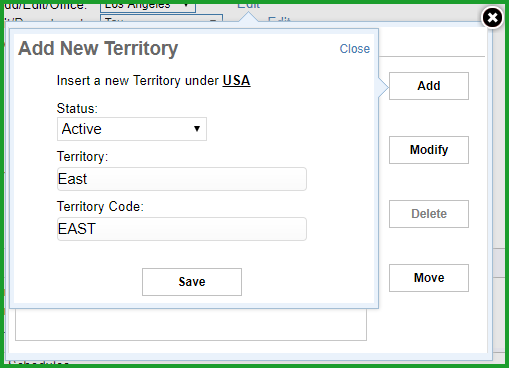
Figure 6 – Adding a Hierarchy Node
Click Save when done to save your work.
To modify a node, click the node, then click Modify
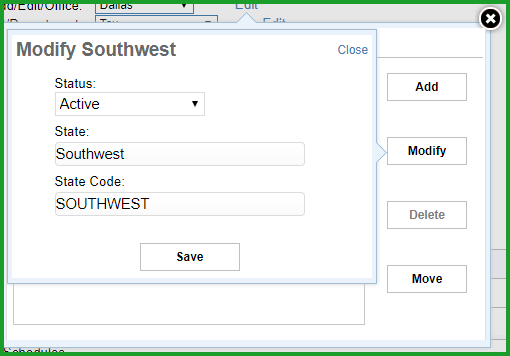
Figure 7 – Modifying a Hierarchy Node
Be sure to save your changes.
To delete a node, click the node, then click Delete. Please note if there is an active employee, an approved timesheet or an active project associated with the node, the node can’t be deleted.
To Move a node, click the node, then click Move. You’ll be asked to select which organization to move the selected node into. In example below, we’re moving the NYC office into the USA \ East \ New York node:

Figure 8 – Moving a Hierarchy Node
You’ll be asked to verify the move:
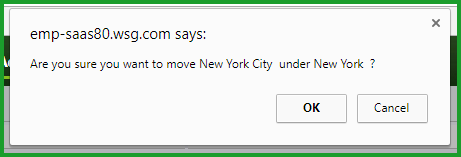
Figure 9 – Hierarchy Move Confirmation
Click OK to continue. And here’s the updated structure:
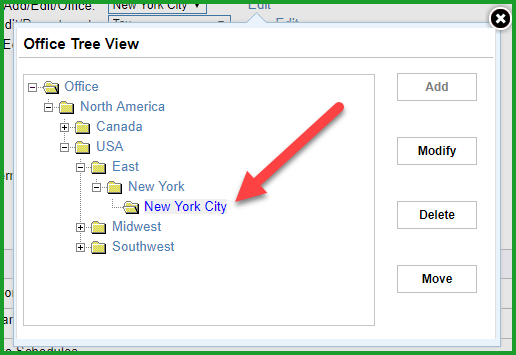
Figure 10 – Final Hierarchy After Move Completed
View Employees
We’ve added a View Employees option to improve performance on the Administration page. Users can navigate directly to the administration menu options without waiting for the page to display your employees’ information. Click View Employee to display your employees in either the list view or card view as selected:
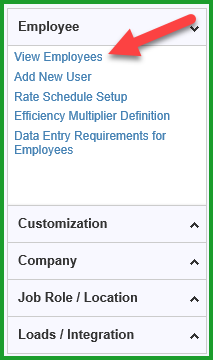
Figure 11 – View Employees
Holiday Lists Management
For those customers who want to simplify company holiday management for their schedulers and timekeepers, we’ve improved our Holiday Lists Management feature. Holiday imports – names, days and hours – are now done from one place in the Administration \ Loads/Integration menu.
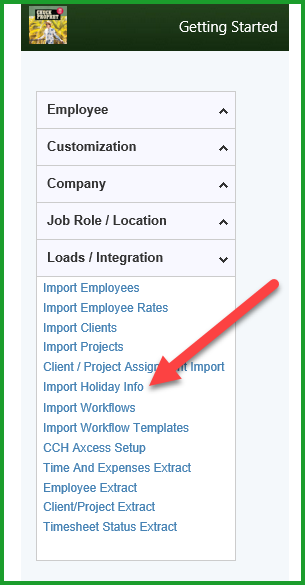
Figure 12 – Holiday Information Import Location
A list of standard US holidays has already been added to the database:
- Christmas Day
- Christmas Eve
- Columbus Day
- Day After Thanksgiving
- Independence Day
- Labor Day
- Martin Luther King Day
- Memorial Day
- New Year’s Day
- New Year's Eve
- Presidents Day
- Thanksgiving
- Veterans Day
Other holidays can be added using the Import Holiday Info template.
Step 1 – Import Holiday Info
The Import Holiday Info template is used to configure the holiday details, such as the holiday date and whether the holiday is a full day or partial day. For example, some employers give employees a half day on Christmas Eve Day or New Year’s Eve Day.
Step 2 – Configure the Office/Employee Calendar
After the import is complete, the next step is to associate the holidays with the Office/Employee Calendars and with the appropriate Client/Project to use for time capture and resource scheduling. From the Administration \ Company menu, select Office/Employee Calendar Setup. Select the appropriate Calendar, then select the Client/Project/Task List/Task details as required by your configuration. Click Save Holiday List to apply the holidays to the Calendar:
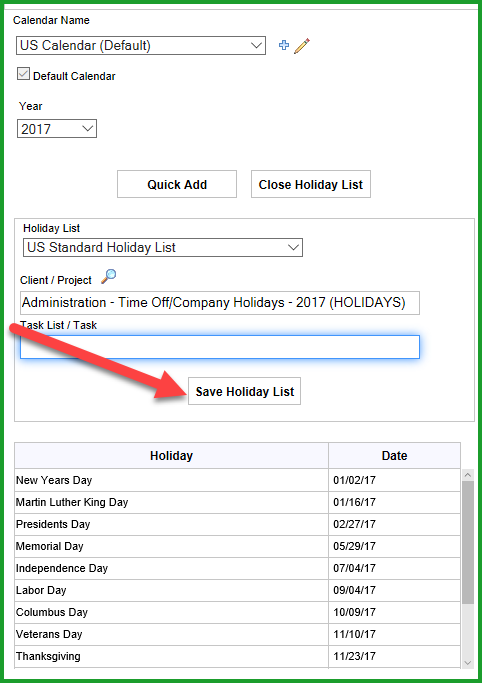
Figure 14 – Applying Holidays to a Calendar
The saved Holiday List will now appear in the company Office/Employee calendar:

Figure 15 – Updated Company Calendar
And in employee timesheets:
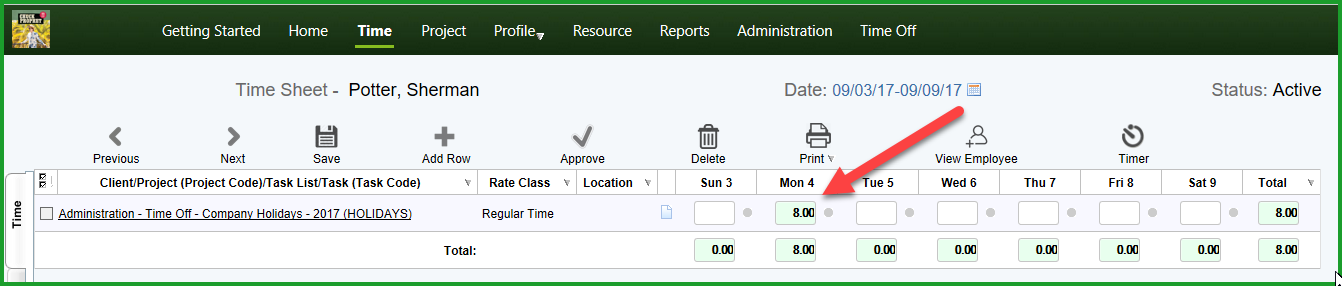
Figure 16 Timesheet with Company Holidays
Company holidays are also integrated with Empire RESOURCE scheduling. For example, if you make a full-time assignment for the week of September 3rd through September 9th, notice Labor Day, Monday, September 4th is not automatically scheduled, although you have the option of scheduling on that day as necessary:
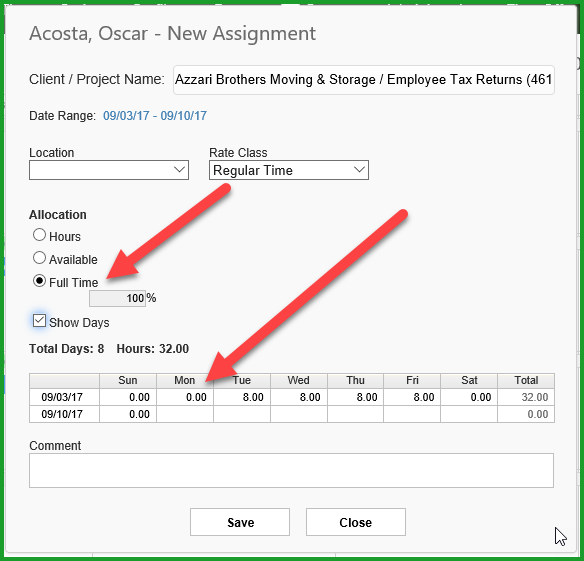
Figure 17 Resource Scheduling with Company Holidays
Timers
For our customers who want to track their employees when the employee is on site with a customer, or for users who want Empire TIME to track the time spent working on an activity, we’ve added Timers. Timers capture client, project, task list, task, location, rate class and geo-location details and load them automatically into the timesheet using the timer duration. As in the timesheet, Location in the timer details refers to data elements your tenant is configured to capture, such as whether you were with a client at the client’s office, at a job site or in your office. To capture specific geo-location information – the physical location of the device along with the device’s latitude and longitude – make sure your device’s location setting is set to Allowed. (If locations are not allowed, we will prompt you when you start the timer.) Please note we’ve added four new permissions in the Time/Expense application group for timer users and administrators. The new permissions control whether users can add a timer and whether the user or a manager can modify the collected timer information:
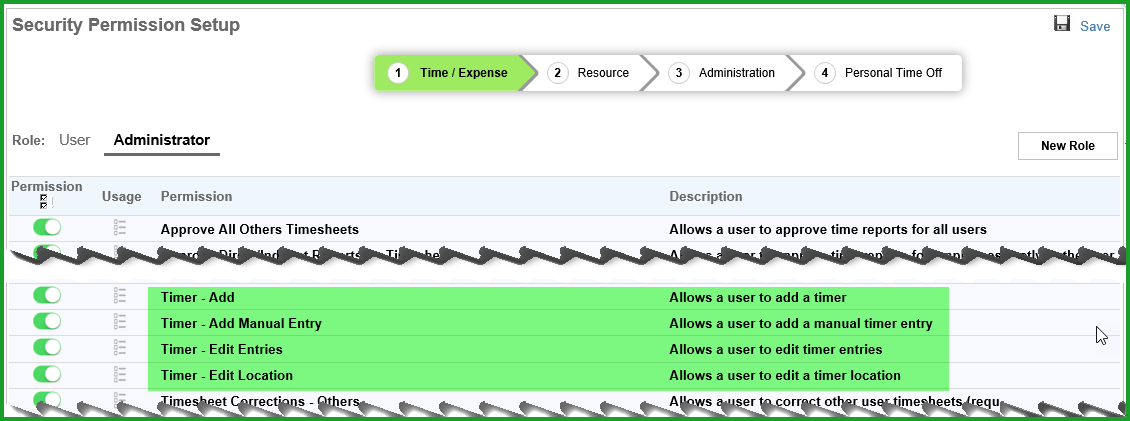
Figure 18 – Timer Permissions
To start a timer, click the Timer icon on the timesheet page:
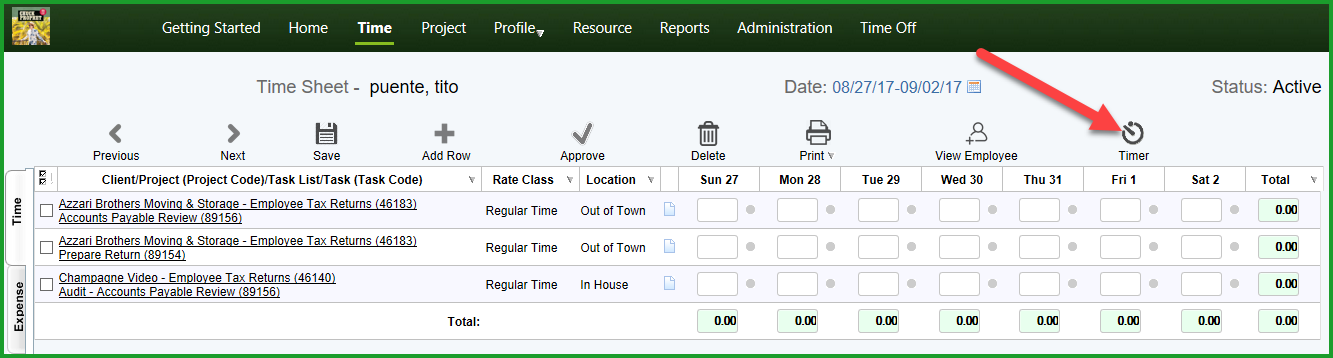
Figure 19 – Timer Icon
Select a client, project, activity and location as your configuration requires, then click Clock In to start the timer:
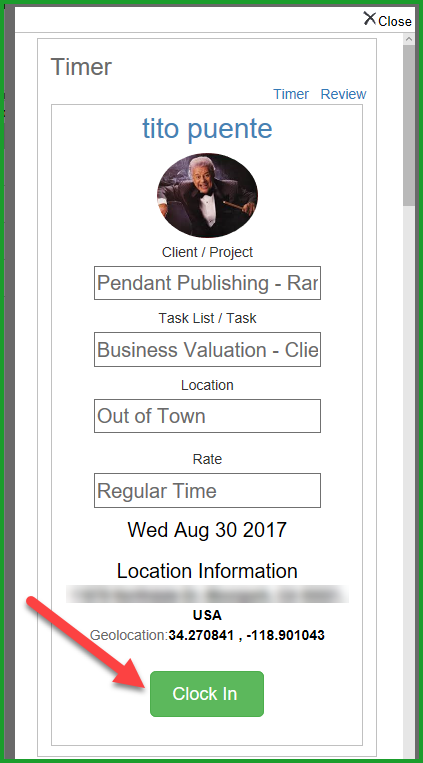
Figure 20 – Timer Clock In
You can Pause a timer to work on a task for a different project, or to answer a phone call or email unrelated to the task at hand, and then restart the timer when you’re ready. Click Clock Out to stop the timer, and the time is automatically added to your timesheet.
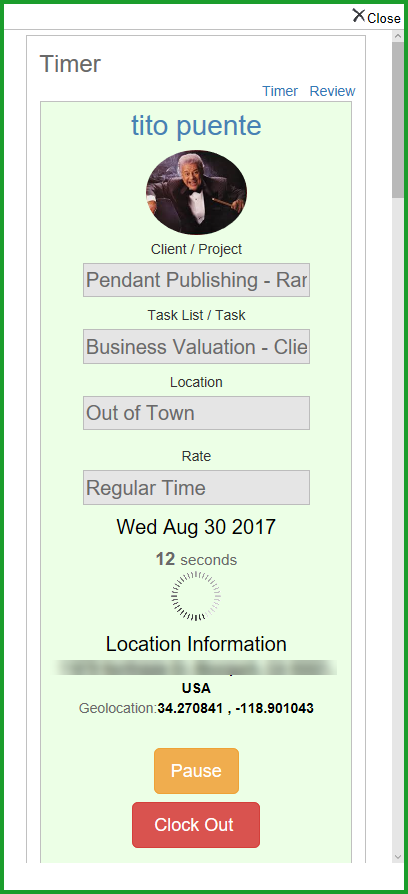
Figure 21 – Timer Launch
When you Clock Out, we’ll show you a summary of the timer details, including the timer duration in hours (or fractional hours) to be added to your timesheet:
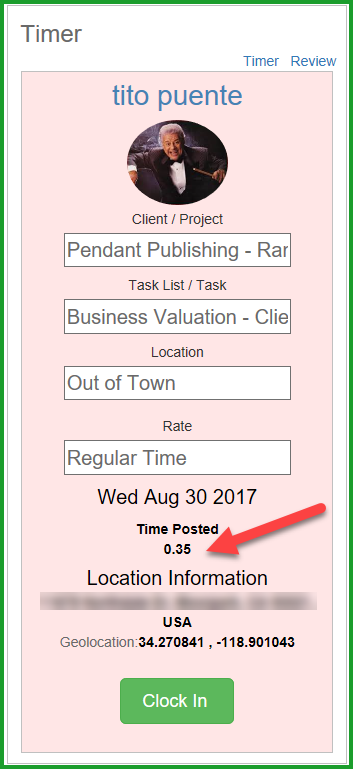
Figure 22 – Timer Information
If you want to review your timers, click the Review link in the timer page. We’ll show you all the timers you have for a selected day:
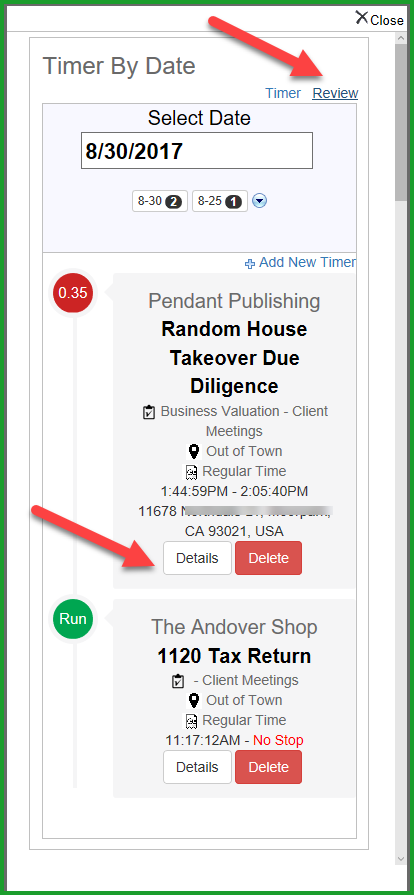
Figure 23 – Timer by Date
To see Timer details, click the Details button. We’ll show precise geo-location information, as well as the timer start and stop times:
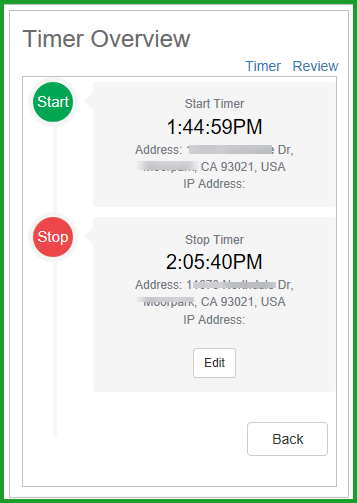
Figure 24 – Timer Overview
Click Edit to verify and/or modify the timer details. You can modify the Client, Project, Task List, Task, Location and Rate Class information as appropriate, as well as adjust the timer Start and End Times. If necessary, you can also make changes to the Start and End formatted location information:
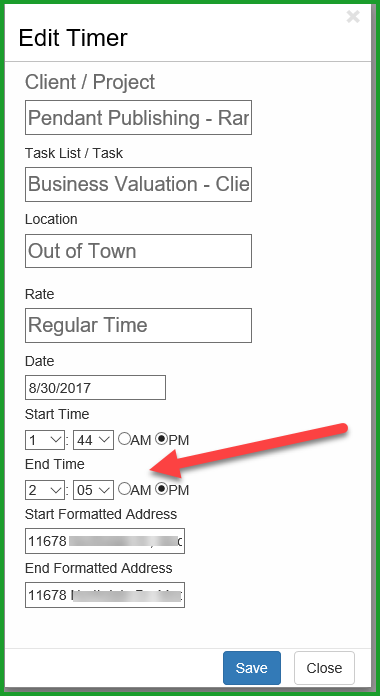
Figure 25 – Edit Timer
When your timer is stopped and the information has been verified, close the timer page and we’ll update the information in your timesheet automatically:
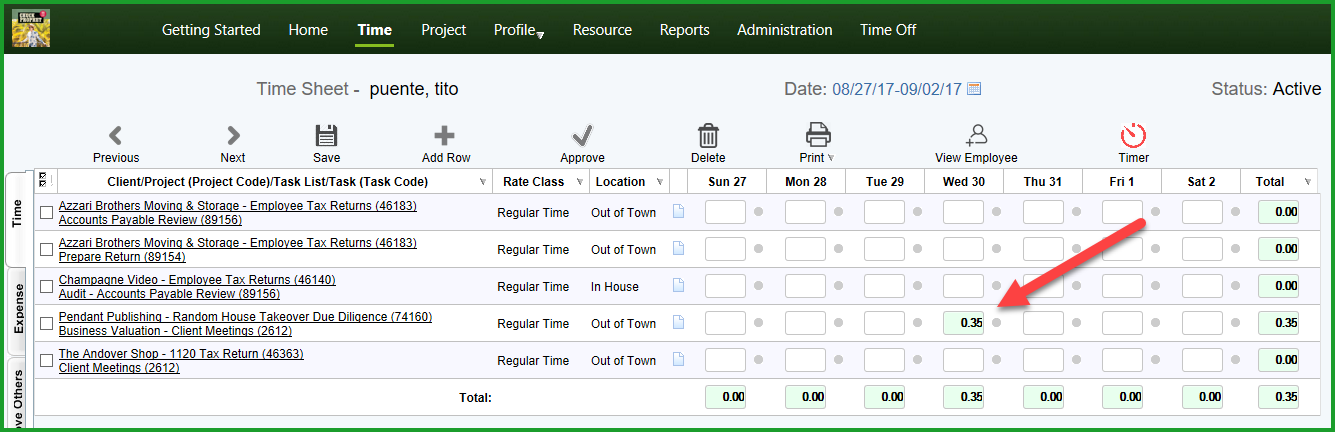
Figure 26 – Timer in Timesheet
Timers are also available on your mobile device. Simply use your iOS or Android phone or tablet to login to http://www.empiresuite.com using your Empire SUITE user name and password and the timer screen will be launched automatically. If you want to include geo-location information in the timer details, make sure your device is set to allow locations. Add your client, project, task list, task, location and rate class details per your configuration and tap Clock In to start a timer, same as on the web timesheet.
If your company would like to use Timers, please contact us to discuss your desired parameters – minimum times and rounding values – so we can configure your environment according to your requirements.
Activity Based Web Resource Scheduling
You can now do your resource scheduling at the activity level – task list, task, location and rate class. Select Resource from the toolbar, then click and drag in the desired employee’s row to highlight the assignment period, then add the details:
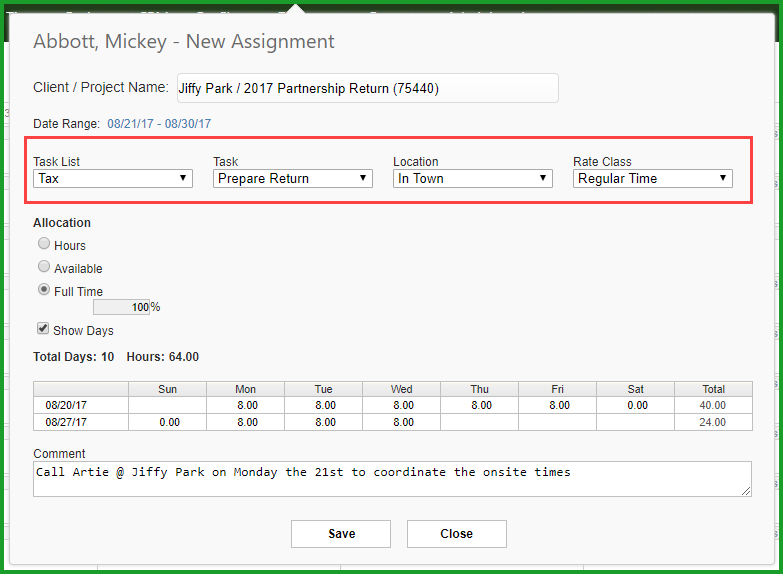
Figure 27 – Scheduling by Activity
After you’ve saved the assignment, you can mouse over the assignment to see the details:
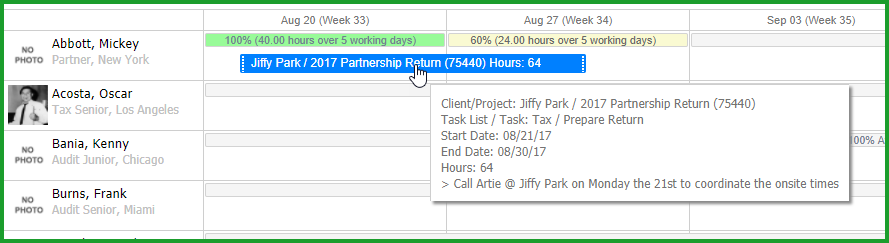
Figure 28 – Mouse Over Assignment Details
Instant Personal Time Off (PTO) Notifications
We’ve added instant email notifications for employees and managers when PTO requests are made, approved, rejected, or cancelled:
1. When an employee makes a PTO request, the employee receives an email confirmation of the request
2. When an employee makes a PTO request, the employee’s manager receives and email with the PTO request details
3. When a manager approves or rejects a PTO request, the employee receives an email confirmation
4. When an employee cancels a PTO request, the employee receives a cancellation confirmation email
Date: April 2017
Summary:
-
Employee Extract
Employee Summary Report
Offices and Departments
Empire RESOURCE Enhancements
Administrative Permissions
Client Page and Dashboard
Project Page Dashboard
Automatic Session Time Out
External Collaborators
Employee Extract
We’ve added the ability to use the employee extract as an employee import template. This is useful if you need to move a group of employees from one manager to another, or move a group of employees from one department to another. Of course you can always make the necessary changes in the Edit User page, but this enhancement allows you to make changes to as many employees as needed rather than one by one. We’ve also added the ability to select Active, Inactive or both Active and Inactive employees in the extract results. The Employee Extract is available from the Loads\Integration menu in Administration:
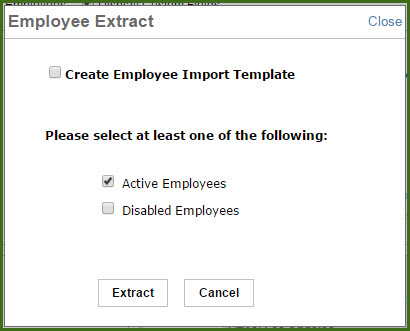
Employee Summary Report
Daily mode in the Employee Summary Report is now actually daily. You can select a date range independent of Summary Period, Approval Period or Calendar month boundaries. You’ll find the Employee Summary Report in the Timesheet under the Print menu:
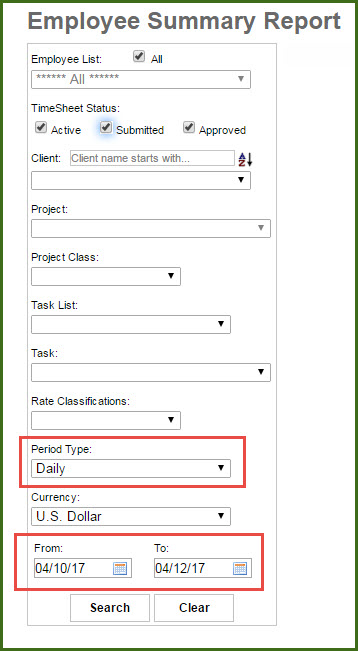
Offices and Departments
You can now add codes to your office and department descriptions. You can also set an office or department status to ‘Active’ or ‘Inactive’ as appropriate. Please note you can’t change the status from ‘Active’ to ‘Inactive’ if there are still active employees or projects in the office or department. You can edit offices and departments from the Edit User page in Administration. Click the pencil next to the Office or Department name to launch the Modify page:

Resource Enhancements
Several new features have been added to Empire RESOURCE
Default Scheduling Configuration
Administrators can now save a default scheduling configuration for new RESOURCE users. From the Home page, click the RESOURCE link, then click the Gear icon at the right side of the toolbar to launch the Setup Options page and configure the desired settings:

Spilt Assignments
System Administrators can now define how many non-scheduled days in an assignment will create two separate assignments. For example, assume a resource has a 10 working day assignment spread over three weeks, with the middle week open.
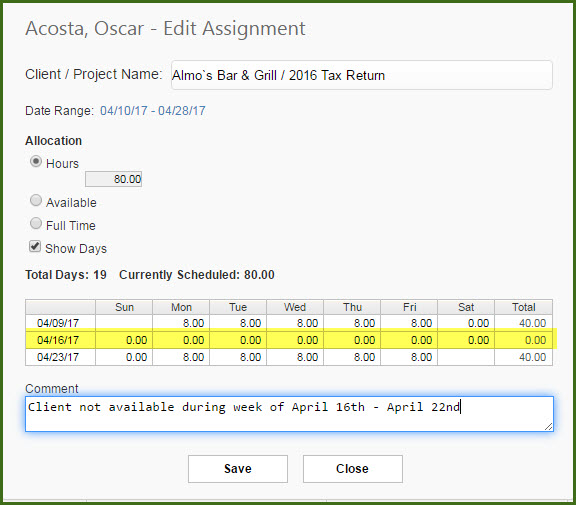
If your system setting was 5 days, we would create two different assignments and show the assignment with two bars in Empire RESOURCE:
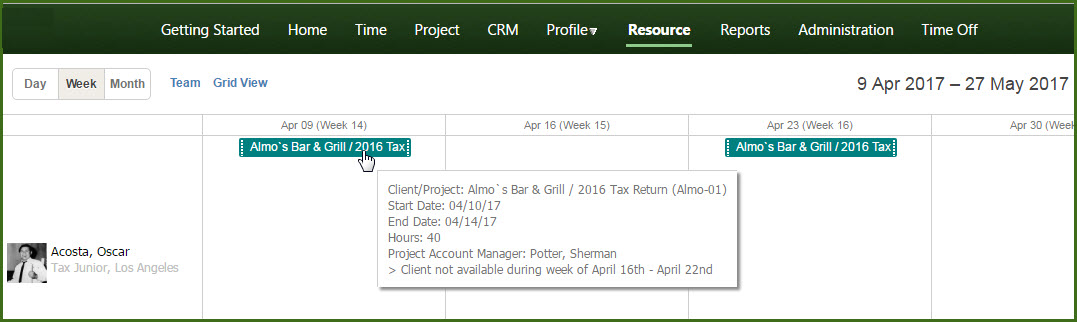
This is no UI for this setting yet, so please contact us so we can set the option for you.
Tool Tips
If you mouse over a resource assignment, you’ll see project manager information and comment details
Administrative Permissions
We’ve broken the Administrative permissions into different functional groups – employee, client, project and others - so your managers can custom tailor user security roles according to user responsibilities, and your requirements and business rules. For example, you can create a ‘Project Manager’ custom role which allows the user to modify any of the project attributes, but prevents the user from making any changes to client attributes.
From the Administration page, select Company, then Edit Permissions.
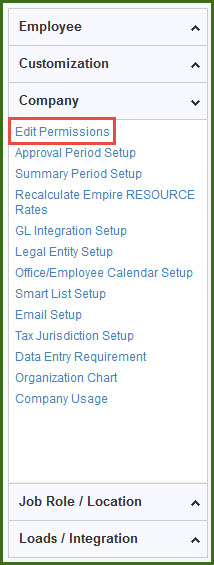
Click Administration from the Security Permissions Setup page role bar:

To modify the standard User or Administrator roles, or to add or a Custom Role, click the appropriate role, or select the desired custom role from the Custom Roles drop down list. Select the appropriate permission group from the list and use the On/Off toggles to include or remove the desired permissions.
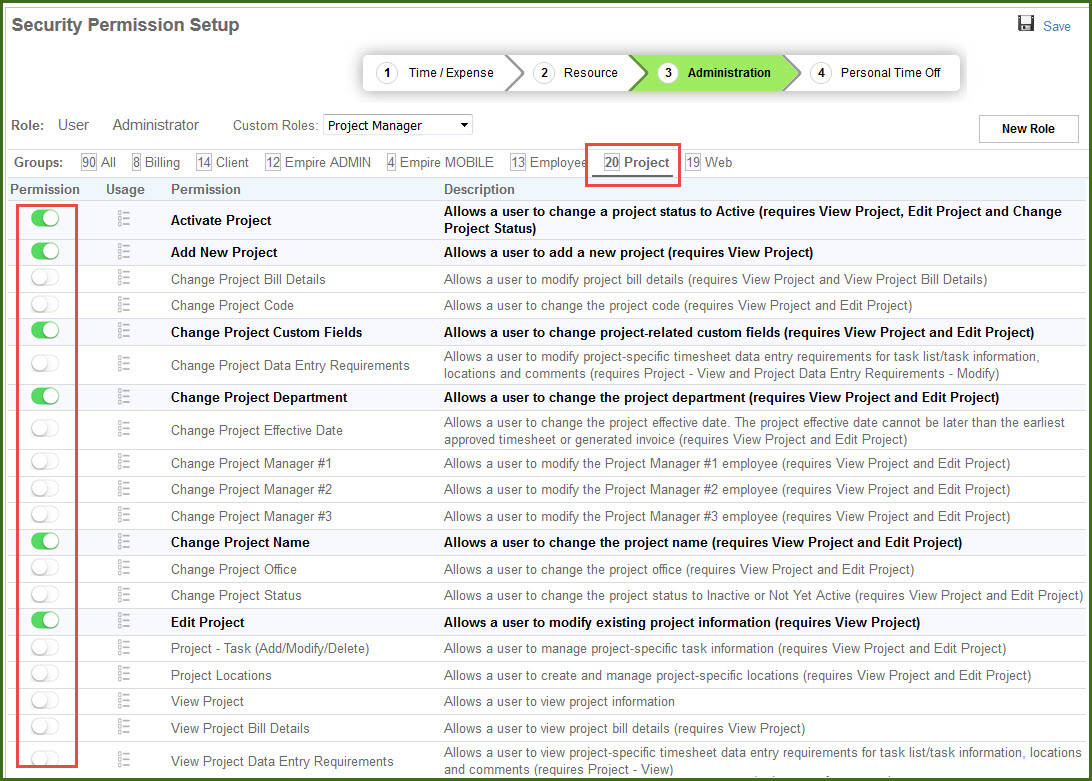
Client Page and Dashboard
We’ve added a client page that allows users with the appropriate permissions to add a new client, modify existing client information such as client name, established date, code and managers. We’ve also added support for Consolidation Clients to support your customers and their subsidiary organizations. Click Project in the toolbar and then click the hamburger icon:
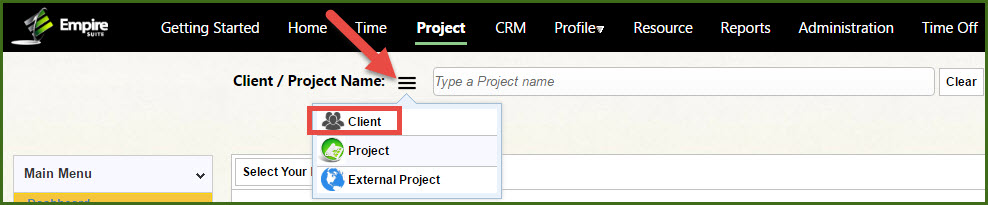
Then click the Client icon. The client page will display the clients associated with the projects you’ve selected in your project dashboard:
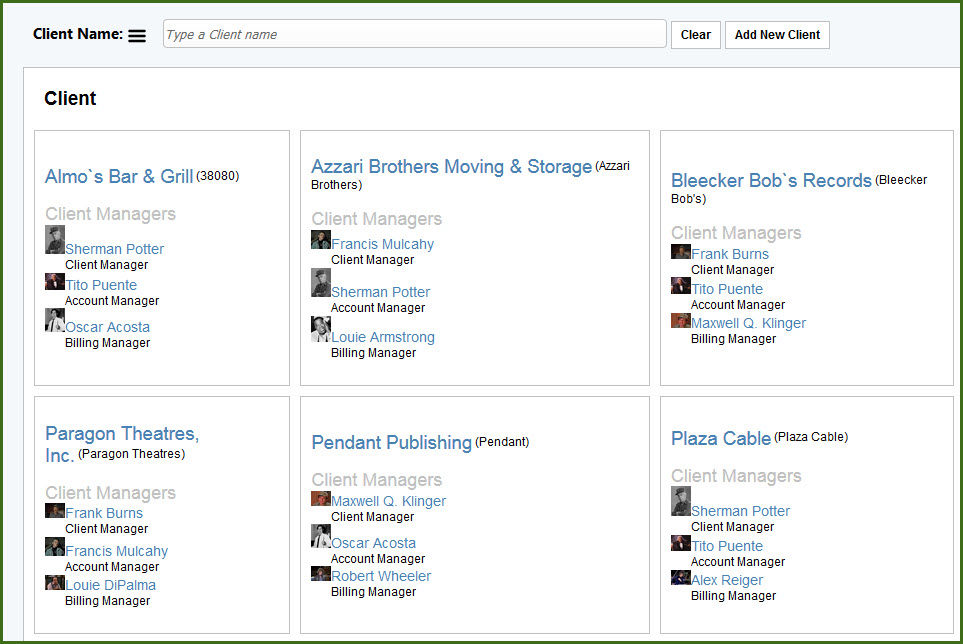
To add a new client, click Add New Client. To modify an existing client, click the appropriate client name. You can also type the client name in the client field to find the desired client if it’s not included in the display. When you select a client from the view, the application will display Client information such as the managers, status and active date.
You can also include charts (Time, Expense, Sprints) in the Client dashboard:
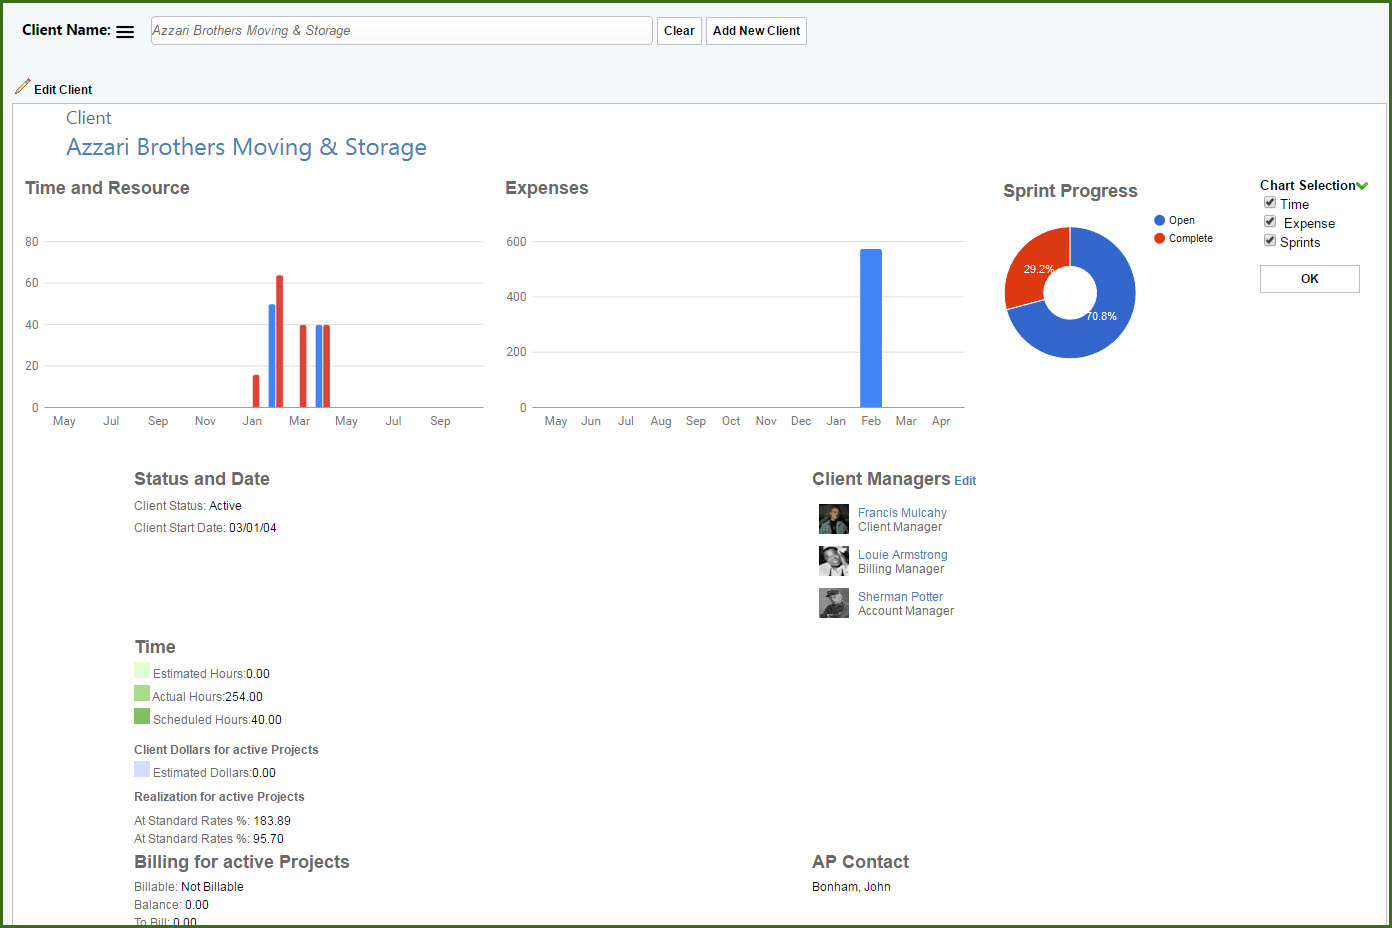
The Time chart shows the scheduled hours (red bars) and actual time (blue bars). The Expense chart shows incurred expenses, and the Sprints chart shows open and closed activities associated with the client’s projects.
To edit the client, click the Edit Client link:
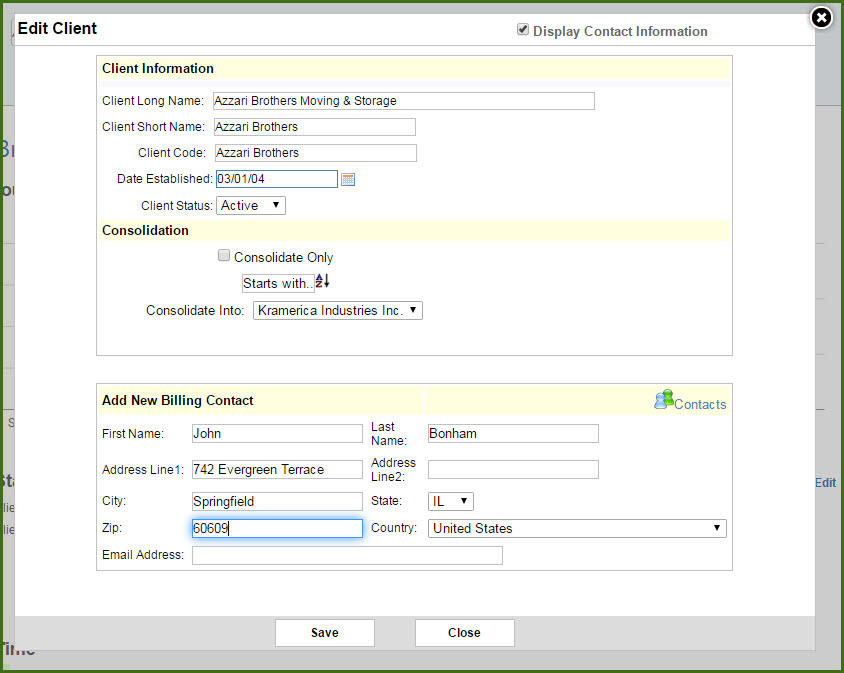
You can manage billing contact information, as well as include the client as a subsidiary in Consolidation Client from the Edit or Add Client page. Each of the Client page fields – client long name, client short name, client code, date established, consolidation client and billing contact are controlled by security permissions. Users with the Add Client permission can add a client, but need ‘Activate Client’ in order to set a new client to active status.
New Project Dashboard
We’ve added new charts to the project dashboard. Select Project from the toolbar or Project from the Hamburger menu to launch the Project Main page:
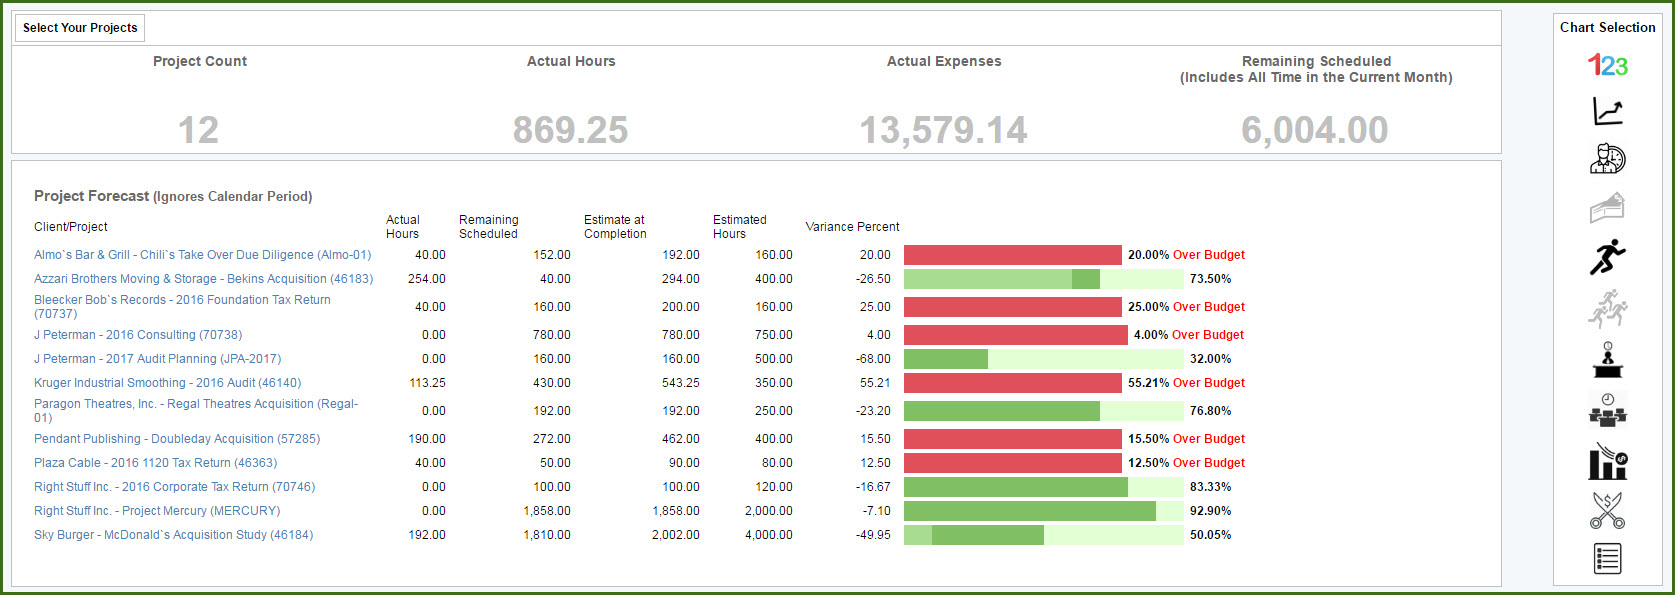
At the right side of the page are icons for different charts:
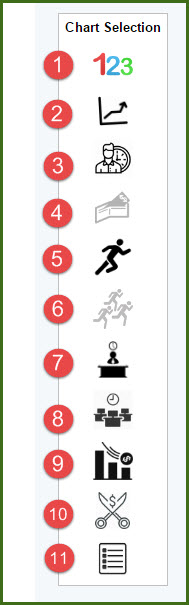
The available charts enable your users and managers to see aggregated information based on the selected projects. Clicking the icons toggles the chart on and off in the display.
1. Counter

- Project Count is the number of projects selected
- Actual Hours is the approved hours for the selected projects
- Actual Expenses is the approved expenses for the selected projects
- Remaining Scheduled are the hours scheduled against the selected projects, including hours scheduled in the current month.
2. Forecast
Actual hours, remaining scheduled hours, estimate at completion hours, estimated hours and the percentage variance between the Estimate at Completion Hours and Estimated Hours for the selected projects are included in the Forecast chart:
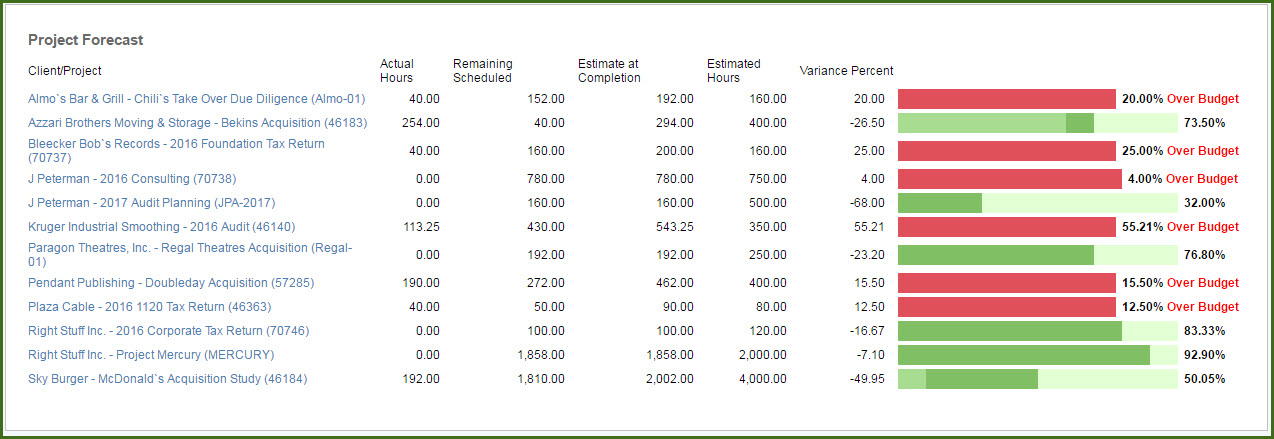
3. Time and Schedule
The Time and Schedule chart shows the approved (blue) and scheduled (red) hours for the selected projects over time, in this example, May 2016 through October 2017:
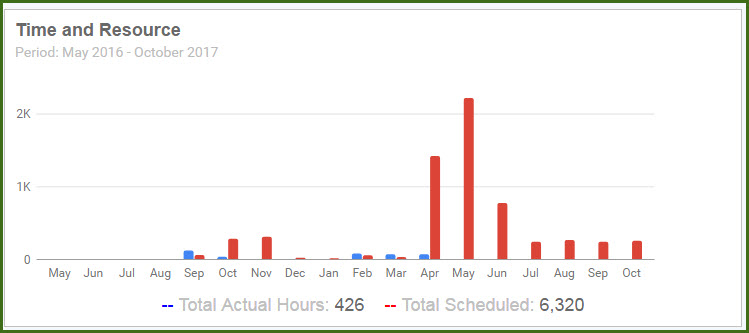
4. Expenses
The Expenses chart shows approved expenses for the selected projects over time, in this example, from May 2016 through October 2017:
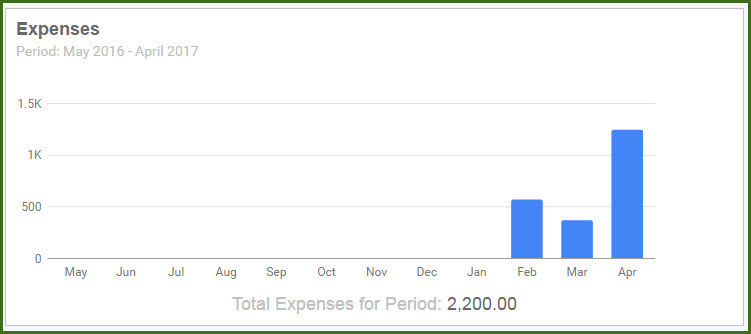
5. Sprint Progress
Sprint Progress displays the status – Open, Closed and Cancelled – for activities included in Sprints for the selected projects
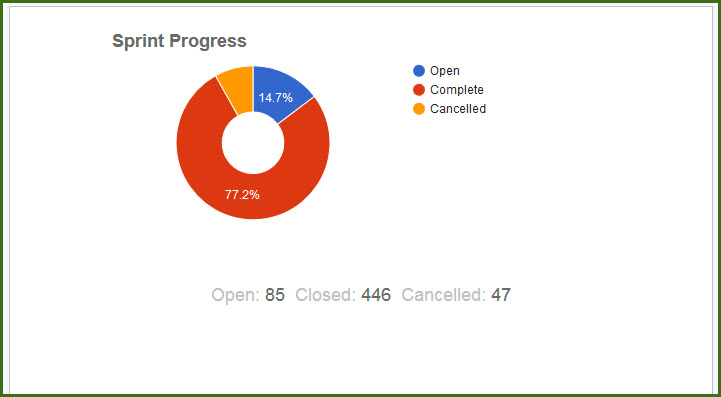
6. Sprint Activities
The Sprint Activities chart displays activities assigned to the user which are associated with Sprints for the selected projects
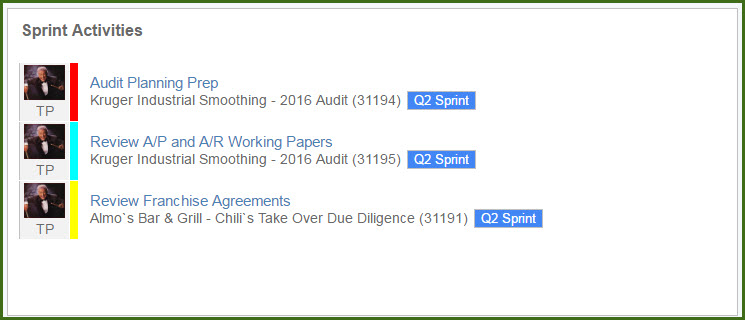
7. Time and Schedule by Office
The Time and Schedule by Office chart shows actual (blue) and scheduled (red) hours by office for the selected projects since project inception:
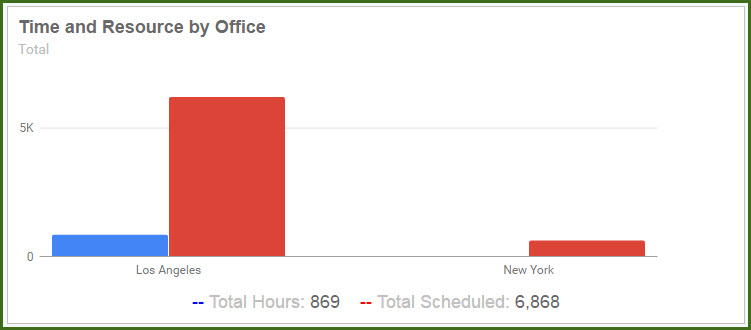
8. Time and Schedule by Department
The Time and Schedule by Department chart shows actual (blue) and scheduled (red) hours by department for the selected projects since project inception:
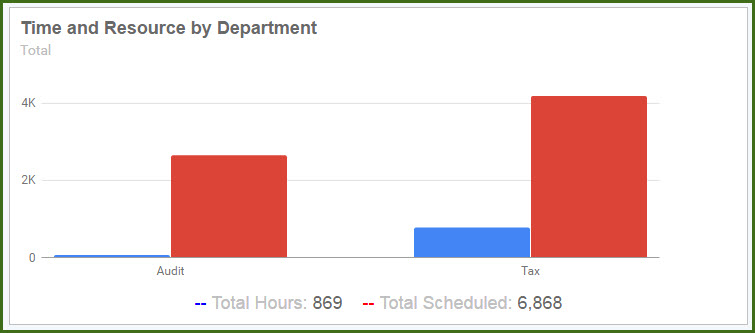
9. Expenses by Office
The Expenses by Office chart shows the distribution of approved expenses for the selected projects across the various offices from project inception:
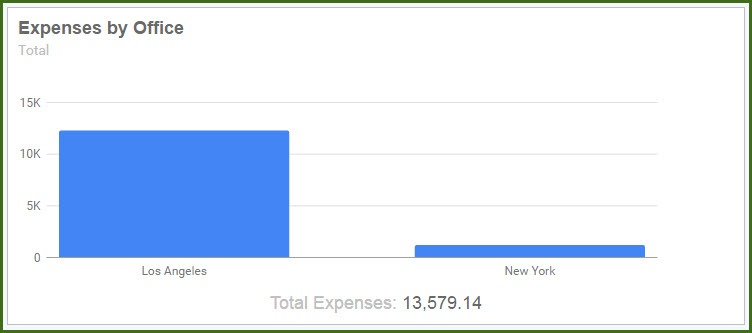
10. Expenses by Department
The Expenses by Department chart shows the distribution of approved expenses for the selected projects across the various departments from project inception:
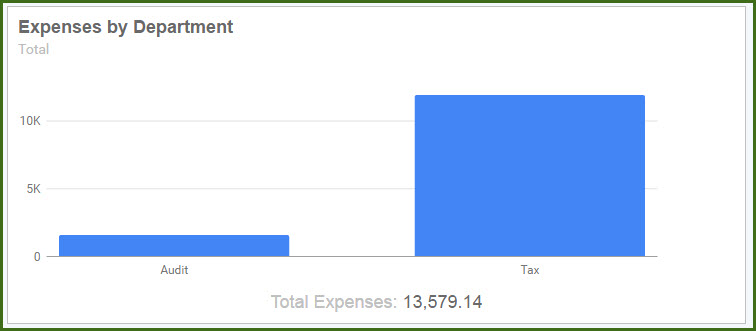
11. Project List
The Project List chart includes hours, total revenue and total billed hours for the selected projects:
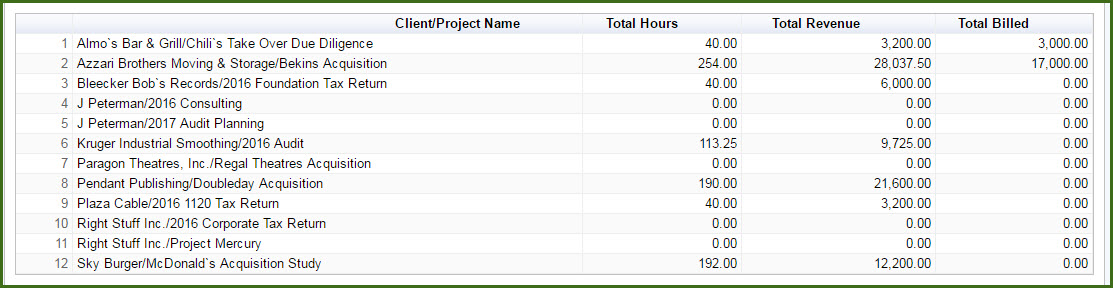
Automatic Session Time Out
For security reasons, we’ve added an automatic session time out feature to the Empire SUITE. After two hours of inactivity, your users will be logged out and returned to the login screen. (Please contact us if you prefer a different timeout setting.) Prior to the time out, the application will display a notification window with a countdown clock which includes an option for the user to extend their session without being forced to login again.
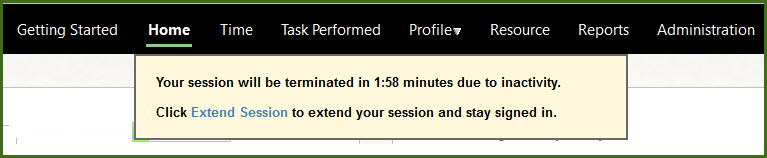
External Collaborators
Each Empire SUITE tenant will have at least one project created specifically for the tenant to suggest enhancements and log software bugs and track their progress toward resolution. Users with the appropriate permissions can create Activities and see the Scrum board for their Empire SUITE project.
Collaborators will have an External Project option in the project page that displays the WSG project for the tenant.
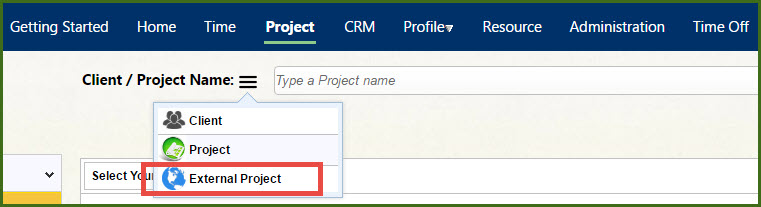
Collaborators will see a list of the projects ‘followed’ by the collaborator:
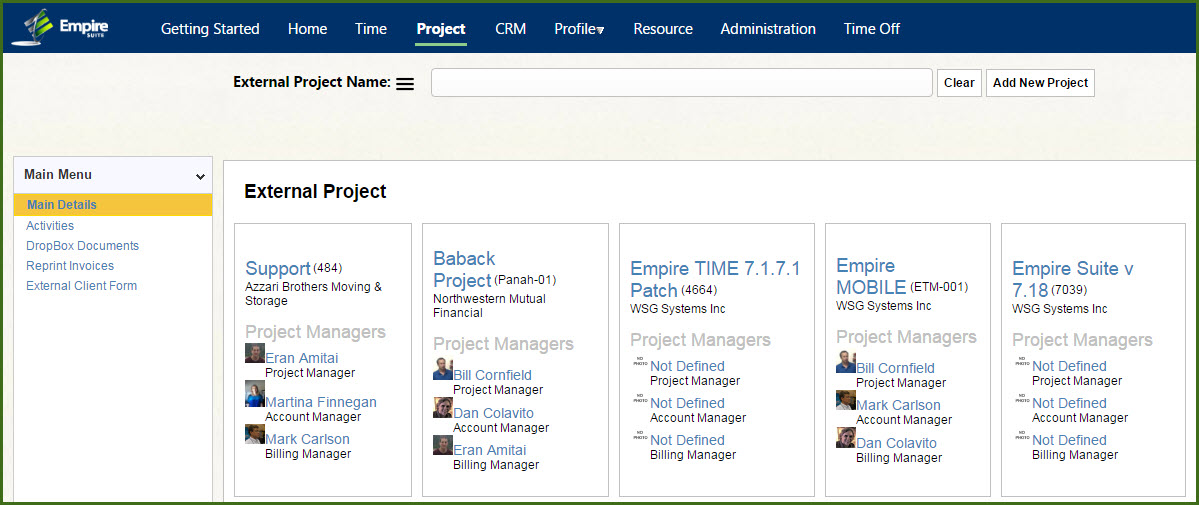
Collaborators can click Activities and see project issues created by the collaborator and the issue status
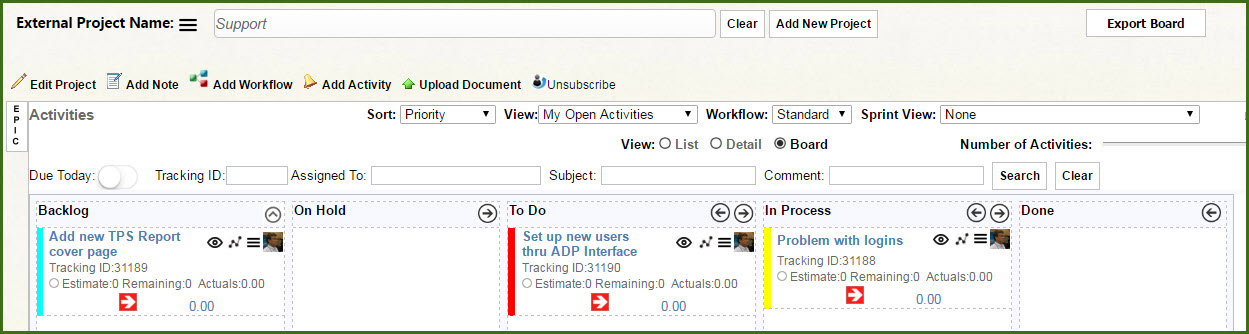
Collaborators with the appropriate security permissions can see an issue’s history, as well as re-assign the activity to other collaborators or to a WSG manager associated with the project. Collaborators can also view and reprint invoices WSG invoices created for the Collaborator’s account. Please contact us if you’d like us to configure your account to allow Collaborator access
Date: December 2016
Summary:
-
View Disabled Employees
Edit Employee Start Date
Security Permissions
View Organization Chart
View Usage Information
View Disabled Employees
You can now view both Active and Disabled Employees at the same time in the Administration main menu page.
Users with Access to Administration rights will see the Employee View page when the user navigates to the Administration page. Check ‘Display Disabled Employees’ to show disabled employees.

Disabled employees are shaded gray. Active employees are unshaded.
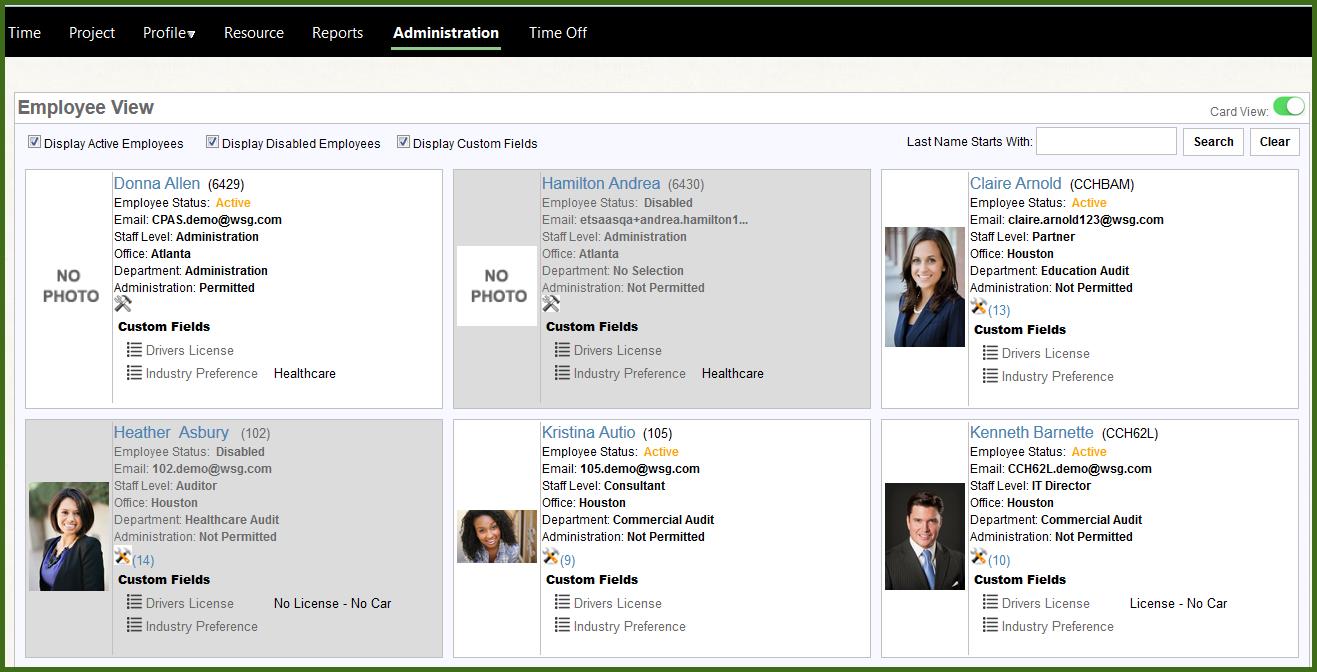
Edit Employee Start Date
We’ve added a field to capture the employee start date when configuring new employees or adding them through the employee import:
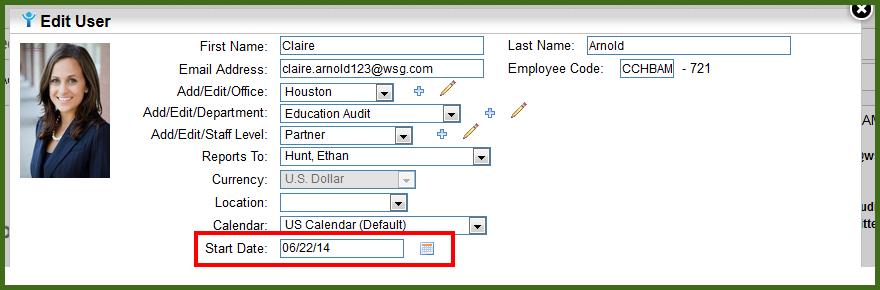
The Employee start date prevents the employee or any user with access to the employee timesheet from entering time or expenses prior to the start date
Editing Security Permissions and Adding Custom Roles
Until now, the Empire SUITE included three standard security Roles – None, User and Administrator – and the security permissions associated with the roles were not editable by firm administrators. We’ve added the ability for Administrators to edit the permissions associated with the standard roles in each of the functional areas (Time and Expense, Administration, Resource, etc.) and firm administrators now have the ability to create new Custom Roles with user selectable permissions to better support each firm’s unique requirements.
EDIT PERMISSIONS
To add or remove permissions from the standard User and Administrator roles, select Edit Permissions from the Administration page Company menu. Select the desired functional area from the menu bar (Time and Expense, Administration, etc.) and the appropriate role (User, Administrator) and use the On/Off toggle next to each permission to customize the standard roles.
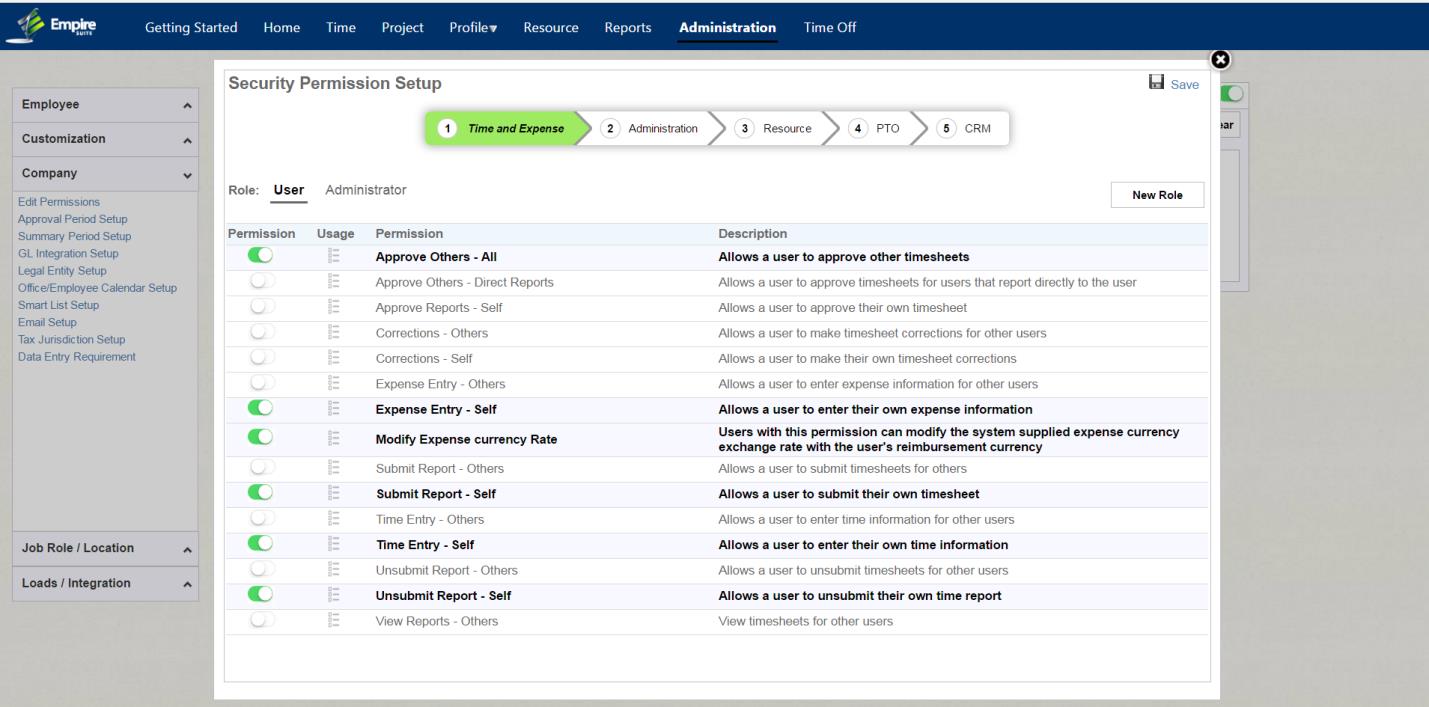
CREATE CUSTOM ROLES
Select one of the functional areas from the menu bar (Time and Expense, Administration, etc.) and click the 'New Role' button to create a custom security role.
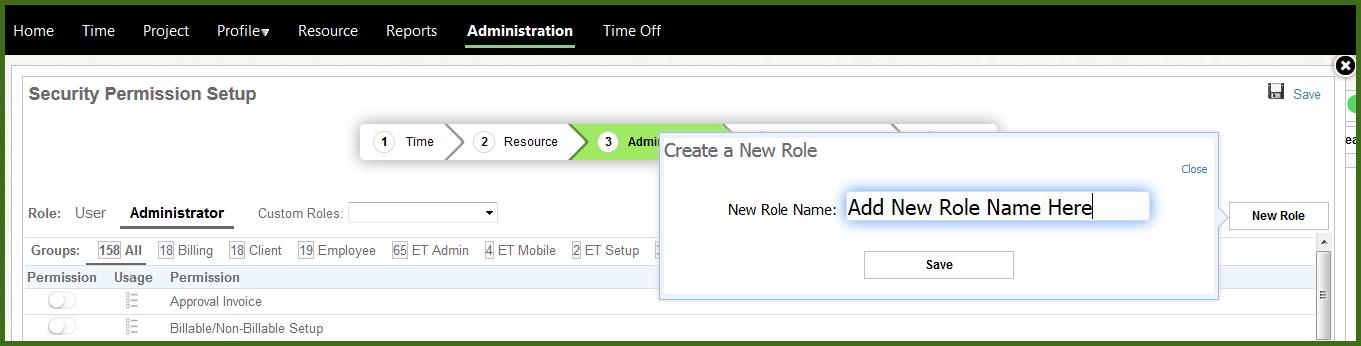
Give the custom role a name, add the appropriate permissions and click Save when done.
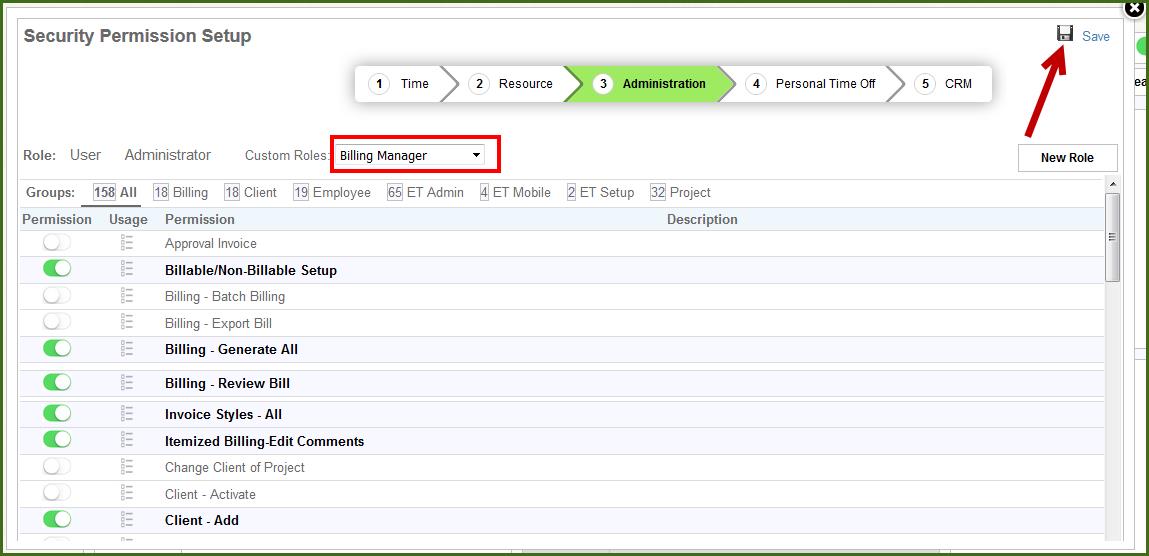
Custom Roles can be assigned to employees from the Edit User page:
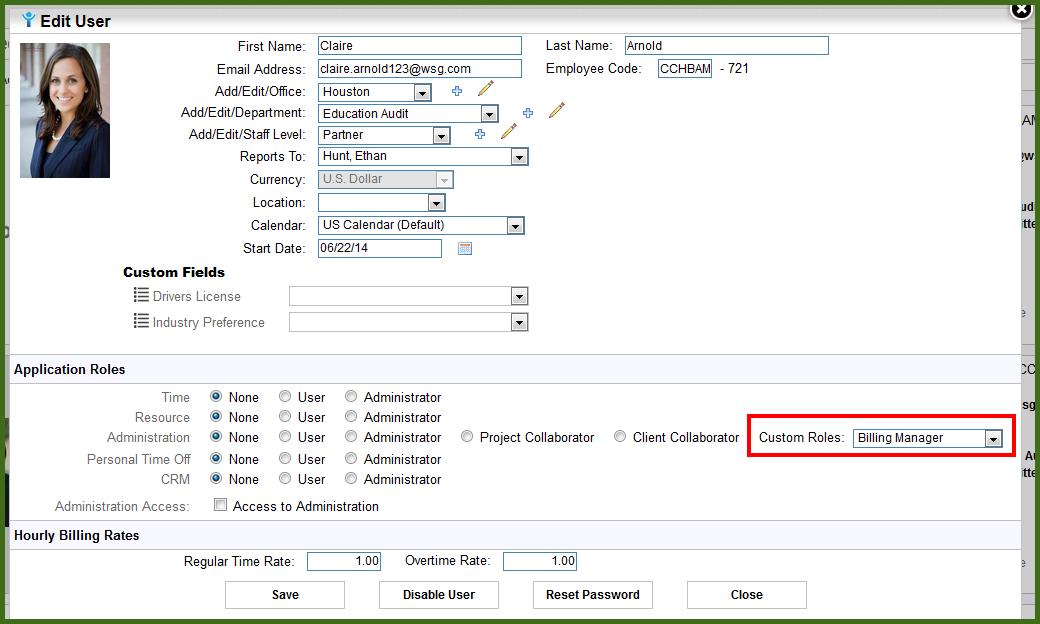
Changing Custom Field-based Security Permissions in Empire SUITE to Custom Security Roles
As noted earlier, the Empire SUITE included three standard security Roles – None, User and Administrator. Administrators also had the option to limit the Time Entry behavior for Users through this Setup area, located in Administration in the Tenant Owner's Account:
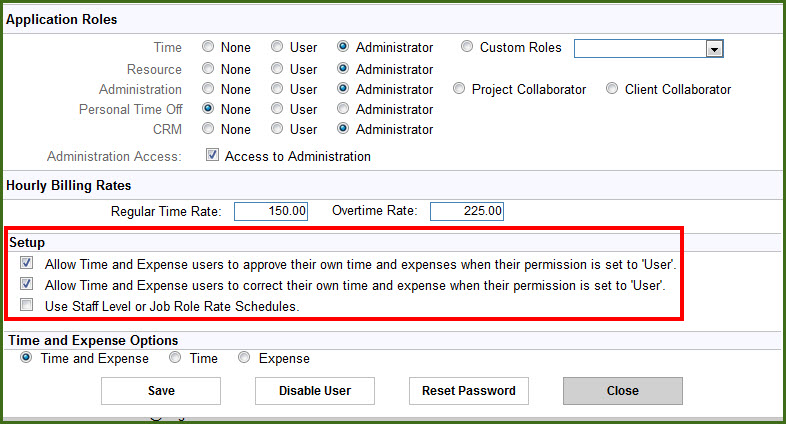
These setup options will be deprecated in the new release and replaced by the Administrator defined Custom Security Roles. That is, if you want to allow Users to Approve their own time and expenses, you can define a custom role that includes the Approve permission.
Some current Empire SUITE clients have implemented custom security roles for their employees and contractors through Custom Fields – that is, they have added custom fields to the employee import and the security permissions associated with those custom fields govern the employee's ability to use the application.
We will continue to support this methodology, but the goal is to move away from Custom Field based security roles into Application based Custom Security Roles. What does this mean to you?
- If your new employee or edit existing employee import includes a security-based Custom Field, we will map the Custom Field to a corresponding
Custom Role as part of the import process. You don’t need to make any changes to your import process.
- If you edit an employee through the Empire SUITE Administration Edit User page, we will ignore the Custom Field value applied through the
import and apply permissions associated with either the 'User' or 'Administrator' radio buttons or the Custom Role defined in Edit
Permissions and applied in the Application Roles section.
For example, let’s assume you’ve used the employee import to add an employee with a Custom Field called ‘Time Entry’ which allows the user to enter time but not approve their own timesheet. However, if you set the employee’s Time Application Role to ‘Administrator’ using the radio button, we will ignore the ‘Time Entry’ custom field permissions and the user will now have all the permissions associated with the Time ‘Administrator’ role, which includes timesheet approval. Or, if you used Edit Permissions to create a Custom Role called ‘Self Approval’, which includes the ability for a user to enter time and approve their own timesheet, we will ignore the ‘Time Entry’ custom field permissions and the user will now have all the security permissions associated with the 'Self Approval' Custom Role.
View Company Information
You can now view the company’s Organization Chart and Company Usage in the Company side menu on the Administration main menu page.
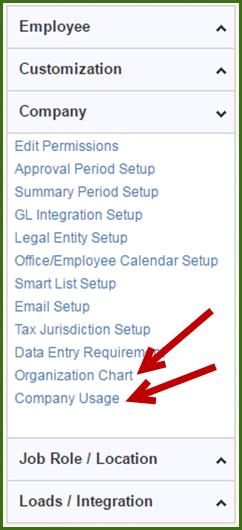
Select Organization Chart to view managers and their employees. Select Company Usage to see how many employees used the system during a specific time period.
Oraganization Chart
Clicking the 'Organization Chart' submenu will bring up the organization chart for the entire company.
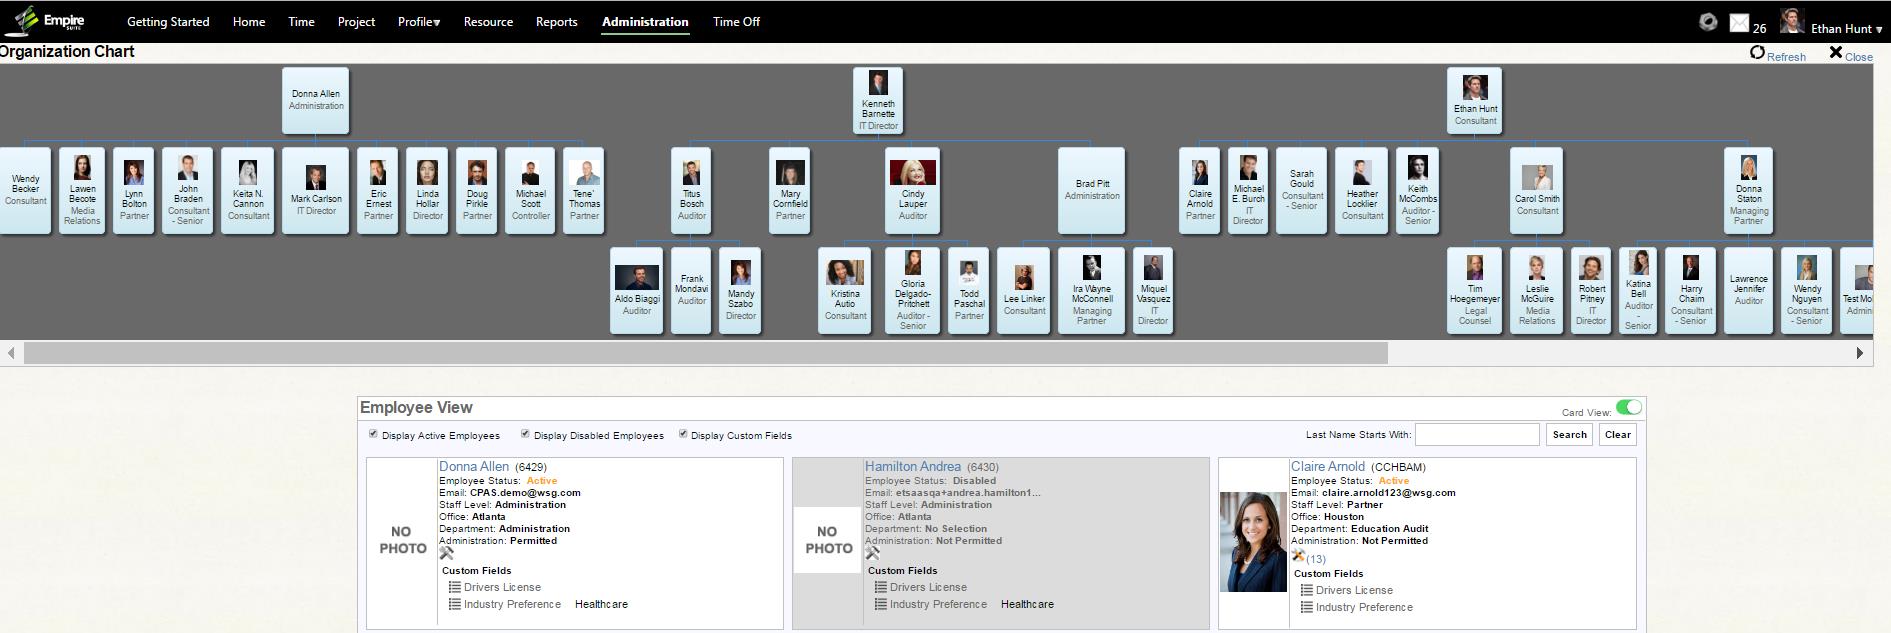
Click an employee to display their details.
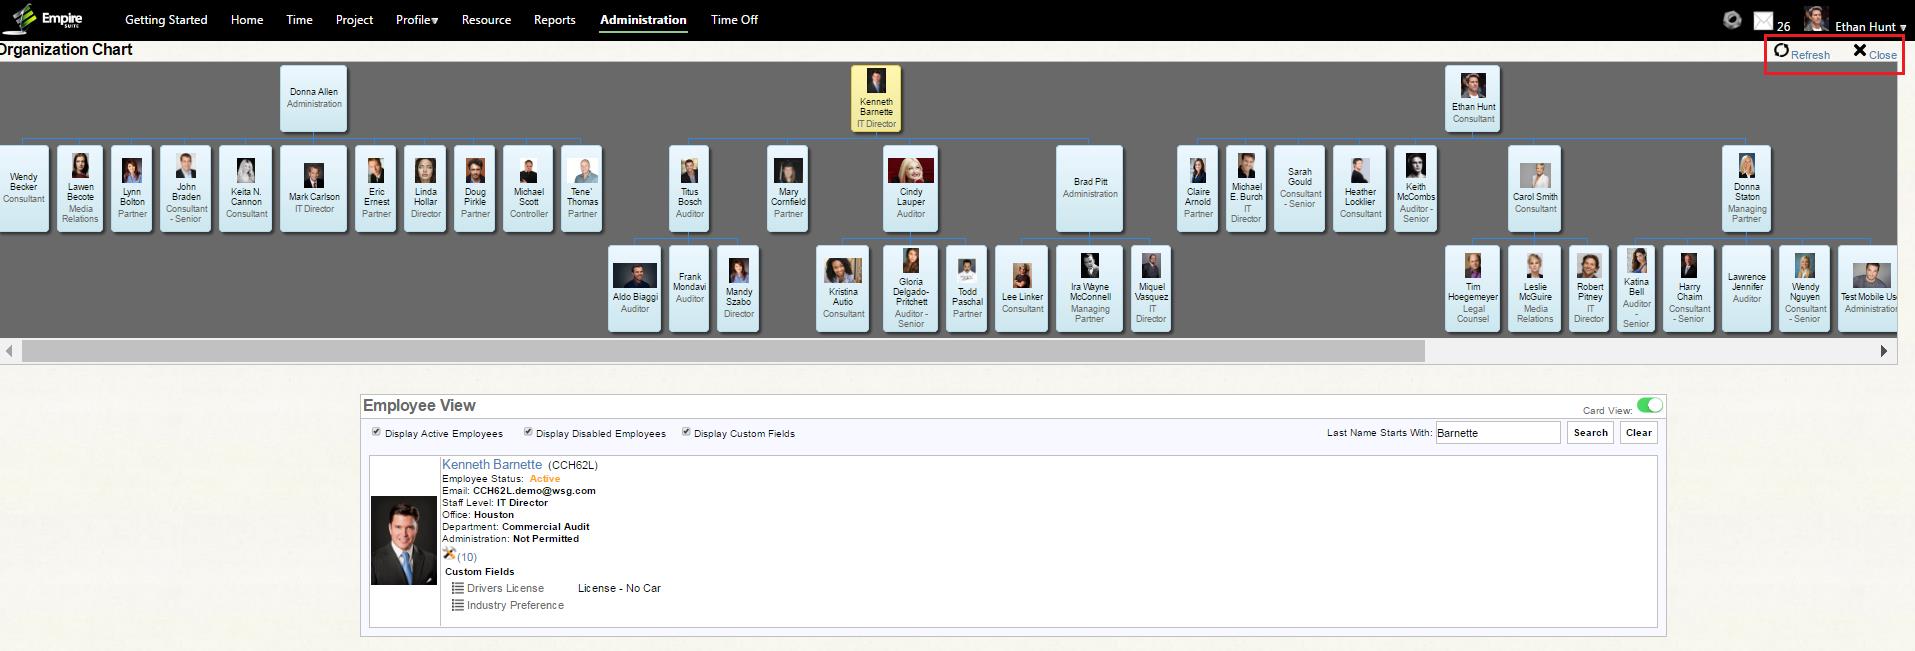
Click the employee first or last name to edit the employee details. Make the appropriate changes and click Save to update the employee details and close the Edit User page.
Company Usage
Click Company Usage to bring up the usage chart. Hovering over individual bars will show the number of users in the system for that month.
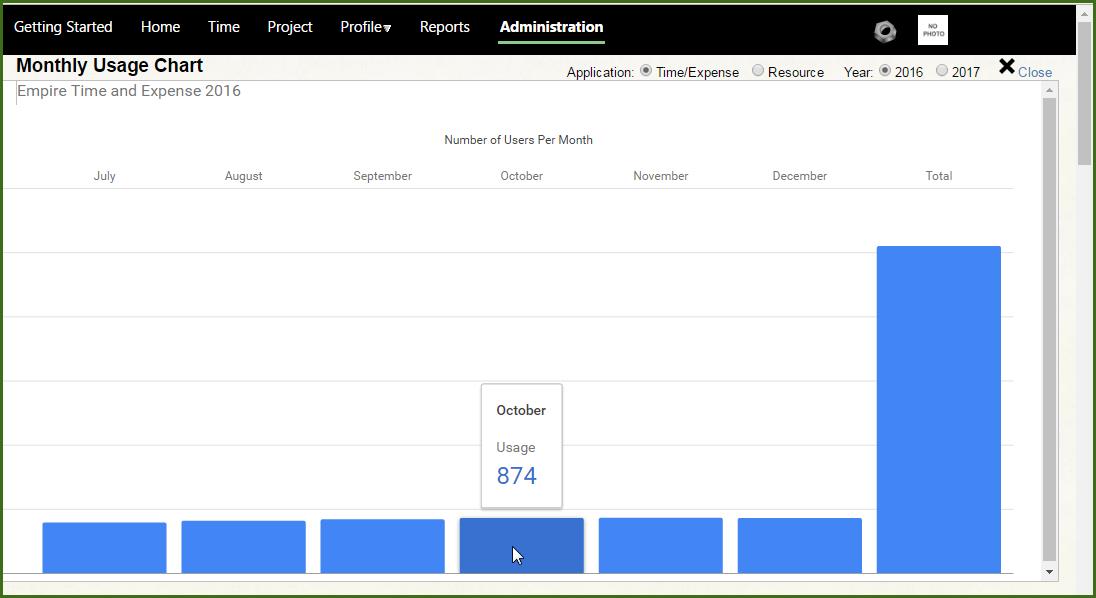
We track the number of days each employee is 'Active' in a month and Usage is defined as the number of employees who had an ‘Active’ status for at least 15 days in any given month. For example, when we calculate October usage, we sum the number of employees who were active 15 or more days in the month of October.